World of Level Design™
Tutorials to Becoming the Best Level Designer and Game Environment Artist (since 2008)
Maya LT/Maya: Interface Overview for Game Environment Modeling - Beginner Tutorial Series 2/13
Category: Maya LT/Maya
September 09, 2016
UPDATE: This tutorial series has been updated to feature 17 new beginner tutorials, start here...
About this tutorial:
The following tutorial is directly from Module 1 of 3 in "3D Game Environment Modeling Foundation" series. I've released this first Module completely free. It is focused on teaching you how to get started with interface overview in Maya LT/Maya specifically for game environment artist.
- First Module is focused on interface overview for game environment modeling (start here).
- Second Module is focused on game environment modeling techniques.
- Third Module is focused on UV mapping, UV unwrapping and UVing.
The full series is designed for game environment artist to learn Maya LT or Maya specifically for modeling and UVing game environment art.
The entire "3D Game Environment Modeling Foundation" tutorial series contains 9 hours, 53 videos and all 3 modules.
Following free 1st module features 13 video tutorials. You can start from the beginning here and watch all videos sequentially.
Maya LT/Maya is a very extensive and complex piece of software.
You can use Maya LT or Maya to model, animate, UV, create shader, rig characters, render still shots, render full animations and much more. Maya also contains pipelines for particle FX and dynamics.
In order to learn Maya as a game environment artist you have to ignore everything else and focus specifically on modeling game assets. Otherwise you won't have any time to do anything.
Disregard tools you won't use and focus on what is only applicable for helping you master Maya to model game environments.
Of course you don't know what that is yet, but this tutorial series is here to show you.
So here is Maya LT interface overview you need to learn and know specifically for game environment art.
Highlight What is New In This Release
Upon Maya LT Launch you will see "Highlight What is New In This Release" window:
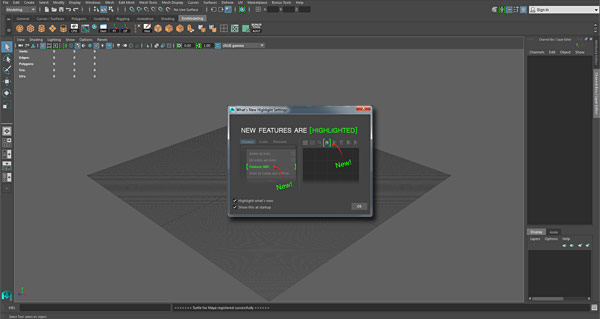
This shows you what's new and updated in Maya LT/Maya with green brackets around new features:
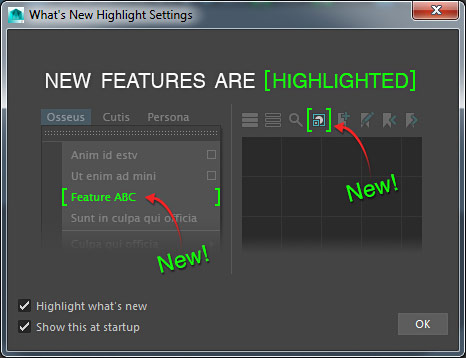
You can disable showing new features and disable pop up window from showing up:

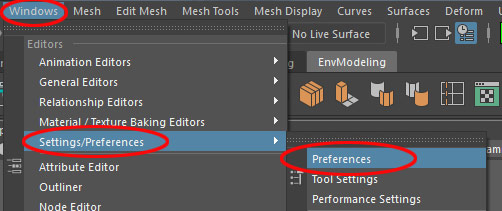
You can also disable/enable this from Interface Preferences under Window > Setting/Preferences > Preferences > Interface > Highlight What's New:

Interface Overview
Here is what we will cover:
1. Menu Sets
2. Status Line
3. Shelf
4. Viewports
5. Panel Toolbar
6. Channel Box / Attribute Editor
7. Display Layers
8. Animation Controls
9. MEL Command Line
10. Help Line
11. Quick Layout Menu
12. Tool Box
13. Poly Count Heads Up
click on image to view full size
1. Menu Sets
Menu Sets define Maya LT to be used for a specific function. These include Modeling, Animation, Rigging and Shading:
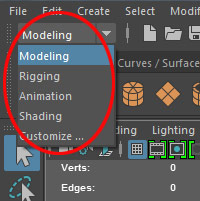
In Maya you also have Dynamics and Surfaces.
Whichever Menu Set you make active, the first 7 drop down bar menus will be the same but the rest will change based what you have set:


For game environment modeling, you want to set this to Modeling.
2. Status Line
Most important items under Maya LT's Status Line you need to know for game environment modeling are Snapping options:

Snapping objects to grid and to other geometry is extremely important for game environment art and we'll focus on the first three:
- Snap to Grids
- Snap to Curves/Edges
- Snap to Points/Vertices

We'll be using a hotkey for snapping but you can also enable/disable them through the Status Line.
Snapping options in Maya LT/Maya are covered in this tutorial.
3. Shelf
Shelves offer a way to access most commonly used functions in Maya LT/Maya within reach, so you don't have to use the drop down menu every time.
Maya LT/Maya comes with default shelves already created such as General, Curves/Surfaces, Polygons, Sculpting, Rigging, Animation and shading:

You can create your own custom shelf and place most used tools onto it. Doing this will greatly speed up your workflow.
See this tutorial on how to create your own custom tool shelf for game environment modeling.
4. Viewports
Viewports need no introduction. They allow you to see what you are creating.
Most common set up you will use for modeling are maximized Perspective View and Four Views (2x2 split).
Perspective View:

Four Views (perspective, top, side and front views):

Each viewport contains a lot of options for how to view your objects in it. We'll cover some of them in more detail later.
For now, if you hover mouse pointer over any 4 viewports and hit Spacebar - you will cycle between maximized and restored viewports. Each viewport is mouse sensitive and by simply placing the cursor inside a viewport and pressing Spacebar, Maya will maximize or restore that viewport.
5. Panel Toolbar
Each viewport contains panel toolbar; a quick access to viewport options. You can toggle this menu bar with Ctrl + Shift + M.
- Ctrl + Shift + M = toggle viewport menu bar
Panel Toolbar will have options that you will use for game environment modeling and we'll cover what you need to know to get started in this tutorial.

6. Channel Box / Attribute Editor
Channel Box and Attribute Editor allow editing and adjusting properties for selected objects. Channel Box is the compact view and Attribute Editor is expanded view of the Channel Box.
Channel Box:

Attribute Editor:

Press Ctrl + A to switch between Channel Box and Attribute Editor or click on the tabs here:
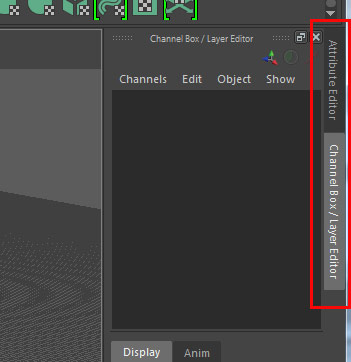
- Ctrl + A = switch between Channel Box and Attribute Editor
Each object will contain variety of different options to edit and adjust. Channel Box will have some limited options to set:

Compared to the Attribute Editor, which will offer more options to choose from:

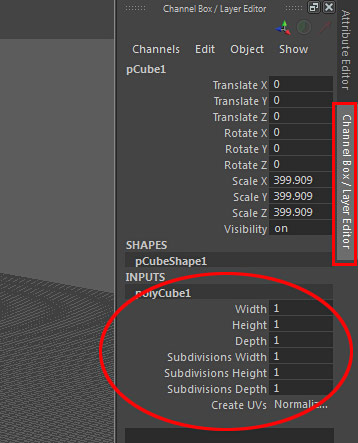
For game environment modeling you will be using both Channel Box and Attribute Editor to set various dimensions for the polygonal objects such as width, height, depth, subdivisions, renaming objects, setting input/output components and editing material/shader properties on objects:
7. Display Layers
Below the Channel Box and the Attribute Editor you'll find Layer Editor:

Layer Editor allows placing objects onto display layers and controlling their visibility in the viewport. This helps us to organize your scene, especially when the viewport becomes cluttered with too many objects.
8. Animation Controls
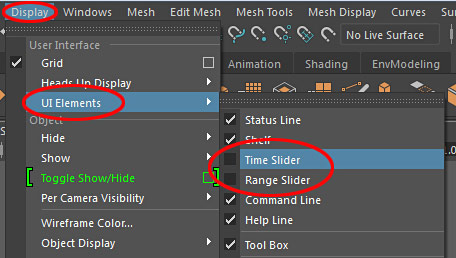
Playback, Time Slider and Range Slider are used for animation controls and we won't be using them for game environment modeling.

Let's hide these controls to maximize our workable area. Go to Display > UI Elements > Uncheck Time Slider and Range Slider:
9. MEL Command Line
MEL is the scripting language inside Maya. Using the MEL command line and you can enter commands in the left menu box and check for output on the right:
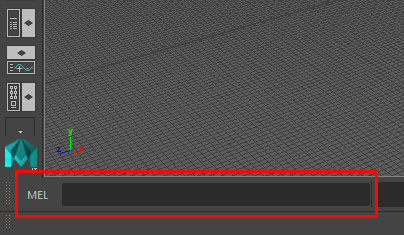
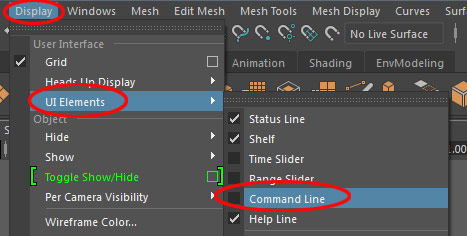
You won't be using MEL command line for game environment modeling, especially as a beginner. Let's turn that off.
Go to Display > UI Elements > Uncheck Command Line:
10. Help Line
Help Line shows a short description of tools and menu items. It gives you tips of what the tool is or what next step with that tool is:
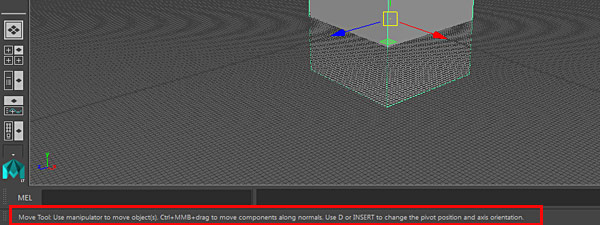
We'll leave Help Line on.
11. Quick Layout Menu
Quick Layout Menu allows switching between different layout panel configurations:

Right-click on any of the Layout Menu icons for additional options:
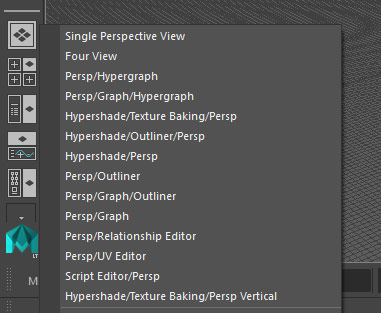
Most commonly used for game environment modeling are Single Perspective, Four View and Outliner/Perspective (first three icons):
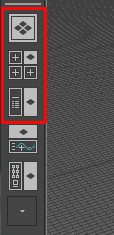
Single Perspective View:

Four View:

Outliner/Perspective:

12. Tool Box
Tool Box contains functions for object movement and selection. These include Select, Lasso, Paint, Move, Rotate and Scale:

You will be using shortcut keys to switch between Select, Move, Rotate and Scale instead of left-clicking on the icons. This is covered in Geometry Modeling Basics tutorial.
13. Poly Count Heads Up
Knowing your object's triangle, poly and vertices count is very important.
You should have Poly Count Heads Up display enabled by default. It is shown in the top left of the viewport:

But if you don't then go to Display > Heads Up Display > Poly Count:
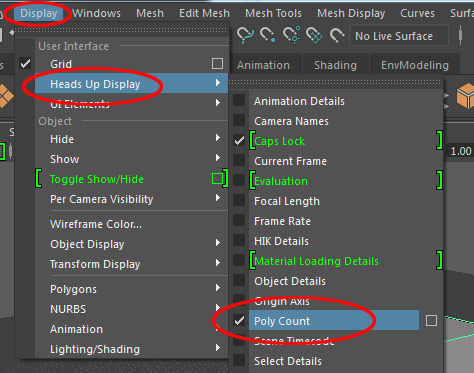
Here is what each column represents:
- First Column: entire scene
- Second Column: selected object only
- Third Column: selected components (accessed in Component Mode)
Everything we just covered will be access and used for game environment modeling at some point.
I know this is a lot to take in, but it gets better after watching this full tutorial series.
Home Terms of Use/Trademarks/Disclaimers Privacy Policy Donate About Contact
All content on this website is copyrighted ©2008-2024 World of Level Design LLC. All rights reserved.
Duplication and distribution is illegal and strictly prohibited.
World of Level Design LLC is an independent company. World of Level Design website, its tutorials and products are not endorsed, sponsored or approved by any mentioned companies on this website in any way. All content is based on my own personal experimentation, experience and opinion. World of Level Design™ and 11 Day Level Design™ are trademarks of AlexG.
Template powered by w3.css


 Maya Foundation: Home-Study Course - Model and UV Environments
 Substance 3D Painter Essentials - Master Texturing
 UE5: Fundamentals Vol.1 - Create with Unreal Engine 5
 UE5: Retro Office Project - Create Beautiful Interior Env
 UE5: Master Material Creation - Create Master Materials in UE5

