World of Level Design™
Tutorials to Becoming the Best Level Designer and Game Environment Artist (since 2008)
Secrets to Getting Started with Maya as Complete Beginner 3D Artist
Category: Maya
September 28, 2022

Every 3d artist needs to learn modeling software but once you begin you will hit road block after roadblock.
If you are completely new to Maya and have no clue where to start, this post will tell you.
Here are the secrets to learning Maya every beginner needs to know...
Video Tutorial
Maya Foundation: Home Study Course
Learn modeling and UVing using the industry-standard software as a complete beginner with "Maya Foundation: Home Study Course".
Why Maya?
Maya is the industry-standard software and it isn't going away. It has been around for over 20 years and it is widely used in large, small and indie studios around the world.
I don't use Blender, 3DSMax, Modo or Cinema4D. I use Maya.
I've been using Maya for 15+ years and I am very good and very quick with modeling and UVing in Maya. In my experience, Maya is the best modeling and UVing application. It's very flexible and efficient.
If you want to learn and use Maya then I'm here to help and I will teach you how.
How to Get Maya to Learn?
"How do I get Maya to learn for free?"
If you are a student you can get access to Autodesk products that includes Maya for 1 full year, for free.
Or you can do free trial of Maya for 30 days.
"How do I learn Maya if I can't afford it."
There is a big misunderstanding that Maya is too expensive. It's not. If you decide to purchase Maya there are few options you have.
Maya has two primary versions. Standard Version that cost $1,700+ annually and more affordable Maya Indie version that is only $290 annually.
If you want to use Maya as a hobbyist, freelancer or indie developer and you make under $100,000 per year with Maya you qualify to get the indie version.
Understanding 3D Concepts
Different words are often used to describe a 3d model: mesh, object, asset, model, static mesh. All mean the same thing.
Each 3d model is made up of vertices, edges and faces:

There are 3 different types of faces you'll come across when modeling: triangle, quad, n-gon:
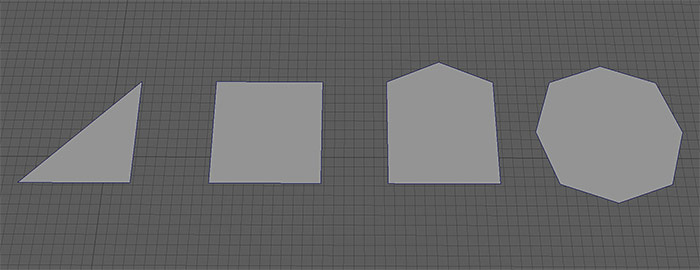
- Triangle: face with 3 edges
- Quad: face with 4 edges
- N-Gon: faces with more than 4 edges
What are UVs
UVing a model will allow you to make textures display correctly on a 3d object. There are 3 common terms you will encounter. UVing, UV Mapping, UV Unwrapping. All have a slightly different definition but each is after the same outcome.
UVs are texture coordinates of the object.
Instead of going into terminology and theory, I'm going to simplify them into this: it's a process of projecting a 2D texture onto a 3D object.

- UV = XY
Each object you model has to be Unwrapped and UV's have to be laid out correctly so it can be properly textured and for that texture to display correctly. There are different tools and different techniques you would use to approach this.
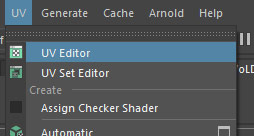
To open the UV Editor go to UV > UV Editor then select the object for the UVs to appear:
Different Modeling Methods
There are 3 primary modeling methods. Polygonal, subdivision and NURB modeling.
Polygonal Modeling
- Meshes are composed of vertices, edges, faces
- Can be high-poly or low-poly depending on the project
- Used in games
- Most common modeling method you'll be using and the one you should focus on learning
Subdivision Modeling
- Uses polygonal objects to creates high-poly and high-quality meshes
- Mainly used in film, animation, rendering and high-poly sculpt prep
- Not used in games directly but can be used to create high-poly meshes for Normal Map baking
- Meshes have to be smoothed (subdivided) in Maya
- Subdivision Preview Mode in Maya can be toggled with 3 hotkey, press 1 to go back to polygonal mode
- Requires holding edges to prevent mesh collapsing
- Primarily should have all quads with minimal triangles for the mesh to Subdivide properly
NURB Modeling
- Objects are composed of splines, control vertices (CVs) and not vertices, edges or faces like in Polygon or SubDiv based modeling
- Not used in games
- Primarily used for engineering and industrial design
- NURBS can be converted to polygons
Understand Maya's Complexity
Maya can be used for many different disciplines such as modeling, UVing, animation, rigging, effects, shading, rendering etc. And this makes Maya difficult to learn unless you narrow down your focus to one specific area of expertise.
What do you want to use Maya for?
Maya has Menu Set that can be switched to whatever you use Maya for such as Modeling, Rigging, Animation, FX, Rendering:
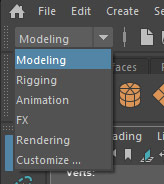
When you switch this, the first 7 drop down menus will be remain the same but the rest will change based on the Menu Set chosen.

You also have Workspaces to maximize the Maya interface for what you'll be using Maya for:

Master Navigation First
Focus on navigating in Maya first.
Spacebar: Switch between viewports by pressing Spacebar. If you hover over any of the 4 viewports, hit Spacebar to cycle through 4 viewports and 1 maximized viewport. Each viewport is mouse sensitive an depending where your mouse cursor is, by pressing the spacebar key, Maya will maximize that viewport where your mouse cursor is. No need to highlight and select the viewport first.
Perspective Viewport
- Hold Alt + Left Mouse Button = Rotate
- Hold Alt + Right Mouse Button = Zoom In/Out
- Hold Alt + Middle Mouse Button = Pan Left/Right/Up/Down
- F = Center View on Selected Object
- Left Mouse Button = Select Object
Orthographic Viewport
- Alt + Right Mouse Button = Zoom In/Out
- Alt + Middle Mouse Button = Pan Left/Right/Up/Down
Full Viewport View
- Ctrl + Spacebar = Full Viewport View
Viewport Options
Few important viewport options you need to start using:
- 4 = Wireframe View
- 5 = Smooth Shaded View
- 6 = Shaded View with Texture Maps
- 7 = Lighting View
- Alt + 5 = Wireframe on Shaded
Create a Project to Work From
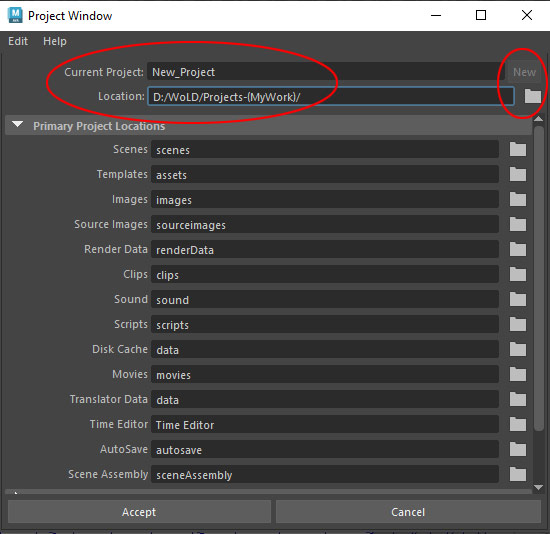
Always have a project you are working from. This makes Maya store scene files, textures, renders in the correct directory for the project.
You can have many projects you are working with but create at least one.
Go to File > Project Window and click New. Define a project name and location where to store the project:
Working with Polygon Primitives and Component Mode
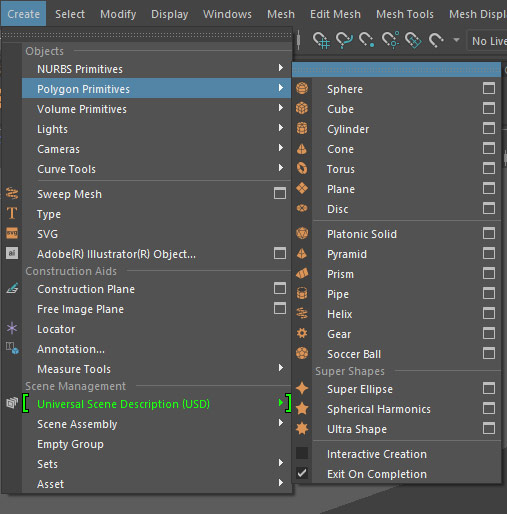
All models you see are created using various modeling tools but all models begin with simple primitive shapes such as a cube, cylinder, sphere and so on. Many objects are composed of multiple of these primitive shapes.
So you'll often start with one or more of these primitive shapes and begin to add edges, extrude faces, bevel edges and more to create your final 3d mesh.
To create polygon primitives go to Create > Polygon Primitives:
Here are some important shortcuts to working with objects in the scene:
- Left Mouse Click = Select Object
- Left Mouse Click and Drag = Marquee Select Objects
- Click off the object to deselect
- Delete = Remove Selected Object
- Ctrl + Z = Undo
- Shift + Left Mouse Button = Add or Remove from Selection
- Ctrl + Left Mouse Button = Remove from Selection
Use Select, Move, Rotate, Scale hotkeys to manipulate objects inside the viewport:
- Q = Select Tool
- W = Move Tool
- E = Rotate Tool
- R = Scale Tool
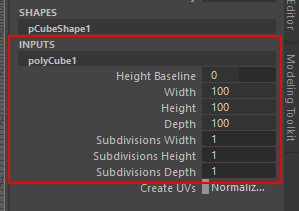
You can also use the Channel Box and Inputs Option to set size and amount of divisions polygon primitives have:
Naming/Renaming Objects in your scene, select the object and in Channel Box double click on the name to rename it:
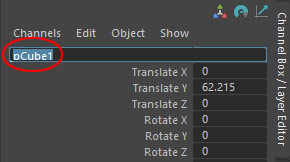
Object Component Mode: allow you to manipulate vertices, faces and edges. This is where more direct modeling control comes in. Majority of your time modeling will be using the component mode.
- Right Mouse Click and Hold on Select Object = Enable Component Mode Selection
Hotkeys for components:
- F8 = Object Selection
- F9 = Vertex
- F10 = Edge
- F11 = Face
- F12 = UVs
Switching to Vertex Face component mode allows you to find problems with geometry such as overlapping faces:
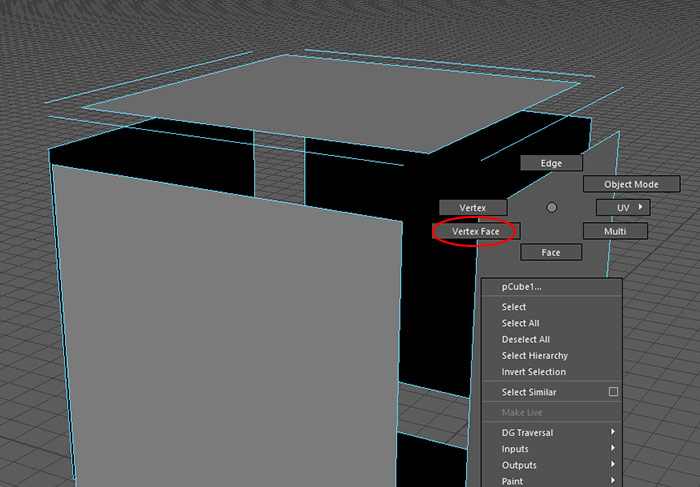
Scale and Grid Setup
Building to real-world scale is another extremely important principle you should use right away.
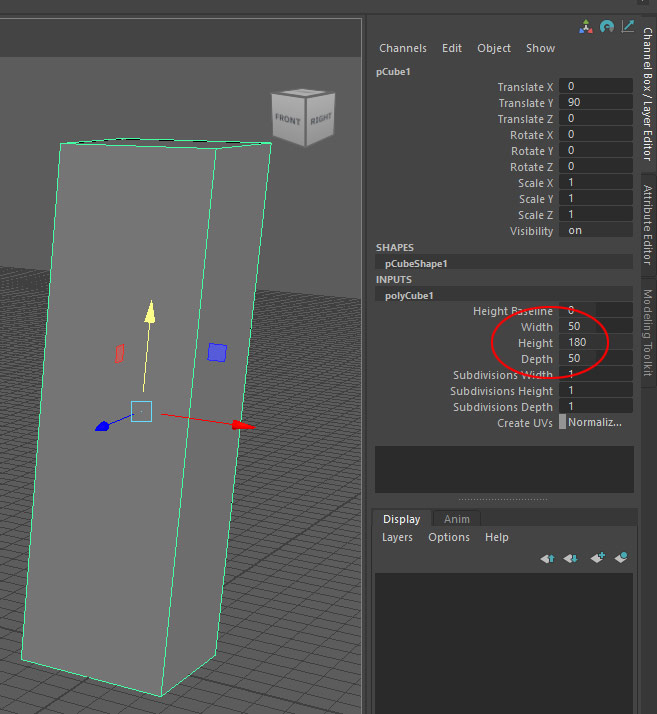
Average height of a human to use as a scale reference: 180cm
By default Maya uses centimeters as its unit of measurement. Go to Windows > Setting/Preferences > Preferences then choose Settings:
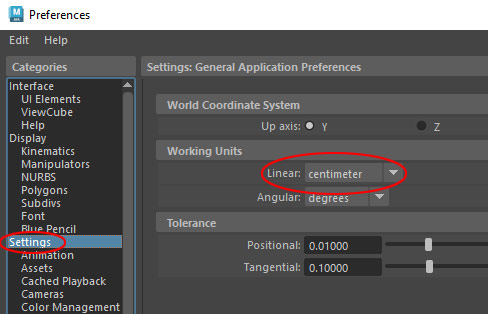
This means everything you model in Maya should match to real-world size of objects. By default the grid settings are way too small. Change your grid size to match the size of objects you'll be creating by setting the following options. Go to Display > Grid Options:
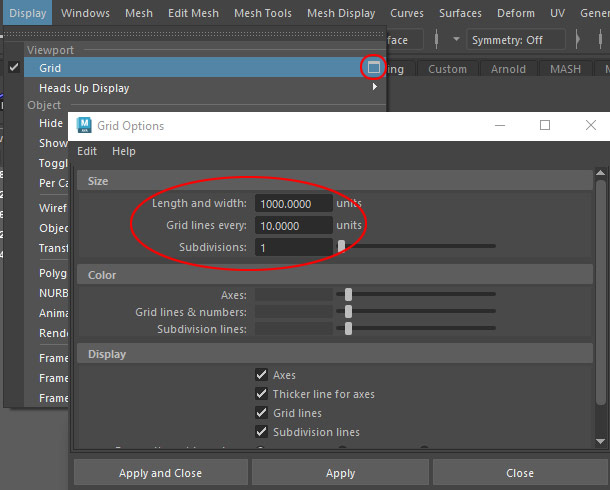
Create a polygon cube and change the size in the Channel Box to match the average size of a human to help you build to correct proportions:
- Width/Depth: 50cm
- Height: 180 cm
Block Things Out First
Number one problem with beginner environment creation is incorrect scale, dimensions and proportions. The environment either looks too big or too small.
Blocking out is a process of using primitive shapes to define the shape, dimensions, scale and proportions of the environment or objects are you going to create.
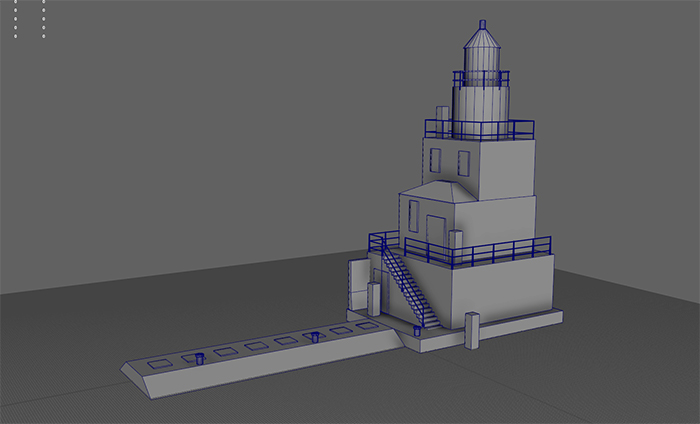
Everything should begin with a blockout. Then you can place the blockout mesh into a Display Layer, lock it and begin modeling. You will have a template to match, knowing that your scale will be correct.
Learn to Use Shortcut Keys
Most modeling tools will have hotkeys already. You'll see the shortcut being used in the drop-down menu.
Additional shortcuts that will speed up your workflow are:
- Right Mouse Click and Hold = Enable Component Mode Selection
- Hold Shift + Right Mouse Button = Context Modeling Menu
- Hold Ctrl + Shift and Right Click Hold = Axis Orientation Change
- Hold Spacebar = Hotbox
Use the Modeling Toolkit:

Options Menu for Tools
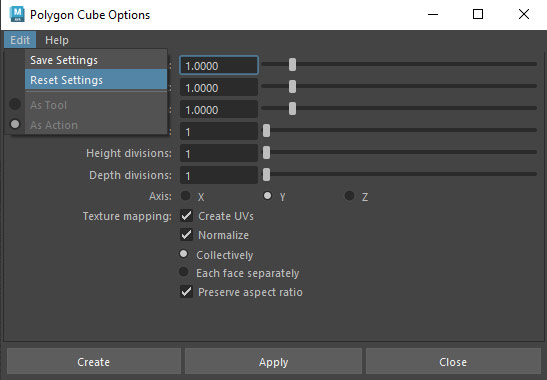
Many of the tools and functions you use in Maya will have additional options to change. Click on the small box next to the name to access the options menu:

If the tool starts working not the way you expect it, in the options menu you can Reset to Default:
Snapping and Pivot Points
Snapping your objects and controlling the pivot points are going to be critical in your game environment modeling, especially when creating modular assets.
Learn to snap and control your pivot points on objects.
Snapping Options
You can access many snap options on your toolbar:

But instead of using the toolbar, learn to master these shortcuts:
- Hold X and Middle Mouse Click = Snap to Grid
- Hold C and Middle Mouse Click = Snap to Curve/Edge
- Hold V and Middle Mouse Click = Snap to Vertex
- Hold J = Rotate Snapping
Modify Pivot Points
Modifying pivot points controls where the move, rotate, scale gizmo will appear and thus where you'll be able to snap at. Control your pivot points using these shortcuts:
- Modify > Center Pivot
- Hold D = Enable Pivot Controls
- Hold D then Hold X and Middle Mouse Click = Snap Pivot Point to the Grid
- Hold D then Hold C and Middle Mouse Click = Snap Pivot Point to Curves/Edges
- Hold D then Hold V and Middle Mouse Click = Snap Pivot Point to a Vertex
Start Custom Tool Shelf
Shelves are a way to access some of the most commonly used tools. Maya comes with a set of shelves by default. But it is best to create your own so you can control what you add to it.
Left-click on the gear icon on left side of the Shelf. Shelf Editor allows to rename, add/delete, change icons, backgrounds etc. What we want right now is to simply set up our own custom tool shelf.
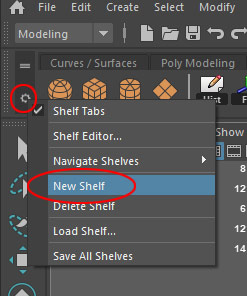
- Gear Icon > New Shelf > Name Shelf
- Rename
- Use the drop down menus and Hold Ctrl + Shift and Left Click = Add Items to Active Shelf
- Middle Mouse Click and Drag = Move Items on the Shelf
- Double Click on Shelf Item = Open Options Menu
- Delete icon by Right-Click and choose Delete
You can go to Shelf Editor for more customization of your shelf:
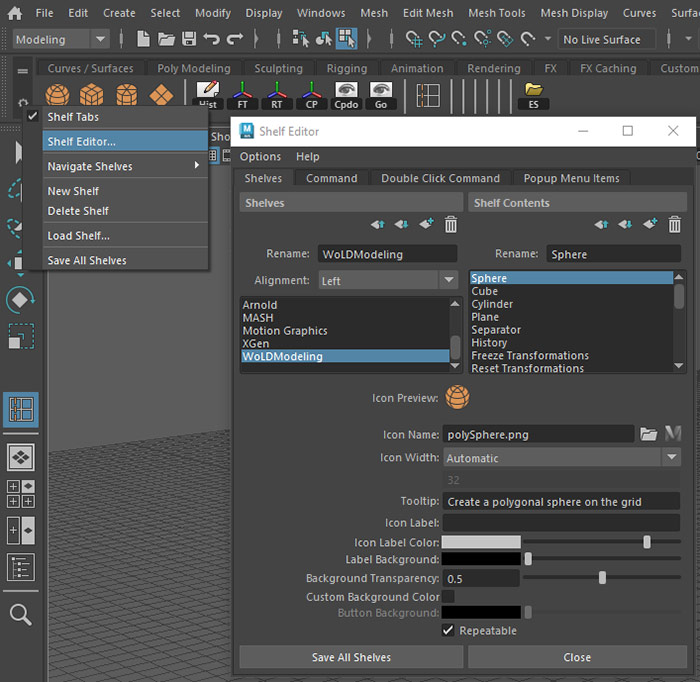
To add a separator to your shelf:
- Open Script Editor
- Type in addShelfSeparator()
- Go to File > Save Script to Shelf
- Note: this script stops working after a while, you'll need to delete the previous icon and redo adding the script to shelf
Use Display Layers and Isolate Select
Display Layers are used to organize and manage objects in a scene, such as for setting their visibility and selectability.
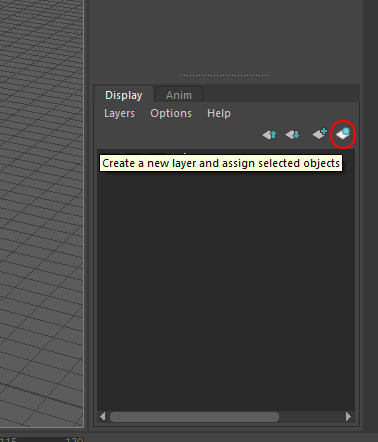
Select an object and click on Create Layer and Assign Selected Object:
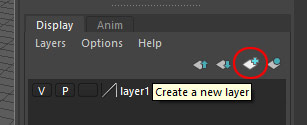
You can also create empty layers with this icon:
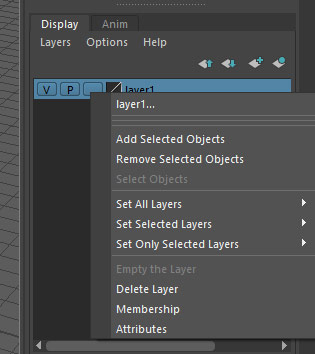
Then Right Click on the Layer for options to add, remove objects and delete layers:
Third window icon on the Display Layer allows you to control how items within that layer will appear:
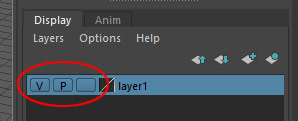
- V = Visiblity (1st window icon)
- P = Visibility during Playback (2nd window icon)
- T = Template (3rd window icon - see wireframe)
- R = Reference (can't select it)
Hide everything inside the scene but only keep the selected objects visible:
- Ctrl + 1 = Isolate Select
Enabling Heads Up Display
Enable Heads Up Display so you can see how many verts, edges, triangles your object, your scene has as well as how many of these components you have selected.
This helps to track down problems as well as seeing how many triangles your objects have.
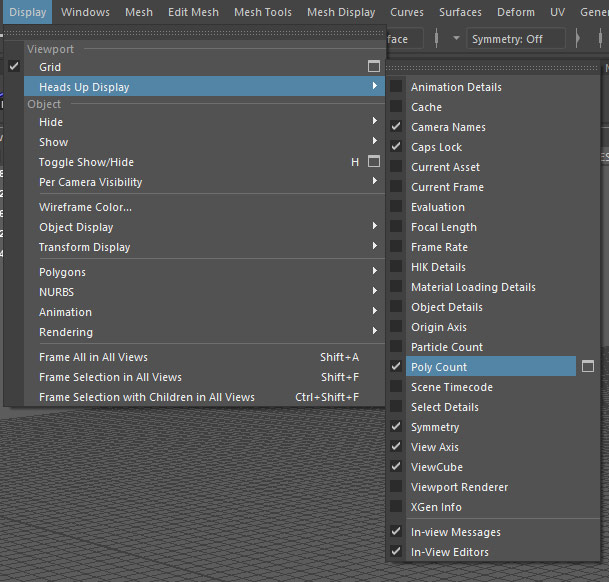
- Display > Heads Up Display > Poly Count
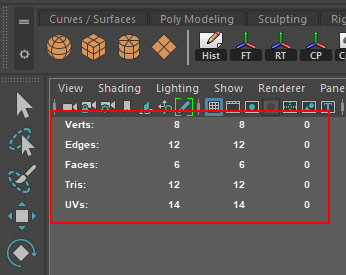
- Column 1: All objects
- Column 2: Selected Objects
- Column 3: Component Mode
Focus on These 11 Modeling Tools
Focus on the following 11 modeling tools in Maya. These 11 will give you enough to model most objects.
- Extrude
- Bevel
- Multi-Cut
- Connect
- Circularize
- Combine/Separate/Extract
- Bridge
- Target Weld
- Booleans
- Soft/Hard Edge Control
- Reverse Faces
Tip of the Iceberg
What was covered here is just the beginning. In the "Maya Foundation Home Study Course" we go deeper into modeling and UVing. Covering everything you need to know to get started with Maya as a beginner to start creating your own environments.
Home Terms of Use/Trademarks/Disclaimers Privacy Policy Donate About Contact
All content on this website is copyrighted ©2008-2024 World of Level Design LLC. All rights reserved.
Duplication and distribution is illegal and strictly prohibited.
World of Level Design LLC is an independent company. World of Level Design website, its tutorials and products are not endorsed, sponsored or approved by any mentioned companies on this website in any way. All content is based on my own personal experimentation, experience and opinion. World of Level Design™ and 11 Day Level Design™ are trademarks of AlexG.
Template powered by w3.css


 Modular Environment Design Masterclass Tutorial Course
 Maya Foundation: Home-Study Course - Model and UV Environments
 Substance 3D Painter Essentials - Master Texturing
 UE5: Fundamentals Vol.1 - Create with Unreal Engine 5
 UE5: Retro Office Project - Create Beautiful Interior Env
 UE5: Master Material Creation - Create Master Materials in UE5
 Preproduction Blueprint: Plan Environments and Level Designs


