World of Level Design™
Tutorials to Becoming the Best Level Designer and Game Environment Artist (since 2008)
Maya LT/Maya: Snap to Grid, Edges, Vertices and Modify Pivot Points - Beginner Tutorial Series 6/13
Category: Maya LT/Maya
September 10, 2016
UPDATE: This tutorial series has been updated to feature 17 new beginner tutorials, start here...
The following tutorial is directly from Module 1 of 3 in "3D Game Environment Modeling Foundation" series. I've released this first Module completely free. It is focused on teaching you how to get started with interface overview in Maya LT/Maya specifically for game environment artist.
- First Module is focused on interface overview for game environment modeling (start here).
- Second Module is focused on game environment modeling techniques.
- Third Module is focused on UV mapping, UV unwrapping and UVing.
The full series is designed for game environment artist to learn Maya LT or Maya specifically for modeling and UVing game environment art.
The entire "3D Game Environment Modeling Foundation" tutorial series contains 9 hours, 53 videos and all 3 modules.
Following free 1st module features 13 video tutorials. You can start from the beginning here and watch all videos sequentially.
On to the tutorial:
Snaps and Pivots are probably the most important elements of game environment modeling that aren't mentioned enough to a beginner.
You have to be able to snap your geometry to grid and to other objects in the scene. This applies to nearly all models you create, especially when creating modular assets.
To do this you have to know how to snap to grid, vertices, edges and modify pivot points.
Snapping Options
As mentioned before in Interface Overview, you'll only need know and use 3 grid options:
- Snap to Grids
- Snap to Curves/Edges
- Snap to Points/Vertices


Left mouse click to enable Snap to Grid, Curves/Edges or Points/Vertices. You can enable one or all of them:


In the viewport, select an object then Left Click Hold and Drag or Middle Mouse Click Hold and Drag the object to snap.
Instead of coming up to the Status Line, you can use shortcut:
- Hold V and Move Object = snap to vertex point
- Hold C and Move Object = snap to curve/edge
- Hold X and Move Object = snap to the grid
You have to hold down V, C or X while moving the object to keep snaps on. Make sure you have snaps disabled in the Status Line in order to use these shortcuts.
How to Modify Pivot Points
Pivot Points control where the object is going to snap to, rotate and scale from. It is very rare for the pivot point to be exactly where you need it without modifying it.
There are 2 ways modify pivot points:
- Insert = enable/disable object pivot modification
- Hold D = enable/disable object pivot modification
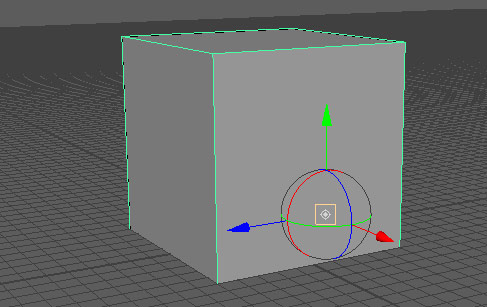
First way is to select the object and press Insert; this will enable you to modify the pivot:

You can now modify the object's pivot point and position it where you want it:

You could also use X, C, V shortcut keys to snap the pivot point to grid, curve/edge or vertex or enable snaps in the Status Line.
Press Insert again to exit pivot point modification tool.
Second way is to select the object, press and hold D key. This will activate the pivot point modification tool:

While keeping D key pressed move and modify the pivot point. Also use X, C, V shortcut keys to snap the pivot point to grid, curve/edge or vertex.
Center Pivot
Quick way to modify a pivot point to the center of the object is to use Modify > Center Pivot:


Freeze Transformations on Object
Freeze Transformations will change Translate, Rotate, Scale Transform inputs and reset them to 0 in the Channel Box:

So if you moved the object, scaled and rotated, the values in the Channel Box will be updated:

You can freeze these values to 0 without changing the size/rotation/scale of the model by selecting the object and going to Modify > Freeze Transformations:

This is very helpful when you want the object to return to a position in the world where you "Freeze Transformations". For example, you Freeze Transformations on an object at world origin 0, 0, 0:

Then, if you move the object anywhere in the scene:

Then decide to move it back to 0, 0, 0; all you need to do is type in 0, 0, 0 for Translate/Rotate/Scale in the Channel Box:

The object will return to the position where you last "Freezed Transformation". Very useful for bringing object back to Maya's world origin for re-exporting back into the game engine.
You will continue to use snap to grid, vertices and edges in every part of modeling, including UVing which is what Module 3 is focused on.
Home Terms of Use/Trademarks/Disclaimers Privacy Policy Donate About Contact
All content on this website is copyrighted ©2008-2024 World of Level Design LLC. All rights reserved.
Duplication and distribution is illegal and strictly prohibited.
World of Level Design LLC is an independent company. World of Level Design website, its tutorials and products are not endorsed, sponsored or approved by any mentioned companies on this website in any way. All content is based on my own personal experimentation, experience and opinion. World of Level Design™ and 11 Day Level Design™ are trademarks of AlexG.
Template powered by w3.css


 Modular Environment Design Masterclass Tutorial Course
 Maya Foundation: Home-Study Course - Model and UV Environments
 Substance 3D Painter Essentials - Master Texturing
 UE5: Fundamentals Vol.1 - Create with Unreal Engine 5
 UE5: Retro Office Project - Create Beautiful Interior Env
 UE5: Master Material Creation - Create Master Materials in UE5
 Preproduction Blueprint: Plan Environments and Level Designs


