World of Level Design™
Tutorials to Becoming the Best Level Designer and Game Environment Artist (since 2008)
Maya LT/Maya: Geometry Modeling Basics and How to Work With Polygon Objects - Beginner Tutorial Series 4/13
Category: Maya LT/Maya
September 09, 2016
UPDATE: This tutorial series has been updated to feature 17 new beginner tutorials, start here...
The following tutorial is directly from Module 1 of 3 in "3D Game Environment Modeling Foundation" series. I've released this first Module completely free. It is focused on teaching you how to get started with interface overview in Maya LT/Maya specifically for game environment artist.
- First Module is focused on interface overview for game environment modeling (start here).
- Second Module is focused on game environment modeling techniques.
- Third Module is focused on UV mapping, UV unwrapping and UVing.
The full series is designed for game environment artist to learn Maya LT or Maya specifically for modeling and UVing game environment art.
The entire "3D Game Environment Modeling Foundation" tutorial series contains 9 hours, 53 videos and all 3 modules.
Following free 1st module features 13 video tutorials. You can start from the beginning here and watch all videos sequentially.
Geometry Modeling Basics covers how to create and manipulate Polygonal Primitives or other objects types in Maya LT/Maya.
You will learn how to:
- Create polygon primitives
- Move, rotate, scale and select objects
- How to access object component mode for vertices, edges and faces
- Shortcuts for vertices, edges and faces components
- Name/rename objects
Creating Polygon Primitives
For game environment modeling you will be working with polygons. You will start with basic geometric shapes to model from such as a cube, cylinder, plane and sphere.
Two ways to create Polygonal Primitive objects are through Polygon Shelf and through Create menu.
Create > Polygon Primitives: Choose Object:

Polygon Shelf:

Creating Polygon Primitives using any of the two methods above will place an object in the center of the scene. This center of the scene is known as 0, 0, 0 XYZ location or world origin:

Going back to Create > Polygon Primitives, you will notice a small box next to each object:

This is tool settings menu. Many functions in Maya LT/Maya contain this option.
In the case of Polygon Primitives, you use an option menu to define few parameters prior to creating that object. So instead of creating a cube first then resizing it, you can enter specific values and create it:

Every time you create the same Polygon Primitive for whose tool settings you've changed, it will retain those values until you reset the options back to default.
To reset settings back to default, bring up the options menu for Polygon Primitive object and go to Edit > Reset Settings:

In addition to Polygon Primitives, there is another object type you could use to model with - NURBS.
NURBS is geometry type based on surface curves.
Create > NURBS Primitives:

Few things about NURBS you should know:
- Avoid using NURBS as a beginner; once you've achieved some proficiency with Maya LT/Maya and gone through the entire "3D Game Environment Modeling Foundation" series, you will be in a better place to experiment with NURBS
- NURBS are very helpful to start modeling from to help you create a complex curved surface that would be very difficult to achieve with polygon primitives
- You will always end up converting NURBS to polygon object prior to export into a game engine
- You almost always will have to clean up and optimize a polygon object that has been converted from NURBS
Basic Object Controls and Selecting Objects
Basic object controls in Maya LT/Maya:
- Left Mouse Button = select object
- Delete = remove selected object
- Left Mouse Click and Drag = marquee select objects
- Shift + Left Mouse Button = Add to Selection
- Ctrl + Left Mouse Button = Remove from Selection
- Z = undo
Move, Rotate, Scale and Select
To enable Move, Rotate, Scale and Select objects tools in Maya LT/Maya use the Tool Box (left hand side menu below Shelf Options Gear):

But it is better to use hotkeys:
- Q = select tool
- W = move tool
- E = rotate tool
- R = scale tool
Left-click to select an object in the scene then use shortcut keys (W, E, R) to cycle between 3 different manipulation tools (Move, Rotate, Scale). For each tool you will see the gizmo change:

Left Mouse Click or Middle Mouse Click Hold and Drag on X, Y, Z gizmo handles to manipulate move, rotate or scale that object.
Using X, Y, Z handles will only Move, Rotate, Scale along that specific axis:

For Move and Scale tool you will also have universal handle to transform along XYZ together. You will find this in the middle of the object.
Move along XYZ together:

Scale on XYZ together:

Left Mouse Click or Middle Mouse Click Hold and Drag on middle gizmo to move along XYZ together or scale on XYZ uniformly.
Quick Way to Find Correct XYZ Gizmo Direction
How do you find which color represents which XYZ gizmo direction?
It is not very apparent to a beginner to know which color represents which XYZ direction.
- X = red
- Y = green (up/down)
- Z = blue

Quick reference is to take a look on the bottom left of the perspective viewport:

This will tell you the direction of each gizmo for XYZ.
Using Channel Box for Object Manipulation
With Move, Rotate and Scale tools you are able to manipulate the Polygon Primitives without constraints.
But what if you know the specific values for movement, rotation or scale?
Let's say you know your cube has to be 300 in XYZ and rotated 45 degrees along X only – how do you do this?
Using Channel Box you can Translate, Rotate and Scale any Polygon Primitive with specific values. Select the object and take a look inside the Channel Box:

Now input values for Translate, Rotate or Scale:

Now before you start using Scale option in the Channel Box, there is something you should know about the workflow of setting specific size of your object to start with.
How to Set Polygon Primitive Size/Scale Values Correctly
Here is the best workflow to set your object's initial size and scale.
Create a Polygon Primitive object:

Make sure the object is selected so its properties show up in the Channel Box.
In the Channel Box, scroll down to INPUTS text and left-click on the name below Inputs to open a menu. The name below INPUTS will vary depending on the object you created. In our case it is "polyCube1". The menu will also contain different options depending on the object:

This is where you want to set the first initial size and scale of your object by defining Width, Height, Depth and Subdivisions:


Here are a few different options you will see depending on which Polygon Primitive you created:
Cube:

Cylinder:

Sphere:

Using the Inputs property to set the initial width, height and depth is very important. This is what I use at first and I do not use Scale XYZ values above in the Channel box to start with.
The values you enter for Width, Height, Depth will be relevant to the game and game engine you are using to export.
Enabling Interactive Creation
Interactive Creation option is not very often used if at all but it does offer a way to quickly block in shapes without using values and input boxes.
Also this option was enabled by default in earlier versions of Maya. Knowing how to turn it off/on is helpful.
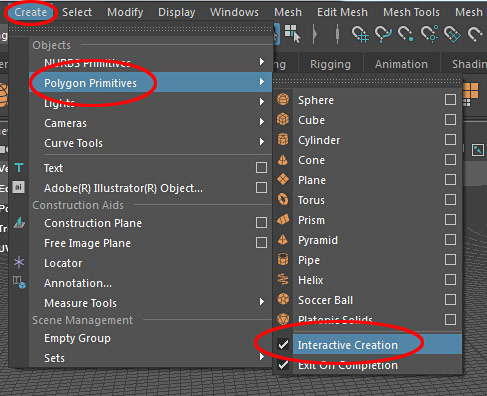
To enable go to Create > Polygon Primitives Interactive Creation:

Now, choose which Polygon Primitive you want to create and in perspective viewport left-click and drag to create it. This will often require multiple clicks and steps to set size and scale of each different Polygon Primitive:

To disable go to Create > Polygons Primitives > Interactive Creation (Uncheck):

Setting Up Correct XYZ Viewport Orientation
To make your job easier to model, it is very helpful to match your perspective viewport orientation to match orthographic viewports.
Make sure that Z-axis (blue arrow) is pointing towards you in perspective viewport:

- X-axis (red arrow): pointing right
- Y-axis (green arrow): pointing up
- Z-axis (blue arrow): pointing towards you
Reason to do this is for making your orthographic viewports (top, side, front) match the same direction as perspective. If you don't then very often your scene's side viewport can become front and back viewport becomes side.
It will not cause any issues if you do not do this. But it will make it easier to distinguish side, front and back orthographic viewports.
If this doesn't make much sense right now, just simply make Z-axis (blue arrow) facing you in perspective viewport.
Object Component Mode
Object's Component Mode allows you to model Polygon Primitives by manipulating vertices, faces and edges.
To access Object Component Mode, select it first then:
- Right Mouse Click and Hold on Select Object = enable component mode
Then switch to vertices, edges or faces:

As a beginner, ignore everything else except vertices, edges and faces.
Here are 5 useful hotkeys for Object Component Mode. Select the object and press:
- F8 = object selection
- F9 = vertex
- F10 = edge
- F11 = face
- F12 = UVs
Naming/Renaming Objects in Your Scene
Naming objects is a good habit to start for organizing your scene. Also many game engines will use the same object's name during export/import.
Select the object and in the Channel Box left click on pCube text (or other default name Maya gives):

Type in new name:

Guidelines to use while naming objects:
- Avoid spaces
- Use underscores or dashes instead of spaces
- Lower case are ideal but it is ok to use Capital Letters
These guidelines extend beyond Maya LT/Maya into game development to keep your project and naming convention consistent. For example, some game engines do not like if you include spaces in names or capital letters. You can use and break the guidelines but it is best to maintain a process that is consistent across modeling and game engine usage to avoid problems and errors in your development pipeline.
This is just the beginning for geometry modeling basics; in Module 2 of "3D Game Environment Modeling Foundation" is where we really get into modeling objects.
Home Terms of Use/Trademarks/Disclaimers Privacy Policy Donate About Contact
All content on this website is copyrighted ©2008-2024 World of Level Design LLC. All rights reserved.
Duplication and distribution is illegal and strictly prohibited.
World of Level Design LLC is an independent company. World of Level Design website, its tutorials and products are not endorsed, sponsored or approved by any mentioned companies on this website in any way. All content is based on my own personal experimentation, experience and opinion. World of Level Design™ and 11 Day Level Design™ are trademarks of AlexG.
Template powered by w3.css


 Modular Environment Design Masterclass Tutorial Course
 Maya Foundation: Home-Study Course - Model and UV Environments
 Substance 3D Painter Essentials - Master Texturing
 UE5: Fundamentals Vol.1 - Create with Unreal Engine 5
 UE5: Retro Office Project - Create Beautiful Interior Env
 UE5: Master Material Creation - Create Master Materials in UE5
 Preproduction Blueprint: Plan Environments and Level Designs


