World of Level Design™
Tutorials to Becoming the Best Level Designer and Game Environment Artist (since 2008)
CS:GO SDK Hammer Source "Abandoned House" Workflow (Part 2/5) - Texturing Tutorial
Category: Source: CSGO SDK, Source: L4D 1 & 2
January 24, 2017
In this 2nd part of 5 you will see the texturing process for the "Abandoned House" environment. This process can be applied to any game environment you create with Hammer Source.
If you want to see all 5 parts and start from the beginning click here for all "Abandoned House Workflow" tutorials.
I will be using CS:GO SDK version of Hammer Source, but any Hammer Source version will work with this tutorial including Team Fortress 2, Half-Life 2 and Left4Dead series.
Once you have blocked in the environment with BSP brushes, it is time to begin texturing it. This is what we ended up with from the previous tutorial:

NoDraw Texture
Currently, the environment contains all developer textures. I want to replace them all with "nodraw" texture.

Developer textures served a function by helping me focus on BSP block-in. Now in the texturing stage I no longer need them.
There are a few reasons I use "nodraw" textures:
- "nodraw" textures are not rendered by Source Engine
- "nodraw" textures are used for brushes that don't need to be textured
- "nodraw" textures are used for optimization as the compiler skips making lightmap on this texture
In addition to the reasons above, "nodraw" helps me texture the environment faster. I can see which sections I already textured and which need to be worked on.
You want to apply "nodraw" texture to all brush faces that will not be seen by the player and only texture brush faces that will be rendered in-game. This way you are only using what you need and don't have hidden faces with textures that a player will never see.
To re-texture the entire environment from developer textures to "nodraw" textures, I use Texture Replace option.
Quickly Replacing Textures
I need to replace all textures in the map to "nodraw" before I focus on texturing.
Open "Face Edit Sheet":

In perspective viewport, left click on the texture from the map you want to replace. This texture will be previewed in "Face Edit Sheet":

In "Face Edit Sheet" click "Replace":

With "Replace Texture" window open, click on "Replace: Browse" and look for the texture you want to have instead. In my case I want "nodraw" texture:

Set the following properties inside "Replace Texture" window:
- Find: is the texture you want to replace
- Replace: new texture to replace with
- Replace In: Everything
- Action: Replace exact matches
Click Ok.
Selected dev texture will now be replaced with nodraw texture:

I replace all developer textures with nodraw texture. The environment now looks like this:

Why Not Start With NoDraw Texture From The Beginning
One of the workflows I've seen is using "nodraw" texture as a way to block in the entire environment right from the start. No developer textures are used, you just go straight to using "nodraw". This ensures the use of "nodraw" texture on every brush face without having to replace any textures later.
I do not like this option because it is very hard to see what you are designing. Also, if you want to compile and jump into the map to play-test, brushes will be invisible.
Using developer texture for BSP block-in then replacing them with "nodraw" prior to texturing is the best option I've found.
Beginning to Texture
With nodraw texture applied to every brush face, I now begin to focus on texturing.
I only texture brush faces that will be seen by the player in-game, the rest will maintain "nodraw".
I open "Face Edit Sheet" and click Browse to open "Texture Browser". Inside the "Texture Browser" I filter by texture name to see what's available:

When I find the texture I want to use, I double click on it to set and apply it to the brush face. I begin with house walls and I use 2 different textures that are very close to the reference:

I then expand to the roof, porch, overhang and the rest of the house:

I focus on major areas first such as walls, roof and porch. Then I expand to more detailed areas and sections. I follow the rule of large to small, primary to secondary.


Texture Alignment and Scale
A lot of my time is spent in texture alignment, making sure that all faces of the brush don't have seams or distortions.
Some surfaces require working with texture shift, scale and rotation:

If a texture seam is impossible to eliminate, I will end up creating some brush detail to help hide it such as on the porch roof rounded corner:

This detailing will be done in the third section of the series.
Texturing Shortcuts
With "Face Edit Sheet" open (Shift+A), move the mouse pointer over a BSP brush:
- Right Click = Apply Texture from "Face Edit Sheet" to a Single Brush Face
- Shift + Right Click = Apply Texture to the Entire BSP Brush
- Left Click = Selects and Sets Texture From a Brush to "Face Edit Sheet"
Re-Use Textures
I attempt to re-use as many textures as I can. This serves a purpose for:
- Doing more with less, less textures have to be loaded into memory and rendered
- It helps to maintain a visual texture unity; there is a pattern of repetition that helps to "sell" this environment
Pay Close Attention to Reference
The way I choose which textures to use is from looking at image reference. I am not creating custom textures so I have to find the default textures that come bundled with CS:GO version of Hammer Source.
For this "Abandoned House" environment I am able to find texture I need without creating custom ones.
Default or Custom Textures
You will be presented with 2 choices:
- Using default textures that come with the editor
- Create custom textures
Creating textures will require additional time added on to your project. Not to mention a steep learning curve if you never created custom textures before.
Using default or creating custom textures will depend on the environment theme and style.
Maintain Same Color and Saturation Theme
In order to create believable environments, you have to maintain a similar texture color, saturation and detail.
Textures have to seem like they can exist within the same location. If a texture doesn't fit the "abandoned" theme of this environment, it will stand out and will look odd - making the map less real.
So you constantly have to judge the visual theme and texture appropriately so everything is cohesive. This is why it is important to constantly check in-editor and compile to see what it looks like in-game.
Here is an example I had to rework as the wooden texture on the porch floor did not fit and stood out:

In order to find the "right" texture you have to constantly apply that texture in your environment and check to see how it is juxtaposed with the rest of the environment.
When using "Texture Browser" change preview size to a higher value so you can see better; I like to use 256x256:


Here is another example of a roof texture that didn't work, but I found the texture that fits better into this environment:

Texturing Interior
Interior was the last section I textured. As I mentioned in part 1, the interior is non-playable space but the player can still see inside.
I did a quick and simple texture pass:

Compile, Test and Re-Texture
Always compile and test what your textures look like in-game. Lighting often changes how your environment is rendered. So it may look good in-editor, but once compiled it may look a bit different.
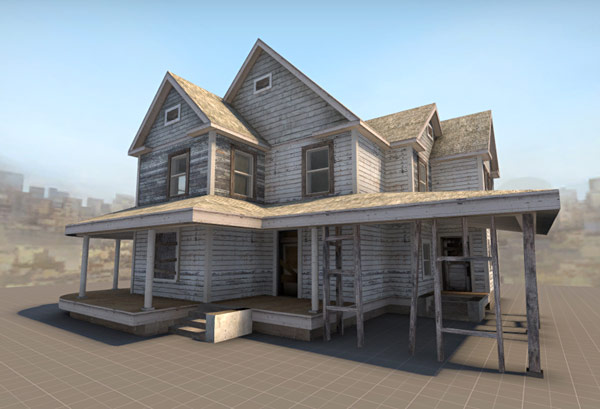
Final textured pass before moving on to the next part:

On to Part 3
In part 3 of the "Abandoned House" series, I will focus on detailing.
5-Part "Abandoned House" Workflow Tutorial Series:
"Abandoned House" Workflow (Part 1/5) - BSP Block In Hammer Source Tutorial
"Abandoned House" Workflow (Part 2/5) - Texturing in Hammer Source Tutorial
"Abandoned House" Workflow (Part 3/5) - Detailing in Hammer Source Tutorial
"Abandoned House" Workflow (Part 4/5) - Terrain/Displacement and Foliage in Hammer Source Tutorial
"Abandoned House" Workflow (Part 5/5) - Beyond the House and Lighting in Hammer Source Tutorial

SUBSCRIBE & GET FREE UE5 PDF GUIDE
Subscribe to receive NEW/UPDATED and FREE "UE5 Beginner's Quick Start Guide" PDF (90 pages).

Visit this page for more info about the guide...
TOP 7 TUTORIAL COURSES FOR 2026
 Modular Environment Design Masterclass Tutorial Course
 Maya Foundation: Home-Study Course - Model and UV Environments
 Substance 3D Painter Essentials - Master Texturing
 UE5: Fundamentals Vol.1 - Create with Unreal Engine 5
 UE5: Retro Office Project - Create Beautiful Interior Env
 UE5: Master Material Creation - Create Master Materials in UE5
 Preproduction Blueprint: Plan Environments and Level Designs
TUTORIAL CATEGORIES
MODULAR ENVIRONMENTS MASTERCLASS

UE5: RETRO OFFICE PROJECT

MAYA FOUNDATION COURSE

SUBSTANCE PAINTER ESSENTIALS

LEARN THE PREPRODUCTION PROCESS

ABOUT WoLD & ALEXG

My name is AlexG. I am self-taught level designer, game environment artist and the creator of World of Level Design.com. I've learned everything I know from personal experimentation and decades of being around various online communities of fellow environment artist and level designers. On World of Level Design you will find tutorials to make you become the best level designer and game environment artist.
Home Terms of Use/Trademarks/Disclaimers Privacy Policy Donate About Contact
All content on this website is copyrighted ©2008-2024 World of Level Design LLC. All rights reserved.
Duplication and distribution is illegal and strictly prohibited.
World of Level Design LLC is an independent company. World of Level Design website, its tutorials and products are not endorsed, sponsored or approved by any mentioned companies on this website in any way. All content is based on my own personal experimentation, experience and opinion. World of Level Design™ and 11 Day Level Design™ are trademarks of AlexG.
Template powered by w3.css