World of Level Design™
Tutorials to Becoming the Best Level Designer and Game Environment Artist (since 2008)
CS:GO SDK Hammer Source "Abandoned House" Workflow (Part 4/5) - Displacement/Terrain and Foliage Tutorial
Category: Source: CSGO SDK, Source: L4D 1 & 2
January 31, 2017
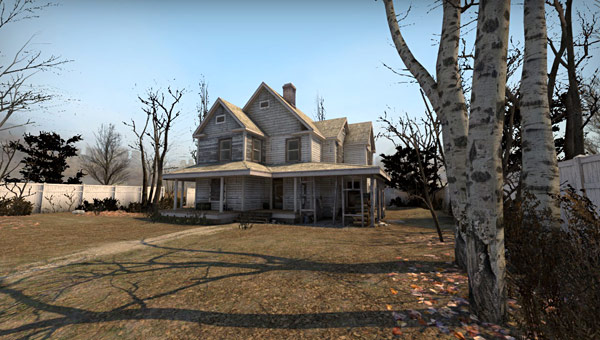
In this 4th part of 5 you will see the creation of displacement (terrain) and foliage process for the "Abandoned House" environment. This process can be applied to any game environment you create with Hammer Source.
If you want to see all 5 parts and start from the beginning click here for all "Abandoned House Workflow" tutorials.
I will be using CS:GO SDK version of Hammer Source, but any Hammer Source version will work with this tutorial including Team Fortress 2, Half-Life 2 and Left4Dead series.
Once I added additional detail to the abandoned house, I move on to terrain and foliage.
Displacement (Terrain)
Terrain is known as displacement in Source. I will use these two terms interchangeably but they mean the same thing.
In Source Engine, terrain is created from BSP brushes.
Creating displacement/terrain itself is very straight-forward process. You create BSP brushes where you want the terrain to be:

Enable Face Edit Sheet:

Select the face of any brush you want to make into displacement:

Then switch over to Displacement tab then click on Create:

The selected brush faces will become displacement and non-selected brush faces will be removed:

Important part is to only select brush faces you want to turn into Displacement through "Face Edit Sheet". Otherwise if you select the brush, open "Face Edit Sheet" then switch over to Displacement and hit Create, this will turn every single brush face into Displacement.
Now, instead of creating a single large BSP brush and then turning that into Displacement like so:

It is better if you construct multiple BSP brushes and arrange them into a grid so everything lines up:

You will end up with more Displacement surfaces but with more control over your terrain. So I took multiple BSP brushes and duplicated them to create a grid pattern. Then I selected top faces only and created Displacement from them:

I used Power of 2 for Displacement:

Power of 2 is the lowest displacement resolution you can have and it is a good place to start when blocking in terrains. You can increase or decrease terrain resolution at any time.
When working with multiple terrain surfaces, it is very important to make sure that all of your displacement is aligned. Meaning that you create and maintain a grid-like pattern where the vertices and resolution is maintained between different terrain patches.
Here are terrain patches that do not align:

This would cause gaps between patches if you attempt to raise/lower the terrain:

Here are terrain patches that are aligned:

Working with this terrain becomes easier as everything stays sewn together:

This grid pattern is important in playable areas so you can avoid gaps between different terrain patches.
Further away, beyond the playable area you don't have to maintain this pattern and allow gaps between these terrain patches as long as the player doesn't seem them.
Outside terrain areas where I hid the gaps from player's view:

I added a fence around the house to help define playable/important area and create a boundary:

Here is the full displacement grid setup I used. Note that most of it is aligned and parts that aren't are in non-playable areas:

Texturing
I now begin to apply textures onto Displacement. Doing it this early in the process will help me visualize terrain sections such as the road and near the house.
I open "Face Edit Sheet", hit Browse and filter for "Blend" or "Nature" textures:

Best way to create believable terrain is to use blend textures that will paint between 2 different materials:

I used the following terrain textures:
- nature/blend_dirtleavesgravel01
- nature/blend_grassdirtleaves01
- nature/blend_dirtleaves_dirt
- concrete/blend_blacktop_05
- nature/blend_dirtleaves_dirt
- nature/blendmilground012_conflr18a
Near the house and under the overhang I use gravel that blends into dirt leaves:

Near the house I use dirt leaves that blend into grass:

On the road I use black top that blends into grass:

Modify Terrain and Paint Textures
Once I have terrain textures applied, I open "Face Edit Sheet" and switch over to Displacement. I select each Displacement section and begin to modify terrain using Paint Geometry:

I use "Raise/Lower" and adjust Distance and Radius:

- Left Mouse = Raise Terrain
- Right Mouse = Lower Terrain
I also switch to Paint Alpha and blend between two available textures:

Use Left or Right Mouse button to paint in/out the terrain texture blend:

I blend various sections near the house:

And road:

I often switch between modifying terrain (raise/lower) and painting textures.
Place Foliage
I begin to include foliage; this includes trees, bushes, shrubs, rocks and grass.
The theme is fall (autumn) so I will be using a lot of foliage without any leaves. This is why I also used terrain texture that contains autumn leaves.
I insert a prop_static and look through what foliage models are available to use. I filter for "trees" and "foliage":

I then insert props I may want to use that fit the environment theme.
With so many props available it is difficult to look through them all and place them at the same time. So I insert what I think I may want to use into the map, but I don't position them yet. I place them next to each other:
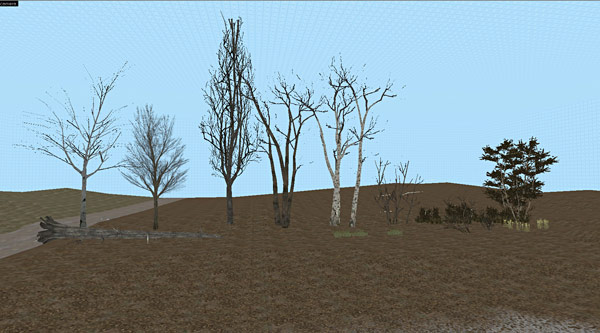
Once I have a series of foliage props inserted, I begin to choose, duplicate and place them around the map:

This method allows quickly place foliage around the map without having to look up each model. It is like a paint palette I see right in front of me so I know what I have to work with. I highly recommend this approach.
I go through various iterations of placing trees, shrubs and bushes to make the arrangement seem natural and aesthetically pleasing:
I duplicate, position and arrange various trees, shrubs and grass around the house:


I do not expand to the exterior boundaries of the map (outside the fence) yet. I only focus around the house, where the player is going to be. Once I have foliage in playable section I then expand to the beyond the house areas which is going to be the focus in the next and final part.
Terrain Decals
I already did a decal pass on part 3 of the series but these were applied to the house. I need to apply a few decals to displacement.
Decals or overlays are textures (materials) that are projected onto existing textured surfaces which include BSP brushes and displacement.
Autumn leaves decals:

Dirt/Ruble decals:

Road damage decals:

I placed these deals into areas where it helps to define extra detail on the terrain and to hide displacement texture repetition.
Walkway and Dirt Piles:
I add additional terrain section for the front house walkway:

For the back of the house:

And a dirt pile with additional props:

These are small additional terrain displacement patches which are placed on top of already existing terrain.
Compile and Test In-Game
Throughout this entire process I compiled to see if everything looked good.


On to Final Part 5
In part 5 of the "Abandoned House" series, I will focus on beyond the house of terrain and foliage to make the environment seem a part of a larger world.
5-Part "Abandoned House" Workflow Tutorial Series:
"Abandoned House" Workflow (Part 1/5) - BSP Block In Hammer Source Tutorial
"Abandoned House" Workflow (Part 2/5) - Texturing in Hammer Source Tutorial
"Abandoned House" Workflow (Part 3/5) - Detailing in Hammer Source Tutorial
"Abandoned House" Workflow (Part 4/5) - Terrain/Displacement and Foliage in Hammer Source Tutorial
"Abandoned House" Workflow (Part 5/5) - Beyond the House and Lighting in Hammer Source Tutorial
Home Terms of Use/Trademarks/Disclaimers Privacy Policy Donate About Contact
All content on this website is copyrighted ©2008-2024 World of Level Design LLC. All rights reserved.
Duplication and distribution is illegal and strictly prohibited.
World of Level Design LLC is an independent company. World of Level Design website, its tutorials and products are not endorsed, sponsored or approved by any mentioned companies on this website in any way. All content is based on my own personal experimentation, experience and opinion. World of Level Design™ and 11 Day Level Design™ are trademarks of AlexG.
Template powered by w3.css


 Maya Foundation: Home-Study Course - Model and UV Environments
 Substance 3D Painter Essentials - Master Texturing
 UE5: Fundamentals Vol.1 - Create with Unreal Engine 5
 UE5: Retro Office Project - Create Beautiful Interior Env
 UE5: Master Material Creation - Create Master Materials in UE5