World of Level Design™
Tutorials to Becoming the Best Level Designer and Game Environment Artist (since 2008)
CS:GO SDK Hammer Source "Abandoned House" Workflow (Part 5/5) - Beyond the House, Lighting and Final Compile Tutorial
Category: Source: CSGO SDK, Source: L4D 1 & 2
February 09, 2017
In this 5th part of "Abandoned House" environment you will see the creation for beyond the house sections, lighting, color correction, fixes and compiling. This process can be applied to any game environment you create with Hammer Source.
Final focus will be on beyond the house or non-playable areas. These will include:
- Props
- Tree Cards
- Additional Foliage
- Sky, Lighting and Fog
- Tonemap and Color Correction
- Various Fixes
- Final Compile
- Cubemaps
- Screenshots
If you want to see all 5 parts and start from the beginning click here for all "Abandoned House Workflow" tutorials.
I will be using CS:GO SDK version of Hammer Source, but any Hammer Source version will work with this tutorial including Team Fortress 2, Half-Life 2 and Left4Dead series.
Props
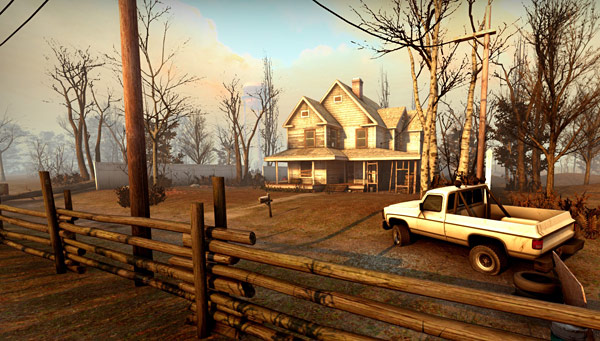
I start off by adding more props to exterior boundaries of the map. These include water tower, corn/cane field, fence, truck and utility poles.
Cane/Corn Filed:
I insert cane field props in front of the house and add a fence around it:

Water Tower:
Water tower is placed far away into the distance behind the house to balance out the composition:

Utility Poles:
Utility pole props are positioned alongside the road and keyframe_rope entities are added for electric wires:

The utility pole and wire is also extended to the house:

Broke Down Truck:
Broken down tow truck is added into the distance down the road:

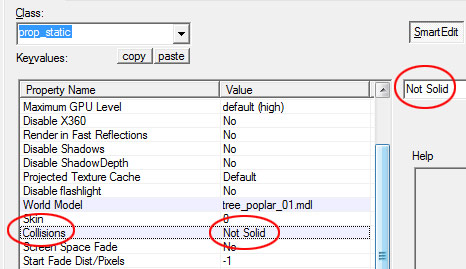
For all props outside the playable area which will not be interacted with, I set Collisions to Not Solid:

Tree Cards
Foliage props must be used in playable areas but to keep your map optimized you have to limit how many of them in your map being rendered onscreen at the same time.
Tree cards are a great way to include more trees without adding more foliage props.
Tree card is a BSP brush with a tree texture applied. This texture contains an alpha channel which removes the background and only the tree is seen:

Placing tree cards outside the player's reach will create a very believable tree line and keep your environment optimized.
I utilize foliage tree cards extensively.
I would have to use a lot of props which would decrease performance of the map, but with a simple BSP brush and a texture I can communicate the same thing:

Tree cards work better and are more optimized if you turn the front face of the BSP brush into displacement and modify it a bit to curve out:

I use 2 different texture tree cards and turn them both into displacement:
- nature/miltree003
- nature/miltree005


I duplicate these 2 tree card displacements all over the map surrounding the exterior boundaries:

I position the tree cards by referencing how the player is going to see it from playable area. I use other views to duplicate and move the tree cards but final position is always looked at from player's point of view:

More Foliage
In part 4, I inserted foliage props only near the house. I now need more foliage props between the tree cards and the playable house section.
I will use the same foliage props as before and position them in the exterior boundaries of the map. I go around the entire environment and duplicate tree and shrub props:

Without the tree cards, the foliage looks bare, but with tree cards in the background the environment begins to look like more real:

All these props have Collisions set to Not Solid:
Again, I am positioning these props from point of view of the player. I do this all around the map:

I can't stress this enough - the only thing that matters is how the player sees and experiences your environment. So you have to constantly position yourself inside the editor from where the player is going to be and compile often to test in-game.
Road Blocks
The road block only needs to be implemented if it is a playable map. It is very likely you are creating an environment that will be played by yourself and by others. So the environment needs to contain a playable area and non-playable area. Abandoned house environment has both. The area within the fence around the house is treated as playable; everything else outside these boundaries is non-playable.

When the environment has large, open non-playable areas, you have to visually communicate which of these areas the player can be in and where they cannot enter. The worst thing you can do is have invisible walls that stop the player without letting them know they cannot go past that point.
For the road I added a truck, few tires, paint bucket and plywood:

The other side of the road includes a fallen tree, tires and corroded panel:

For fence gap near the side of the house, I include few cinder blocks and corroded panel:

These will serve as a way to let the player know that you can't enter beyond these spots. I would also include a BSP brush with "clip" texture applied to prevent the player from ever reaching beyond these areas. This brush will be invisible and block the player in-game:

Updating the Sky
I update the default skybox by going to Map > Map Properties:

Under "Skybox Texture Name" I use "sky_cs15_daylight02_hdr":

You can look up the names of skies to use here from Valve's full sky list for CS:GO.

Fast compile to check out the sky:

Lighting doesn't match the sky right now, but I'll fix this in the next step.
Light Environment and Sun Disk
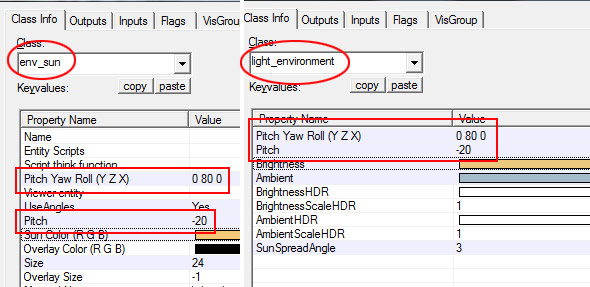
For sun light I use light_environment entity and the following values:
- Pitch Yaw and Roll: 0 80 0
- Pitch: -20
- Brightness: 236 201 128 450
- Ambient: 236 201 128 700
- Sun Spread Angle: 3

The last value in Brightness (450) is light's intensity, while the first 3 values are RGB color values:

Env_sun entity will give you a sun disk in the skybox:

I change Pitch Yaw Roll, Pitch, Use Angles, Sun Color and Size:
- Pitch Yaw and Roll: 0 80 0
- Pitch: -20
- Use Angles: Yes
- Sun Color (R G B): 244 201 121
- Size: 24
- Sun Spread Angle: 3

You have to match the settings for "Pitch Yaw Roll" and "Pitch" values from the light_environment entity to env_sun to make sure the sun disk shows up in the same location in the sky:
Env_sun in-game and updated lighting:


Environment Fog
I insert env_fog_controller entity which gives me atmospheric fog in the environment.
I change the following properties for the fog:
- Fog Enable: Yes
- Primary Fog Color: 146 162 171
- Fog Start: 128
- Fog End: 6500
- Interploate Time: 5
- Far Z Clip Plane: 12000

With Source Engine you have to compile the map to see what your lighting and fog looks like. The downside of using an older engine that doesn't have in-editor real-time lighting preview.
Lighting and fog after quick compile:
Env Cubemaps
Cubemaps calculate reflections in your environment. I had only one cubemap this entire time, now I need to duplicate and position multiple env_cubemaps around the map to calculate more accurate reflections.
I duplicate one for each side of the house, so I end up with 4 cubemaps:

Ideally, you would position a cubemap in areas and near objects that need to have accurate reflections from and around that specific section.
Tonemap
Tonemap is a way to control auto-exposure of your map. Auto-exposure is also known as HDR or High Dynamic Range. This is when your eyes naturally begin to adjust as you walk from dark to light or light to dark environment.
To avoid default HDR, you must insert env_tonemap_controller entity so you can control auto-exposure yourself.
I insert env_tonemap_controller entity and named it "tonemap":

I need to set following three commands:
- Auto Exposure Max
- Auto Exposure Min
- Bloom Scale
In order to find # values I like, I compile the map on HDR and use a few console commands to test the exposure.
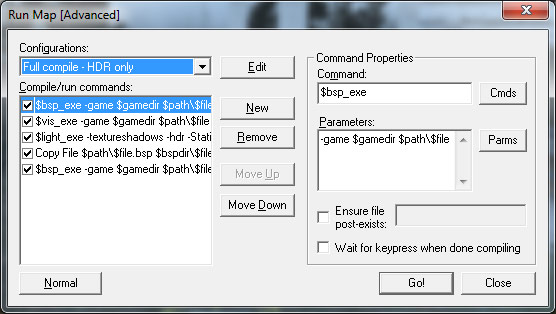
I compile on "Full Compile – HDR Only":
After compiling is finished, I open the map in-game and use following 3 commands to find the values I like:
- ent_fire tonemap setautoexposuremax #
- ent_fire tonemap setautoexposuremin #
- ent_fire tonemap SetBloomScale #
Adjust SetAutoExposureMax in shadows or dark areas of your environment, away from lights:

Adjust SetAutoExposureMin in light areas, where lighting is directly affecting the enviornment:
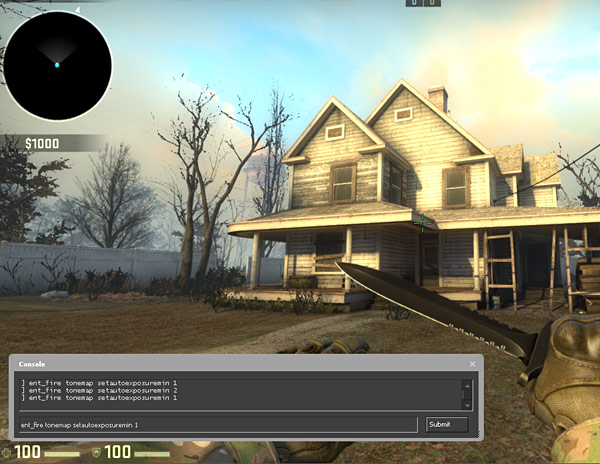
Adjust SetBloomScale in light areas, where lighting directly affecting the environment:

I reach the following values that look good:
- ent_fire tonemap setautoexposuremax 3
- ent_fire tonemap setautoexposuremin 1.5
- ent_fire tonemap SetBloomScale .2
Back in editor, I want to set these commands and values to execute on map start. This is done by using logic_auto entity. So you won't be directly entering these commands into env_tonemap_controller, but through logic_auto entity which will trigger the tonemap.
Insert logic_auto entity:

Open logic_auto properties and go to Outputs. Add the following 3 Outputs:
- My Output: OnMapSpawn
- Target: tonemap
- Target Input: SetAutoExposureMax
- With a Parameter Override of: 3
- My Output: OnMapSpawn
- Target: tonemap
- Target Input: SetAutoExposureMin
- With a Parameter Override of: 1.5
- My Output: OnMapSpawn
- Target: tonemap
- Target Input: SetBloomScale
- With a Parameter Override of: .2

I compile again using "Full Compile - HDR only" to make sure it works:

Color Correction
Color correction is a way to change your environment's colors. You wouldn't need to do this inside the level editor through lighting but rather through Color Correction UI in-game or through Photoshop. You still need to do your best lighting your map with light_environment, lights and fog entities but after that you adjust the colors through color correction.
With color correction technique you can adjust and change any colors in your map and drastically change how your environment looks.
Here are some examples I did.
Default:

Black and White:

Sepia:

Warm Color Palette (the one I chose to keep):

Cool Color Palette:

Launch Counter-Strike: Global Offensive game with "-tools". If you do not, then "colorcorrectionui" will not work:

Load your level in-game and type "colorcorrectionui" in console:


I then go through various options and adjust how I want the colors to look. I spend a lot of time here:

I save the color correction lookup table to be used inside the editor. I named mine "abandonedhouse-cc-warm" but you can name yours anything you want:

Inside the editor I insert color_correction entity:

I set properties to:
- Lookup Falloff End Distance: -1
- Lookup Table Filename: materials/correction/nameofcolorcorrection.raw

I compile to test what it looks like in-game:

There is a lot more to the color correction method, so I recommend for you to check out these 2 step-by-step tutorials (Coming Soon).
Various Fixes
Throughout this entire "Beyond the House" focus, I catch problems and errors that need to be fixed and I take care of them right away. Some of these include props that need to be positioned to the ground, terrain displacement gaps that are seen from playable areas, better texture blending and foliage updates.
Final Compile
You are never really finished working on your map. But at some point, the time comes when you have to call it done and release what you have.
So after you detailed everything you can think of, fixed all errors and problems you found you are ready to run your final compile. To do this, you have to compile your map on "Full compile –both –final (slow!)".
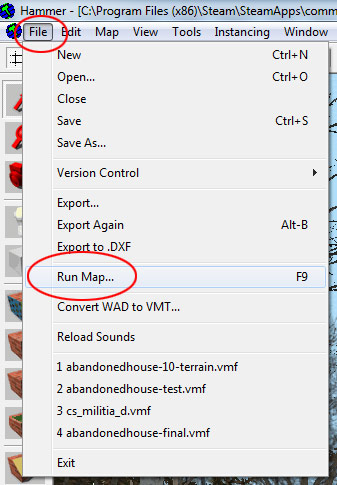
This compile option is available under File > Run Map: Expert option:


The final compile will take a long time. The larger your map, the longer it will take.
Rebuilding Cubemaps
After full compile is finished you have to rebuild your cubemaps. Right now, the map contains old cubemap reflections and they need to be updated.
Load your level in-game and in console type "buildcubemaps":

This will properly re-build your cubemap reflections.
Screenshots
Final step is to take good looking screenshots to showcase the environment.
I take screenshots without hud or player models in the level. For this you need to input a few console commands:
- sv_cheats 1
- bot_kick
- noclip
- cl_drawhud 0
- r_drawviewmodel 0


What's Next
Visit full tutorial list for CS:GO SDK version of Source Engine to learn more beginner and advanced techniques on how to create stand-alone game environments and playable levels.

SUBSCRIBE & GET FREE UE5 PDF GUIDE
Subscribe to receive NEW/UPDATED and FREE "UE5 Beginner's Quick Start Guide" PDF (90 pages).

Visit this page for more info about the guide...
TOP 7 TUTORIAL COURSES FOR 2026
 Modular Environment Design Masterclass Tutorial Course
 Maya Foundation: Home-Study Course - Model and UV Environments
 Substance 3D Painter Essentials - Master Texturing
 UE5: Fundamentals Vol.1 - Create with Unreal Engine 5
 UE5: Retro Office Project - Create Beautiful Interior Env
 UE5: Master Material Creation - Create Master Materials in UE5
 Preproduction Blueprint: Plan Environments and Level Designs
TUTORIAL CATEGORIES
MODULAR ENVIRONMENTS MASTERCLASS

UE5: RETRO OFFICE PROJECT

MAYA FOUNDATION COURSE

SUBSTANCE PAINTER ESSENTIALS

LEARN THE PREPRODUCTION PROCESS

ABOUT WoLD & ALEXG

My name is AlexG. I am self-taught level designer, game environment artist and the creator of World of Level Design.com. I've learned everything I know from personal experimentation and decades of being around various online communities of fellow environment artist and level designers. On World of Level Design you will find tutorials to make you become the best level designer and game environment artist.
Home Terms of Use/Trademarks/Disclaimers Privacy Policy Donate About Contact
All content on this website is copyrighted ©2008-2024 World of Level Design LLC. All rights reserved.
Duplication and distribution is illegal and strictly prohibited.
World of Level Design LLC is an independent company. World of Level Design website, its tutorials and products are not endorsed, sponsored or approved by any mentioned companies on this website in any way. All content is based on my own personal experimentation, experience and opinion. World of Level Design™ and 11 Day Level Design™ are trademarks of AlexG.
Template powered by w3.css