World of Level Design™
Tutorials to Becoming the Best Level Designer and Game Environment Artist (since 2008)
UE5: How to Blend or Combine 2 Normal Map Textures Together Using the Material Editor
Category: UE5
July 30, 2025

Normal Maps are essential for adding depth and detail to surfaces without increasing polygon counts.
In this guide, I'll show you how to blend or combine 2 normal maps in UE5 and control their intensities individually.
Additionally, I'll cover how to create a Static Switch to enable or disable the secondary Normal Map.
Let's get started!
Video Tutorial
Prerequisites
Before diving in, make sure you have:
- 2 Normal Map textures you want to blend between
- A Material and a Material Instance created in UE5 (See Material creation and Material Instance creation tutorials if needed)
- Basic familiarity with the UE5 Material Editor
Basic Setup: Blending Two Normal Maps
To combine 2 Normal Maps:
- Add the BlendAngleCorrectedNormals Node
- Connect 1st Normal Map RGB output to the Base Normal input
- Connect 2nd Normal Map RGB output to the Additional Normals input
- Connect the output of BlendAngleCorrectedNormals node to the Normal input of the main Material node

Controlling Normal Map Intensities
To adjust the intensity of each normal map independently setup the following for EACH of the Normal Maps.
- Add a ComponentMask node and connect the RGB output of Normal Map to its input
- Configure the ComponentMask to isolate the Red and Green channels (this is the default option)
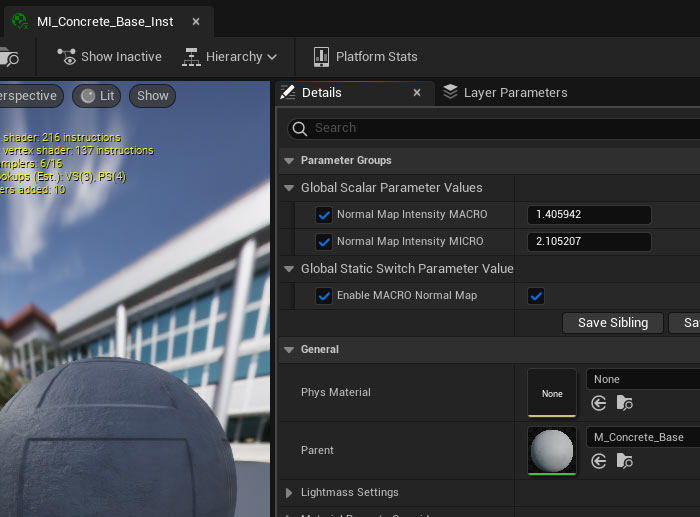
- Create a Scalar Parameter node named "Normal Map Intensity Micro" with a default value of 1
- Add a Multiply node, connecting the ComponentMask output to A and the Scalar Parameter to B.
- Use an AppendVector node to reintroduce the Blue channel
- Connect the Multiply output to Append A
- Set a Constant1Vector node to 1 and connect it to Append B
- Connect the AppendVector output to the Base Normal input of the BlendAngleCorrectedNormals node.
Repeat the same process for the 2nd Normal Map. But rename the Scalar Parameter to something else.
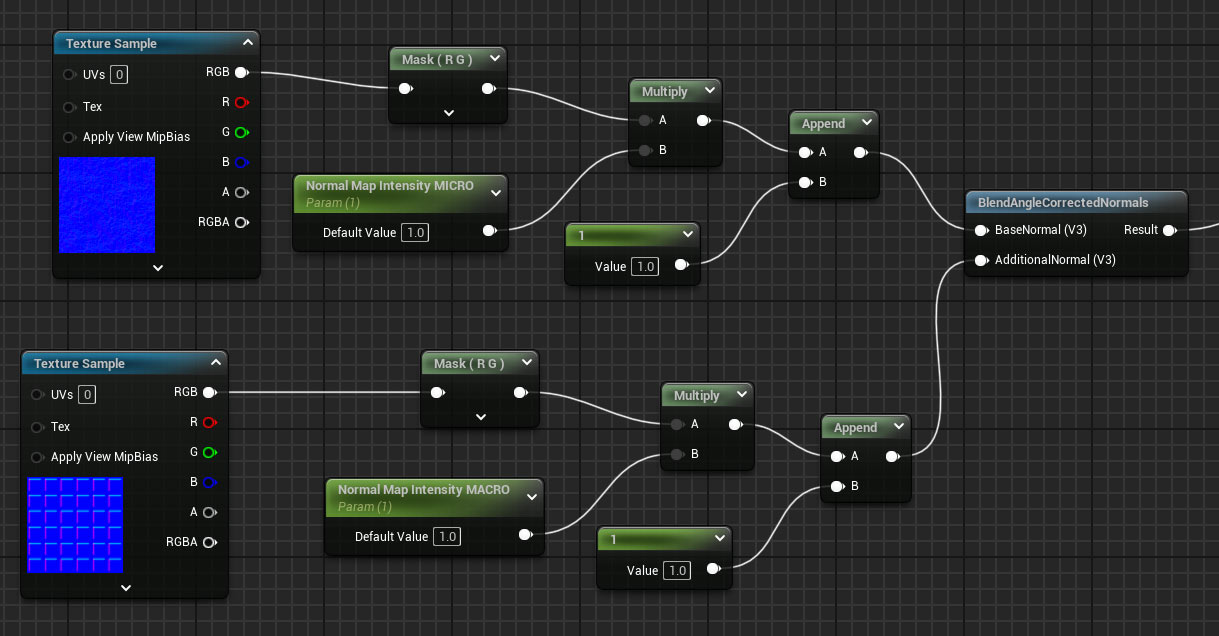
click on image to view full size
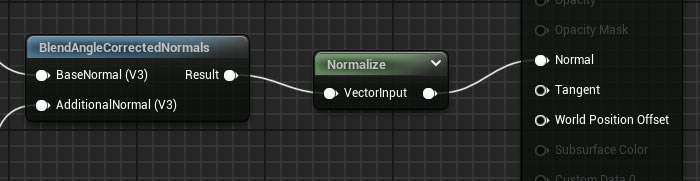
Normalize the Output:
- Add a Normalize node to ensure the blended Normal Map values stay between 0 and 1, preventing lighting artifacts.
- Connect the BlendAngleCorrectedNormals output to the Normalize node, then connect the Normalize output to the Normal input of the main material node.
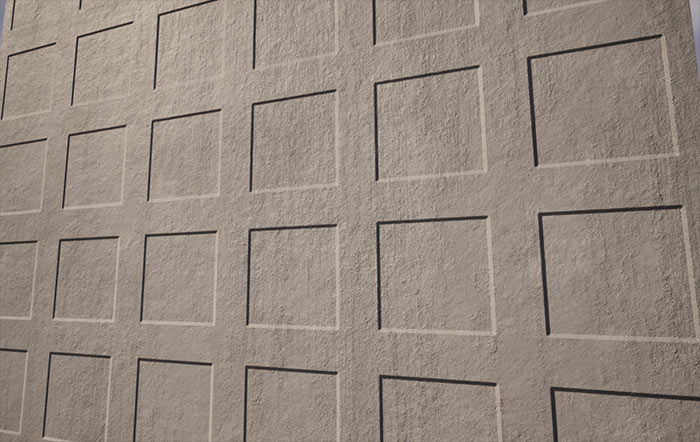
Apply changes and test in the level using the Material Instance.
Adding a Static Switch for Normal Map Blending
This will allow you to have a base Normal Map but then also introduce the second Normal Map on top of the first whenever you want to.
- Add a Static Switch Parameter node and name it
- Connect the first Normal Map setup from AppendVector output to False input of the static switch; this setup will be the default when the switch is off
- Connect the BlendAngleCorrectedNormals output to the True input of the Static Switch. This enables the blended Normal Map when the switch is on.
- Connect the StaticSwitchParameter output to the Normalize node, then connect the Normalize output to the Normal input of the main material node
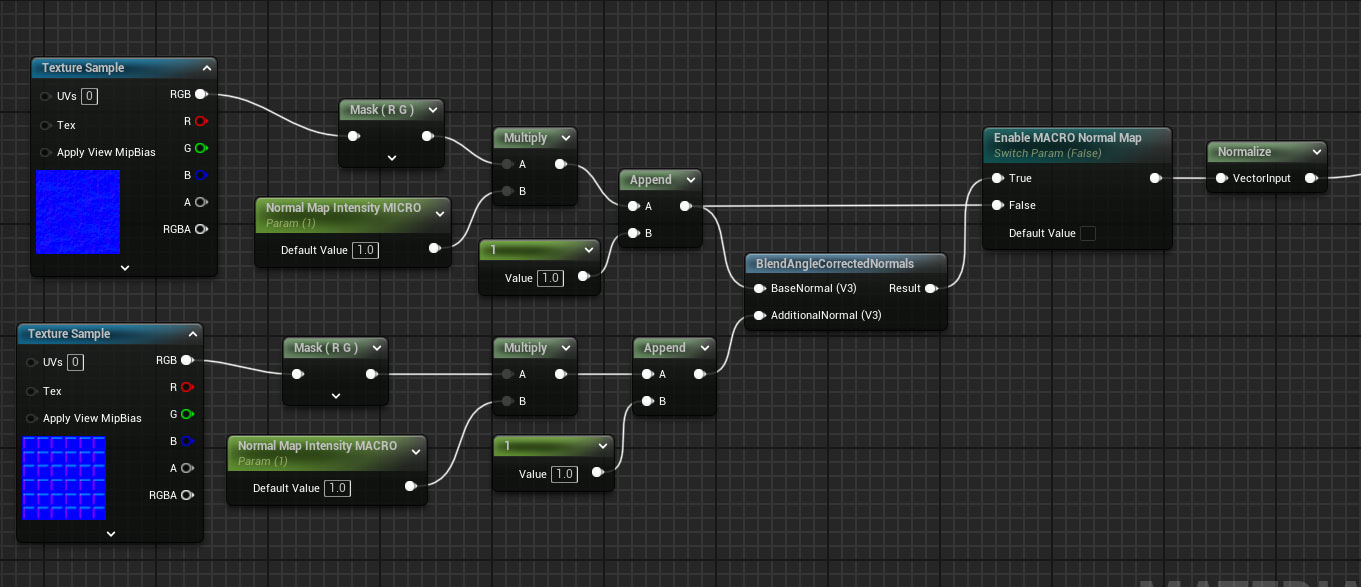
click on image to view full size
Apply the changes and test it inside the level using the Material Instance:
Conclusion
You've now created a flexible UE5 material that blends 2 Normal Maps, allowing you for individual intensity control and includes a Static Switch to toggle the second Normal Map.
For a deeper dive into UE5's Material Editor and master material creation, check out the complete "UE5 Master Material Creation" tutorial course.

SUBSCRIBE & GET FREE UE5 PDF GUIDE
Subscribe to receive NEW/UPDATED and FREE "UE5 Beginner's Quick Start Guide" PDF (90 pages).

Visit this page for more info about the guide...
TOP 7 TUTORIAL COURSES FOR 2026
 Modular Environment Design Masterclass Tutorial Course
 Maya Foundation: Home-Study Course - Model and UV Environments
 Substance 3D Painter Essentials - Master Texturing
 UE5: Fundamentals Vol.1 - Create with Unreal Engine 5
 UE5: Retro Office Project - Create Beautiful Interior Env
 UE5: Master Material Creation - Create Master Materials in UE5
 Preproduction Blueprint: Plan Environments and Level Designs
TUTORIAL CATEGORIES
UE5 FUNDAMENTALS VOL.1 COURSE

UE5: RETRO OFFICE PROJECT

MODULAR ENVIRONMENTS MASTERCLASS

LEARN THE PREPRODUCTION PROCESS

ABOUT WoLD & ALEXG

My name is AlexG. I am self-taught level designer, game environment artist and the creator of World of Level Design.com. I've learned everything I know from personal experimentation and decades of being around various online communities of fellow environment artist and level designers. On World of Level Design you will find tutorials to make you become the best level designer and game environment artist.
Home Terms of Use/Trademarks/Disclaimers Privacy Policy Donate About Contact
All content on this website is copyrighted ©2008-2024 World of Level Design LLC. All rights reserved.
Duplication and distribution is illegal and strictly prohibited.
World of Level Design LLC is an independent company. World of Level Design website, its tutorials and products are not endorsed, sponsored or approved by any mentioned companies on this website in any way. All content is based on my own personal experimentation, experience and opinion. World of Level Design™ and 11 Day Level Design™ are trademarks of AlexG.
Template powered by w3.css