World of Level Design™
Tutorials to Becoming the Best Level Designer and Game Environment Artist (since 2008)
UE5: Definitive Beginner Crash Course Guide to Standard Material Creation for Environment Assets and Props
Category: UE5
July 21, 2025

Welcome to the ultimate beginner's guide to creating materials for environment assets and props using Unreal Engine 5 Material Editor.
This tutorial covers everything you need to know to get started, including techniques, tips and tricks often overlooked by other.
By the end, you'll be ready to create quality materials for your environments and props.
For those looking to dive deeper after this tutorial, check out the "UE5 Master Material Creation" tutorial course to elevate your skills further.
Let's get started!
Video Tutorial
Setting Up Your Material in the Content Browser
Navigate to the folder where you want to store your Material in the UE5 Content Browser. Organizing assets is key, so create a subfolder (e.g., "Materials") by right-clicking in the folder, selecting New Folder, and naming it.
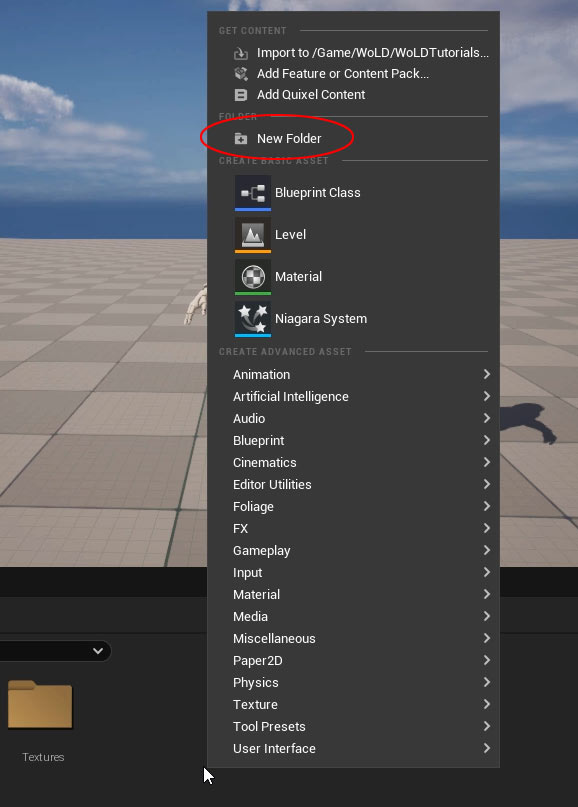
Right-click in the empty space, select Material from the context menu, or use the Add button and choose Material.

- Name your material using the recommended prefix M_, such as M_MyFirstMaterial. Avoid spaces in the name.
- To rename a material later, right-click it and select Rename or press F2.
- Double-click the material to open the Material Editor, which can be docked above the viewport or used as a floating window.
Navigating the Material Editor
- Panning: Right-click, hold, and drag.
- Selecting Nodes: Left-click or marquee-select by holding left-click and dragging.
- Deselecting: Left-click in empty space.
- Zooming: Use the mouse scroll wheel or hold Alt, right-click and drag left/right.
- Details Panel: Updates based on the selected node, showing its properties.
- Deleting Nodes: Select a node and press Delete.
- Saving: Click the Save button to avoid losing work (indicated by an asterisk in the tab).
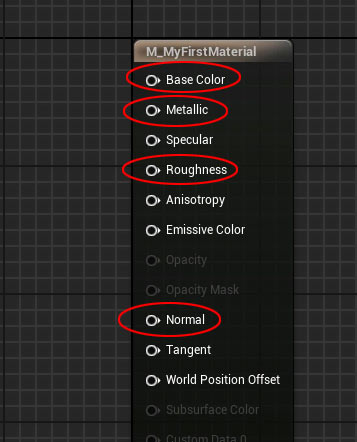
The Material Editor starts with a blank Master Material Node, where you'll connect textures and nodes to define your material's appearance. Key inputs for a standard Physically Based Rendering (PBR) material include Base Color, Metallic, Roughness, and Normal.
Understanding PBR Essential Texture Maps
PBR materials rely on specific texture maps to achieve realistic results.
Here's a breakdown of the essentials:
- Base Color (Albedo/Diffuse): Defines the surface color under neutral lighting, without shadows or highlights.
- Normal Map: Adds the illusion of surface detail (e.g., bumps, dents, scratches) without extra geometry. A flat plane with a normal map can appear to have surface detail as if it were modeled.
- Roughness: Controls how smooth or rough a surface is, affecting light reflection. Values range from 0 (shiny, glossy) to 1 (rough, matte).
- Metallic: Determines if a surface is metal (1) or non-metal (0). Metallic textures use black (non-metal) and white (metal) values, with no in-between unless specified by a texture.
Importing Textures
To create a material, you'll need textures.
If you don't have textures, UE5's Starter Content folder offers sample textures for practice.
- Create a subfolder (e.g., "Textures") in your project to stay organized.
- Import textures by dragging them into the Textures folder in the Content Browser.
For packed textures (e.g., Roughness in the Green channel, Metallic in the blue channel), open the texture in the Texture Editor, disable sRGB and save. This ensures black-and-white values have no Gamma correction applied and remain Linear Color to appear correctly in UE5.

Building the Material: Step-by-Step
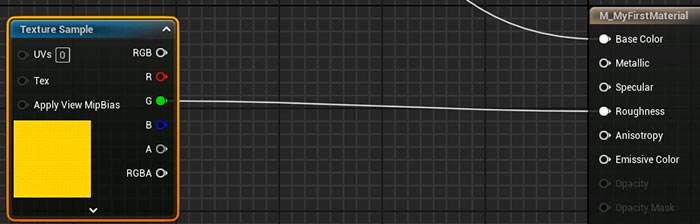
1. Base Color
- In the Material Editor, drag the base color texture into the graph.
- Connect the RGB output to the Base Color input of the Material Node.

2. Applying Materials to Static Meshes
To test your Material, apply it to a static mesh in your level:
Local Application: Drag the material from the Content Browser onto a mesh in the viewport. This applies the material only to that instance.
Global Application: Applies the Material to every used instance of the Static Mesh and this is done through Static Mesh Editor:
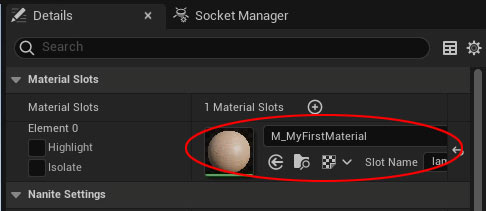
- Open the mesh in the Static Mesh Editor by double-clicking it.
- In the Details panel, under Materials, replace the default material (e.g., World Grid Material) with your material.
- Click Apply and Save. All instances of this mesh will now use your material.
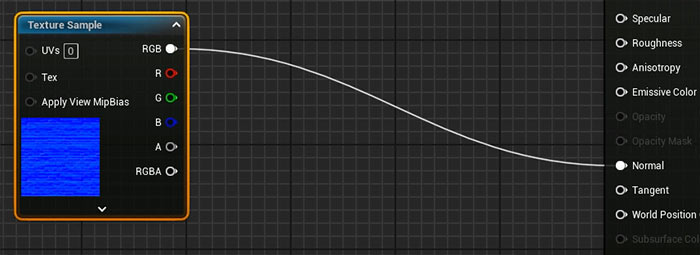
3. Normal Map
- Drag the normal map texture into the Material Editor.
- Connect the RGB output to the Normal input of the Master Material Node.
- Click Apply to see the added surface detail in the level. The normal map creates the illusion of depth (e.g., raised bricks) without extra polygons.
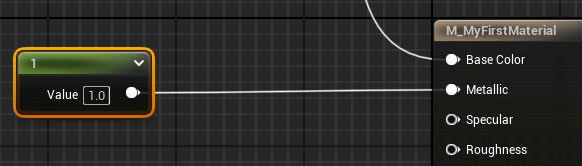
4. Roughness
- For a quick test, add a Constant 1 Vector node (shortcut: hold 1 and left-click).
- Set its value between 0 (shiny) and 1 (matte).
- Connect the node to the Roughness input and click Apply.

For more accuracy, use a Roughness texture:
- Drag the packed texture into the Material Editor.
- Connect the Green Channel (roughness) to the Roughness input.
- This adds variation to the Roughness through a texture.
5. Metallic
By default, metallic is set to 0 (non-metal).
To create a metallic material:
- Add a Constant 1 Vector node and set it to 0 (non-metal) or 1 (metal). Connect it to the Metallic input.
For a partially metallic Material you'll need a Metallic Texture:
- Import the texture.
- Disable sRGB for the packed texture in the Texture Editor.
- In the Material Editor, connect: Metallic: Blue channel to Metallic (if you used Substance Painter to generate this packed texture).
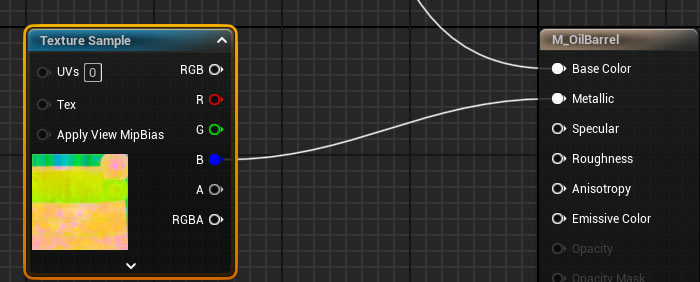
This creates a material parts that are metallic and parts that are non-metallic.
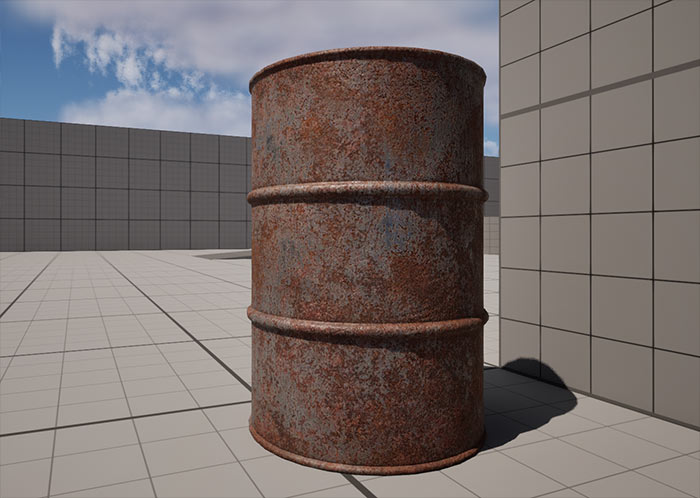
Next Steps: Mastering Material Creation
You now have a solid foundation for creating PBR materials in UE5. This basic material is usable but can be enhanced with additional techniques like color adjustments, normal map intensity, roughness intensity and more. Check out "UE5: Master Material Creation Tutorial Course" for in-depth, step-by-step guidance on mastering the Material Editor for environments and props.

SUBSCRIBE & GET FREE UE5 PDF GUIDE
Subscribe to receive NEW/UPDATED and FREE "UE5 Beginner's Quick Start Guide" PDF (90 pages).

Visit this page for more info about the guide...
TOP 7 TUTORIAL COURSES FOR 2026
 Modular Environment Design Masterclass Tutorial Course
 Maya Foundation: Home-Study Course - Model and UV Environments
 Substance 3D Painter Essentials - Master Texturing
 UE5: Fundamentals Vol.1 - Create with Unreal Engine 5
 UE5: Retro Office Project - Create Beautiful Interior Env
 UE5: Master Material Creation - Create Master Materials in UE5
 Preproduction Blueprint: Plan Environments and Level Designs
TUTORIAL CATEGORIES
UE5 FUNDAMENTALS VOL.1 COURSE

UE5: RETRO OFFICE PROJECT

MODULAR ENVIRONMENTS MASTERCLASS

LEARN THE PREPRODUCTION PROCESS

ABOUT WoLD & ALEXG

My name is AlexG. I am self-taught level designer, game environment artist and the creator of World of Level Design.com. I've learned everything I know from personal experimentation and decades of being around various online communities of fellow environment artist and level designers. On World of Level Design you will find tutorials to make you become the best level designer and game environment artist.
Home Terms of Use/Trademarks/Disclaimers Privacy Policy Donate About Contact
All content on this website is copyrighted ©2008-2024 World of Level Design LLC. All rights reserved.
Duplication and distribution is illegal and strictly prohibited.
World of Level Design LLC is an independent company. World of Level Design website, its tutorials and products are not endorsed, sponsored or approved by any mentioned companies on this website in any way. All content is based on my own personal experimentation, experience and opinion. World of Level Design™ and 11 Day Level Design™ are trademarks of AlexG.
Template powered by w3.css