World of Level Design™
Tutorials to Becoming the Best Level Designer and Game Environment Artist (since 2008)
The following quick tips series is created for beginners and experts using Maya.
These are quick useful tips to help improve and show techniques you may have not known or forgotten about.
All videos are very short, between 1-5 minutes.
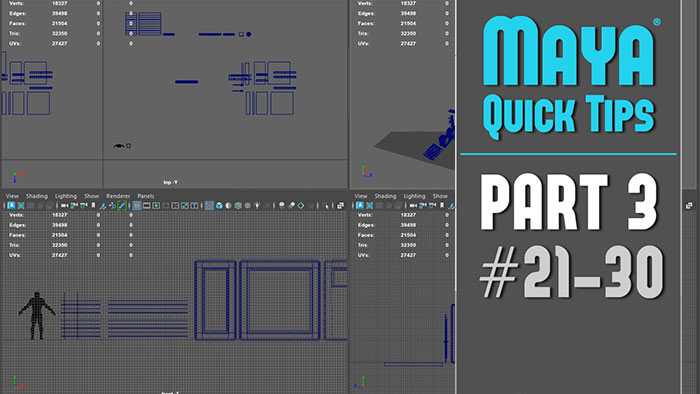
The following Part 3 includes 10 quick tips:
- Tip #21: Fix UVs Disappear When Combining Objects
- Tip #22: Converting Edges to a Curve to Extrude and Create Complex Geometry
- Tip #23: Fix Viewport Grid Doesn't Show and Objects Disappear
- Tip #24: Renaming Multiple Objects at the Same Time
- Tip #25: Fix - Green Polygon Material Color on Faces
- Tip #26: Add Extra Edges Using Bevel for Modeling Detail While Preserving Your Mesh
- Tip #27: Use One of These UV Grid Textures to Help and Improve UVing
- Tip #28: Vertices Geometry CleanUp - Merge and Target Weld Vertices to Center
- Tip #29: Fix Hidden Overlapping Vertices and Cleanup Your Meshes Quick (Merge Vertices)
- Tip #30: Make Textures Appear Beyond 0-1 UV Layout Space Inside UV Editor (Image Range)
Maya: Quick Tip Series:
- Part 1 (Tips #1-10)
- Part 2 (Tips #11-20)
- Part 3 (Tips #21-30) - current
Maya Tip #21: Fix UVs Disappear When Combining Objects
When combining objects together, you may see UVs disappear. This is due to different UV set names.
You have to keep all the UV set names the same across all objects for them to NOT disappear.
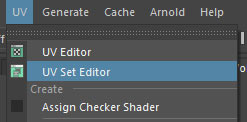
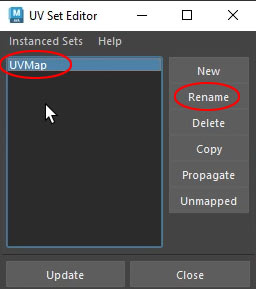
Before combining, select each object and check the UV Set name. Inside the UV Editor go to UV Sets > UV Set Editor:
To rename, select the UV set name and choose Rename, then rename it to contain the same name as the other object's UV sets.
Now combine and your UVs will no longer disappear.
Maya Tip #22: Converting Edges to a Curve to Extrude and Create Complex Geometry
You'll often need to create spiral railings or other geometry that follows edges along existing geometry.
To do this quickly you can convert existing edges to a curve.
Select edges from existing geometry you want to convert to a curve. Then go to Modify > Convert: Polygon Edges to Curve:
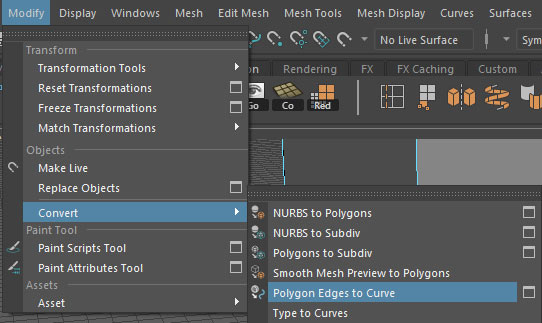
You now have a curve that aligns to the existing edges and one you can extrude geometry along.
Select the curve and then either use:
- Sweep Mesh
- Extrude Geometry Along Curve
This will create the geometry you need using the curve.
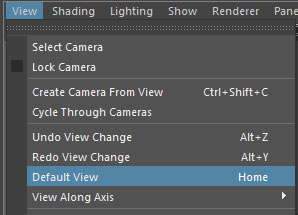
Maya Tip #23: Fix Viewport Grid Doesn't Show and Objects Disappear
First check Display > Grid:
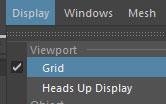
Then check each individual viewport has Show > Grid enabled:
If not of the above work, the solution is go to View and select Default View:
Maya Tip #24: Renaming Multiple Objects at the Same Time
Selecting multiple objects and renaming them through the Channel Box doesn't work. This will only rename one object while keep all the names default.
Here is how to rename multiple objects correctly.
Select multiple objects inside the scene you want to rename.
Change to Rename option in the Status Line:
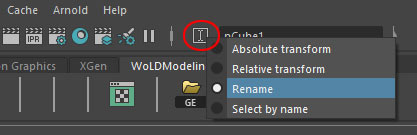
Then type in the new name. All selected objects will now have the name you assigned and a numeric value appended to it.
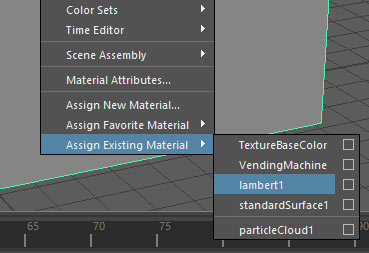
Maya Tip #25: Fix - Green Polygon Material Color on Faces
There are times when you bridge edges to create new faces, Maya will assign a Green color material onto them.
This means the faces are missing a material. Maya doesn't know what to assign and gives you a missing material error by showing you green color material.
To fix this simply select the entire mesh at object level or those individual green faces and apply a Lambert1 material or any other material you were using on the mesh.
Right-Click hold then go to Assign Existing Material and select the material you want to assign:
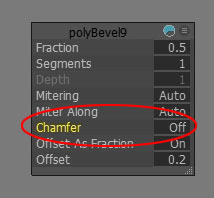
Maya Tip #26: Add Extra Edges Using Bevel for Modeling Detail While Preserving Your Mesh
Beveling an edge but disabling Chamfer will let you add extra edges to each side of the edge, equal distance from each other while preserving the mesh.
Bevel with Chamfer Off will keep your edges intact and not round them out. Helping you add edge and face detail where needed.
- Select a set of edges
- Bevel it (Ctrl+B)
- Turn Chamfer Off
- Add Segments, Adjust Fraction
Maya Tip #27: Use One of These UV Grid Textures to Help and Improve UVing
I don't like using the Default Checker Pattern. It's not as easy to track down problems and work with as when using UV grid textures.
Instead I use one of these Grid Textures:
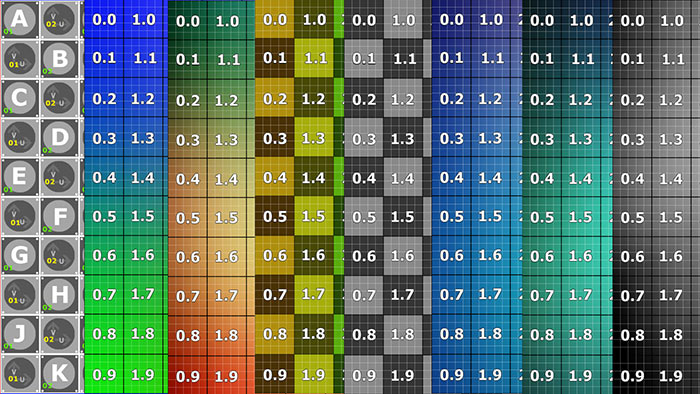
Specifically, UV Grid Textures help with:
- Showing you which parts of the mesh needs to be UVed
- Tracking down UV distortions such as compression or stretching faster
- Flipped or incorrectly oriented UVs are easier to spot
- Matching Texel Density between different mesh sections or different meshes becomes easier to see and set
If you want to get these UV Grid Textures to use to help you improve UVing, get them here on WoLD Patreon.
First, make sure to place the UV Grid Textures into the SourceImages folder of Maya project.
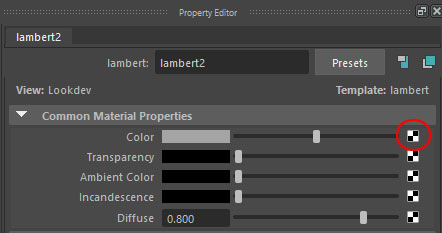
Then follow these steps to assign the Grid Texture as Base Color into the Material.
Step 1: create a new Lambert Material:

Step 2: click on Color Checker Box:
Step 3: Choose File:
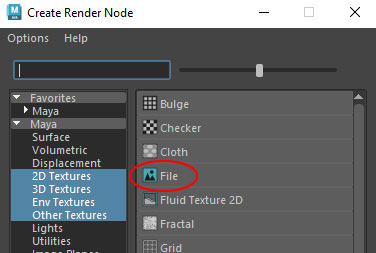
Step 4: Under File Attributes and Image Name, choose folder icon:
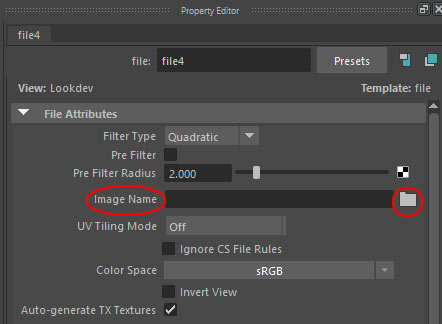
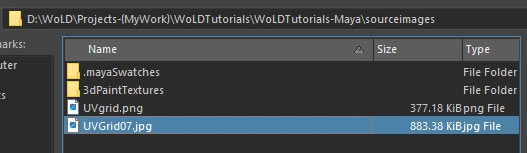
Step 5: Choose the UV Grid Texture inside SourceImages folder and select Open:
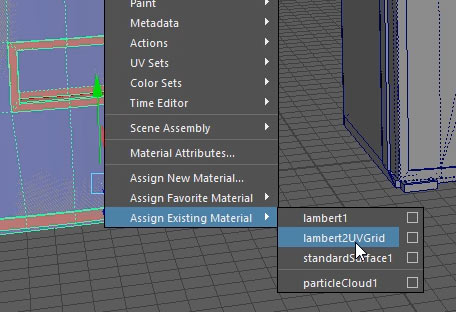
Step 6: right-click on the mesh and choose Assign Existing Material > NameOfMaterial you just setup:
Enable the following shortcut in Perspective Viewport:
- 6 = Texture View
Enable the following shortcut in UV Layout View:
- 5 = Shaded UV View
- 6 = Image Display (if you want to see the Texture also appear in UV Editor)
Maya Tip #28: Vertices Geometry CleanUp - Merge and Target Weld Vertices to Center
Two ways to clean-up vertices and make sure you maintain a centerline. Merge Vertices and Target Weld.
Target Weld:
Switch to vertex component mode then enable Target Weld.
- Middle Mouse Click and Drag = Merge Vertices to Center
Use Middle-Mouse Click and Drag between 2 vertices to merge them to center. A green dot will pop-up, showing the exact midpoint between these two vertices prior to welding. By repeating Middle-Mouse Click and Drag, you'll merge vertices precisely in the center, keeping your centerline intact.
Merge Vertices:
Alternatively, you can use Merge Vertices instead of Target.
Here's the trick: select only the two vertices you want to merge. Then go to Edit Mesh > Merge, or use a shortcut key to access Merge Vertices quicker: Hold Shift + Right Click Hold, choose Merge Vertices and then Merge Vertices again.
- Hold Shift + Right Click Hold = Modeling Context Menu
Then, keep picking two vertices and press G to repeat Merge Vertices, merging them to the center. It's a simple, reliable way to clean up your geometry quickly.
Maya Tip #29: Fix Hidden Overlapping Vertices and Cleanup Your Meshes Quick (Merge Vertices)
When working on a 3D mesh, vertices can often overlap, occupying the same position. These overlapping vertices are impossible to spot. And if not fixed, they will cause issues with UVing, baking, rendering, rigging, animation.
For instance, consider a modular wall asset with a window. At first glance, the mesh appears fine - no obvious issues stand out. However, there are overlapping vertices. Selecting all vertices on the mesh shows 246 vertices. By running Merge Vertices with a low distance threshold (0.01), it brings down the number to 240. So there were 6 vertices fixed.
The merge operation is straightforward but requires careful attention to the distance threshold. A low threshold, such as 0.01, ensures that only vertices extremely close to one another (effectively overlapping) are merged, preserving the mesh's geometry.
To run Merge Vertices and fix your mesh, follow these steps:
- Select All Vertices: Switch to vertex selection mode and select all vertices on your mesh.
- Run the Merge Operation: Go to Edit Mesh > Merge and use a low distance threshold (e.g., 0.01) to merge only overlapping vertices.
- Monitor Vertex Count: Note the vertex count before and after merging. A decrease indicates that overlapping vertices were removed.
- Inspect the Mesh: Navigate around the mesh to ensure no unintended collapsing or distortion occurred. Pay special attention to complex areas like corners or edges.
- Repeat Periodically: Perform this check periodically or whenever you notice irregularities in your mesh or just want to run clean-up.
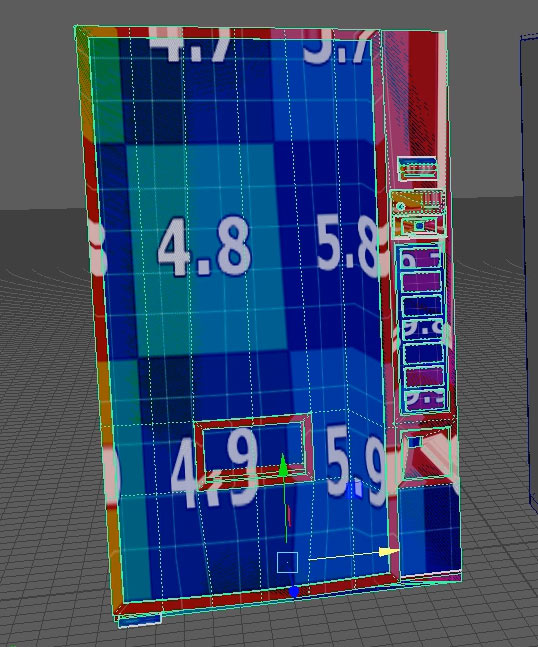
Maya Tip #30: Make Textures Appear Beyond 0-1 UV Layout Space Inside UV Editor (Image Range)
The UV editor's default texture view is limited to the 0 to 1 UV space, which is ideal for most texturing but restrictive for tiling textures or trim sheets.
For tiling textures and trim sheets, UVs will often extend beyond this range as the texture repeats itself outside this 0 to 1 space. This is common practice for many modular assets.
Problem is you won't see the texture repeat outside this 0-1 space unless you do the following.
Step 1: To toggle the texture display inside the UV editor, press the 6 key. This will show the texture applied to your mesh.
Step 2: In UV editor, go to Image > Image Range Options. The default settings for Minimum U/V and Maximum U/V are set to 0 and 1, restricting the texture to the 0 to 1 UV space.
To expand the texture display, modify these values:
- Set Minimum U and Minimum V to a negative value (e.g., -2) to tile the texture left and downward.
- Set Maximum U and Maximum V to a positive value (e.g., 2) to tile the texture right and upward.

The texture will now repeat and tile outside 0-1 UV space.

SUBSCRIBE & GET FREE, UPDATED PDF GUIDE
Subscribe to receive FREE & Updated "Maya 3D Primer" PDF Guide (200+ pages).

See more about this Free PDF Guides and what you are subscribing to.
TOP 7 TUTORIAL COURSES FOR 2026
 Modular Environment Design Masterclass Tutorial Course
 Maya Foundation: Home-Study Course - Model and UV Environments
 Substance 3D Painter Essentials - Master Texturing
 UE5: Fundamentals Vol.1 - Create with Unreal Engine 5
 UE5: Retro Office Project - Create Beautiful Interior Env
 UE5: Master Material Creation - Create Master Materials in UE5
 Preproduction Blueprint: Plan Environments and Level Designs
TUTORIAL CATEGORIES
MAYA FOUNDATION COURSE

SUBSTANCE PAINTER ESSENTIALS

MODULAR ENVIRONMENTS MASTERCLASS

UE5: RETRO OFFICE PROJECT

LEARN THE PREPRODUCTION PROCESS

ABOUT WoLD & ALEXG

My name is AlexG. I am self-taught level designer, game environment artist and the creator of World of Level Design.com. I've learned everything I know from personal experimentation and decades of being around various online communities of fellow environment artist and level designers. On World of Level Design you will find tutorials to make you become the best level designer and game environment artist.
Home Terms of Use/Trademarks/Disclaimers Privacy Policy Donate About Contact
All content on this website is copyrighted ©2008-2024 World of Level Design LLC. All rights reserved.
Duplication and distribution is illegal and strictly prohibited.
World of Level Design LLC is an independent company. World of Level Design website, its tutorials and products are not endorsed, sponsored or approved by any mentioned companies on this website in any way. All content is based on my own personal experimentation, experience and opinion. World of Level Design™ and 11 Day Level Design™ are trademarks of AlexG.
Template powered by w3.css