World of Level Design™
Tutorials to Becoming the Best Level Designer and Game Environment Artist (since 2008)
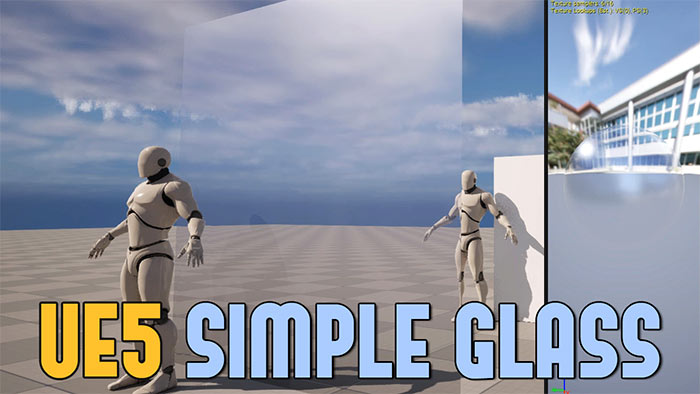
In this tutorial, I'll walk you through the process of creating a simple glass material using UE5's standard material editor.
You'll learn how to configure the main Material node, adjust key properties like opacity, roughness, base color, and refraction and propagate these settings to a Material Instance.
While this is a basic glass setup, it provides a solid foundation for creating transparent surfaces in your levels.
If you are looking for advanced glass setup, see this tutorial.
Let's begin!
Video Tutorial
Creating the Glass Material
Step 1: Create a New Material
- In the Content Browser, right-click in empty space select Material to create a new material and name it (e.g., M_Glass_Simple).
- Double-click the material to open the Material Editor.
Step 2: Configure the Main Node
- Change the Blend Mode from Opaque to Translucent. This allows light to pass through, creating a see-through effect.
- Note: Translucent materials are more expensive but provide the best visual results for glass.
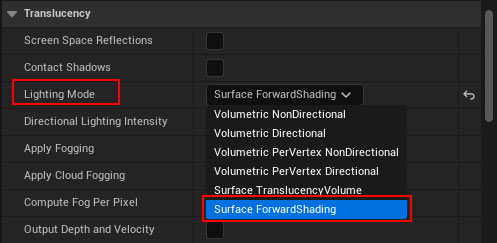
- Under Translucency, set the Lighting Mode to Surface Translucency Volume for a balance of performance and quality. Later, we'll change this to Surface Forward Shading for better looking glass.

Setting Up Initial Glass Properties
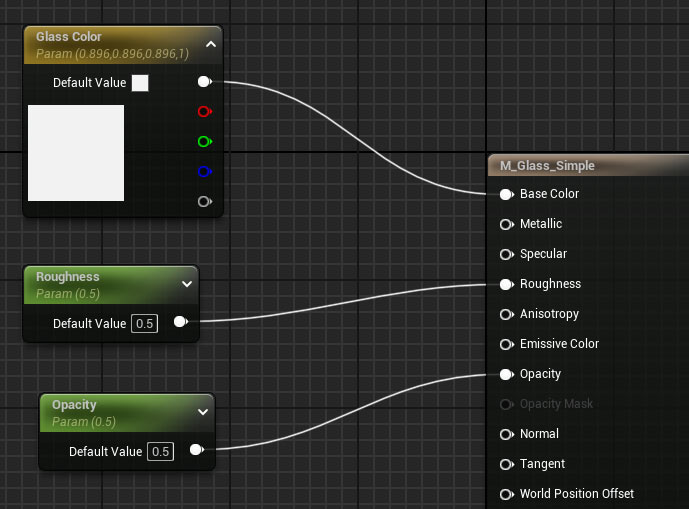
Opacity
- Create a Scalar Parameter (hold S and left-click).
- Name it Opacity and set a default value of 0.5 (adjustable between 0 and 1).
- Connect it to the Opacity input of the main node.
Roughness
- Create another Scalar Parameter, name it Roughness, and set a default value of 0.5.
- Connect it to the Roughness input to control how shiny or diffuse the glass appears.
Base Color
- Create a Constant 3 Vector (hold 3 and left-click) to define the glass color.
- Right-click and convert it to a parameter, naming it Glass Color.
- Set a default color and connect it to the Base Color input.
Testing the Material Instance
- In the Content Browser, right-click the material (M_Glass_Simple) and select Create Material Instance. Name it (e.g., MI_Glass_Simple).
- Drag the material instance onto any Static Mesh inside your scene for testing.
- Double-click the material instance to open its properties.
- Start adjusting ands testing various parameters we've set up.
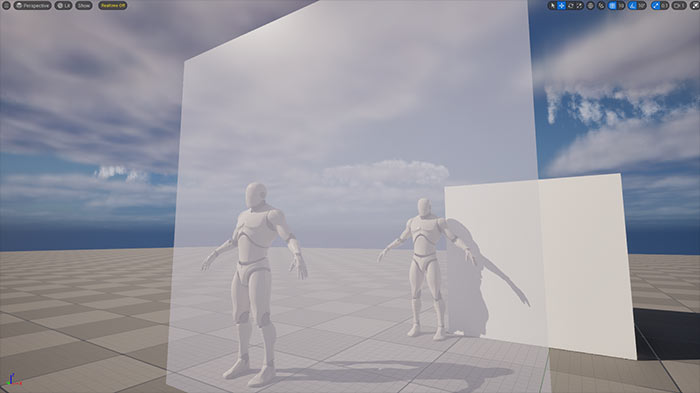
At this stage, the material may resemble plastic more than glass. Let's fix that by tweaking the metallic property.
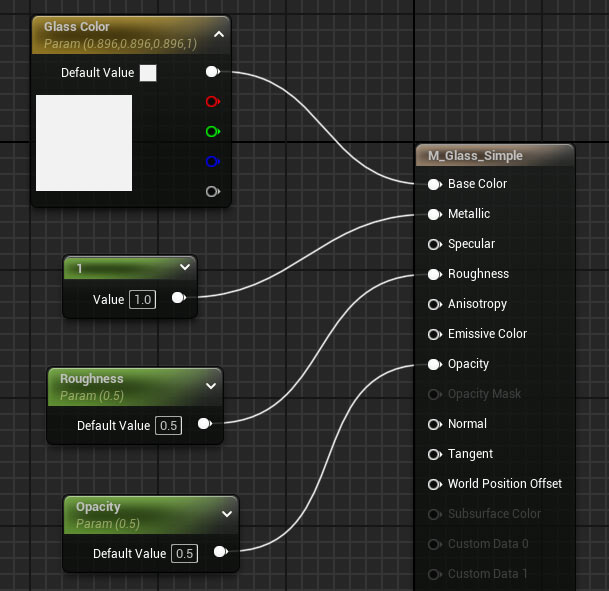
Enhancing the Glass Look with Metallic
- In the Material Editor, create a Constant 1 Vector (hold 1 and left-click) and set its value to 1.
- Connect it to the Metallic input. While glass isn't metallic, enabling this property improves its reflective qualities, making it look more realistic.
The glass should now look more realistic.
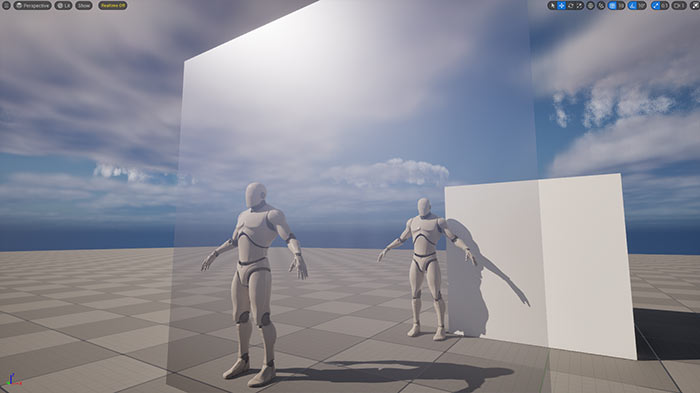
Adding Refraction for Realism
Refraction creates the distortion effect seen when looking through glass, especially at certain angles.
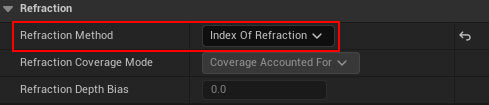
In the Material Editor, select the Main Node and enable Refraction by setting the Refraction Method to Index of Refraction.
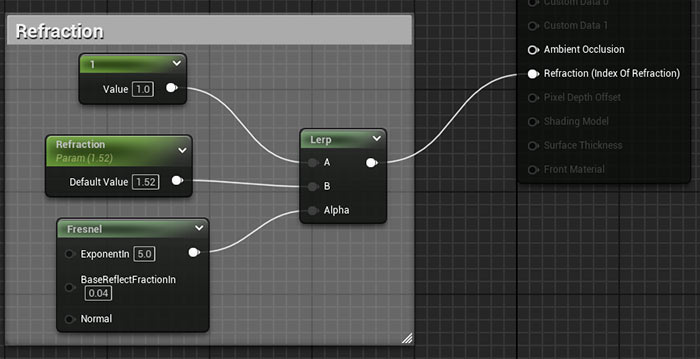
- Create a Scalar Parameter named Refraction with a default value of 1.52 (the physically accurate index of refraction for glass).
- To enhance the effect, add a Fresnel Node: Right-click, search for Fresnel, and add it.
- Create a Constant 1 Vector with a value of 1.
- Create a Lerp (Linear Interpolate) node (hold L and left-click).
- Connect the Constant 1 Vector to Lerp A, the Refraction parameter to Lerp B, and the Fresnel node to Alpha.
- Connect the Lerp output to the Refraction input of the main node.
In the viewport, you'll notice distortion around the edges of the glass, which can be adjusted by tweaking the Refraction value in the material instance (e.g., increasing or decreasing from 1.52).
Switching to Surface Forward Shading
For better visual glass quality: change the Lighting Mode from Surface Translucency Volume to Surface Forward Shading.
- Surface Translucency Volume: This is a cheaper option that still allows for realistic lighting interactions with translucent materials.
- Surface Forward Shading: This offers the highest quality translucency rendering, calculating lighting per-pixel for each light, but it is more expensive.
The glass will now reflect light more accurately, with the Roughness parameter having a more pronounced effect. Lower roughness values (e.g., 0.1) make the glass shinier, while higher values (e.g., 0.5) make it more rough.
Organizing the Material Instance
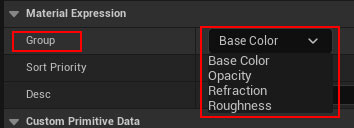
To keep the material instance user-friendly: In the Material Editor, assign groups to parameters.
- Set Glass Color to the Base Color group.
- Set Roughness to the Roughness group.
- Set Opacity to the Opacity group.
- For refraction nodes, select them, press C to comment, and label the comment Refraction. Assign the refraction scalar parameter to the Refraction group.
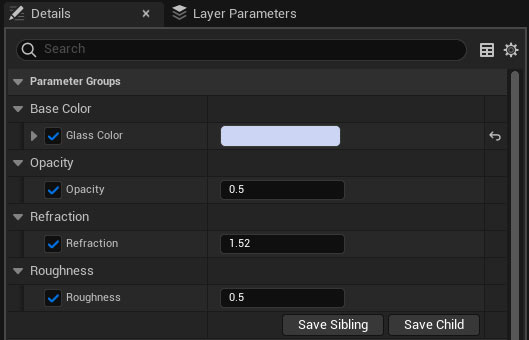
In the material instance, parameters will now be neatly organized under their respective groups.
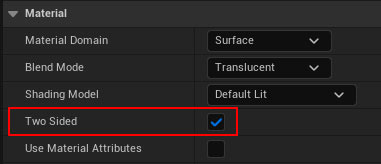
Enabling Two-Sided Glass
If you're applying the glass material to a single plane and want it to render on both sides, in the Material Editor, select the Main Node and enable Two Sided.
Alternatively, in the Material Instance, go to Material Property Overrides and toggle Two Sided.
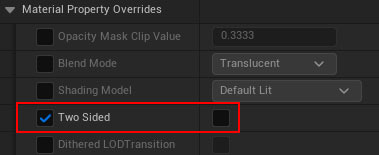
The glass will now render on both sides of the plane.
Complete UE5 Material Graph Setup (Simple Glass)
Here is the full material editor graph setup for simple glass:
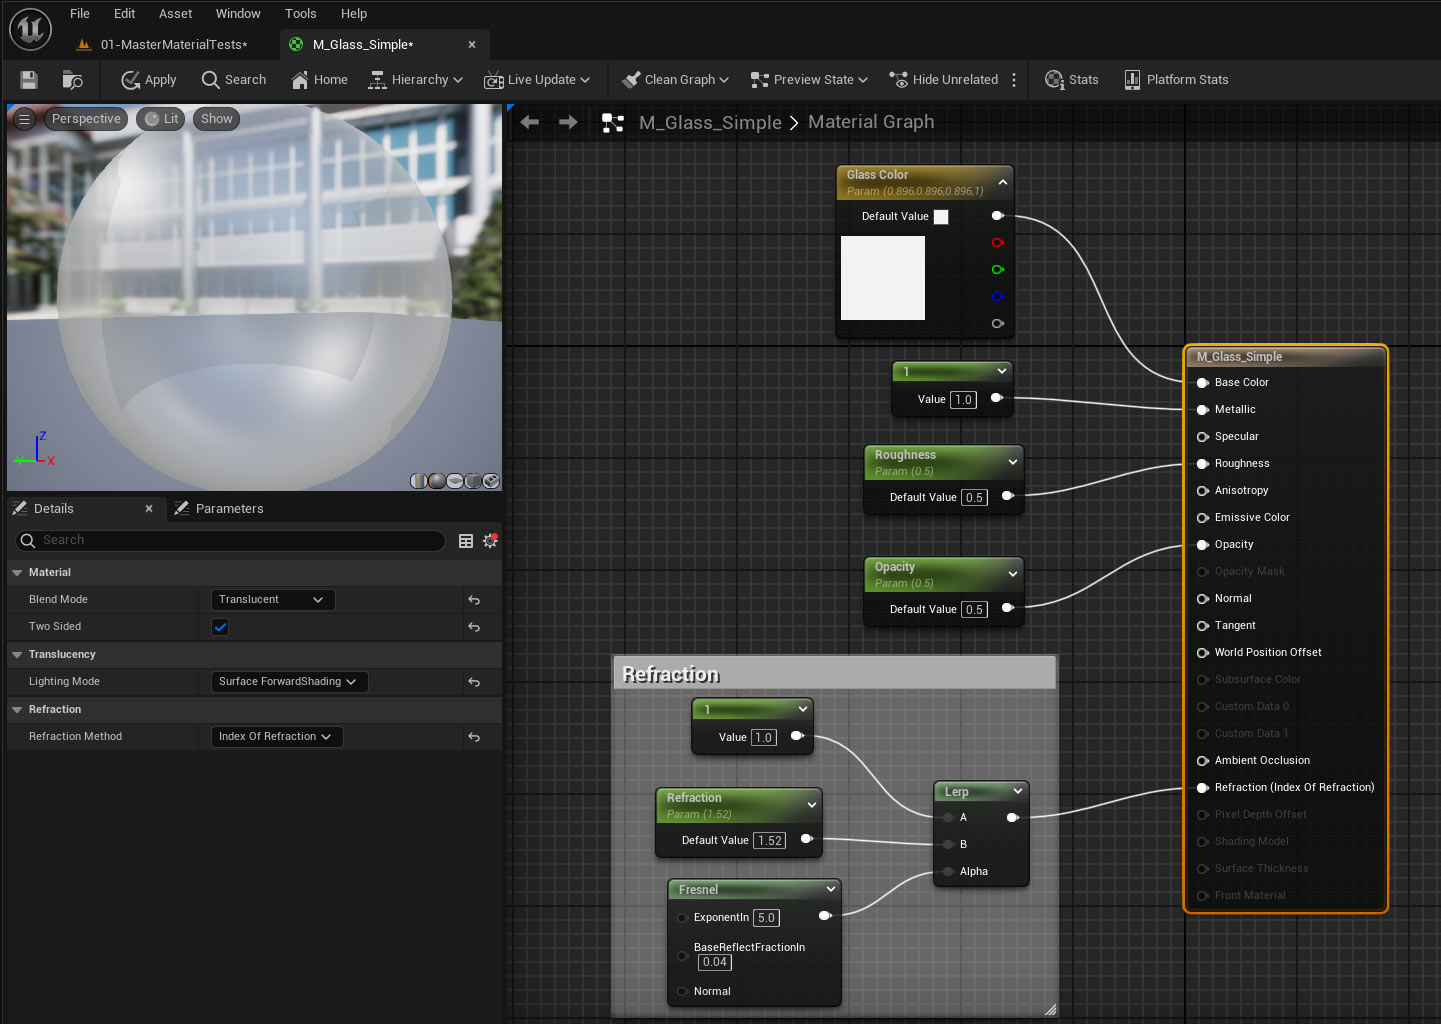
click on image to view full size
In Summary
This simple glass material, built with a translucent blend mode, provides a solid starting point for creating glass surfaces in UE5. You can adjust opacity, roughness, base color, and refraction in real-time using a material instance.
Create More Advanced UE5 Glass
For more advanced glass effects, consider incorporating textures for roughness and normal maps. See this full tutorial on creating advanced UE5 glass.
UE5 Master Material Creation Tutorial Course
For a comprehensive guide to material creation in UE5, check out "UE5 Master Material Creation" course, which dives deep into building materials for environments and props.

SUBSCRIBE & GET FREE UE5 PDF GUIDE
Subscribe to receive NEW/UPDATED and FREE "UE5 Beginner's Quick Start Guide" PDF (90 pages).

Visit this page for more info about the guide...
TOP 7 TUTORIAL COURSES FOR 2026
 Modular Environment Design Masterclass Tutorial Course
 Maya Foundation: Home-Study Course - Model and UV Environments
 Substance 3D Painter Essentials - Master Texturing
 UE5: Fundamentals Vol.1 - Create with Unreal Engine 5
 UE5: Retro Office Project - Create Beautiful Interior Env
 UE5: Master Material Creation - Create Master Materials in UE5
 Preproduction Blueprint: Plan Environments and Level Designs
TUTORIAL CATEGORIES
UE5 FUNDAMENTALS VOL.1 COURSE

UE5: RETRO OFFICE PROJECT

MODULAR ENVIRONMENTS MASTERCLASS

LEARN THE PREPRODUCTION PROCESS

ABOUT WoLD & ALEXG

My name is AlexG. I am self-taught level designer, game environment artist and the creator of World of Level Design.com. I've learned everything I know from personal experimentation and decades of being around various online communities of fellow environment artist and level designers. On World of Level Design you will find tutorials to make you become the best level designer and game environment artist.
Home Terms of Use/Trademarks/Disclaimers Privacy Policy Donate About Contact
All content on this website is copyrighted ©2008-2024 World of Level Design LLC. All rights reserved.
Duplication and distribution is illegal and strictly prohibited.
World of Level Design LLC is an independent company. World of Level Design website, its tutorials and products are not endorsed, sponsored or approved by any mentioned companies on this website in any way. All content is based on my own personal experimentation, experience and opinion. World of Level Design™ and 11 Day Level Design™ are trademarks of AlexG.
Template powered by w3.css