World of Level Design™
Tutorials to Becoming the Best Level Designer and Game Environment Artist (since 2008)
Quick Tip Series is created for beginners and advanced Unreal Engine 4 users.
These are quick, useful tips to help improve, refine, fix and remind you of tools, techniques and principles you may have not known or forgotten about.
All videos are very short, between 30 seconds to 3+ minutes.
The following Part 2 includes the following 10 Quick Tips and entirely focused on UE4 Landscapes:
- UE4 Tip #11: Fix - How to Remove Black Lines on Your Landscape
- UE4 Tip #12: Fix - Open World Kite Demo Field Grass is Too Dark
- UE4 Tip #13: 2 Ways to Enable Non-Destructive Landscape Layers 4.24+
- UE4 Tip #14: How to Sculpt with Non-Destructive Landscape Layers 4.24+
- UE4 Tip #15: Texture Painting Rules and Guidelines for Non-Destructive Landscape Layers
- UE4 Tip #16: What is a Landscape Heightmap and Correct Heightmap File Format to Use
- UE4 Tip #17: Recommended Landscape Texture Heightmap Resolutions (Don't Use Power of 2)
- UE4 Tip #18: Landscape Scale Metric - How to Find the Size of the Landscape in KM and Miles
- UE4 Tip #19: Landscape Mode Changes in 4.25 and Later
- UE4 Tip #20: How to Export and Import Landscape Heightmaps
Quick Tip Series:
- UE4: Quick Tip Tutorial Series Part 1 (Tips #1-10)
- UE5: Quick TIp Tutorials Part 3 (Tips #21-30)
- UE5: Quick Tip Tutorial Part 4 (Tips #31-40)
Let's begin!
UE4 Tip #11: Fix - How to Remove Black Lines on Your Landscape
When you first create your landscape within a Default Level, you will see these black lines on your landscape.

The black lines outline each landscape component.
There is nothing wrong with your landscape but having these black lines is distracting to work with.
To fix this do ONE of the following:
- Build Lighting
- Change Directional Light Mobility to Movable, making the lighting dynamic
- Toggle the Directional Light Mobility to Movable then back to Stationary
I prefer to work with landscapes by having my Directional Light set to Movable. This allows me to work and test everything in real-time without having to build any lights. Then if the project requires Static Lighting, then I deal with that after landscape is done.
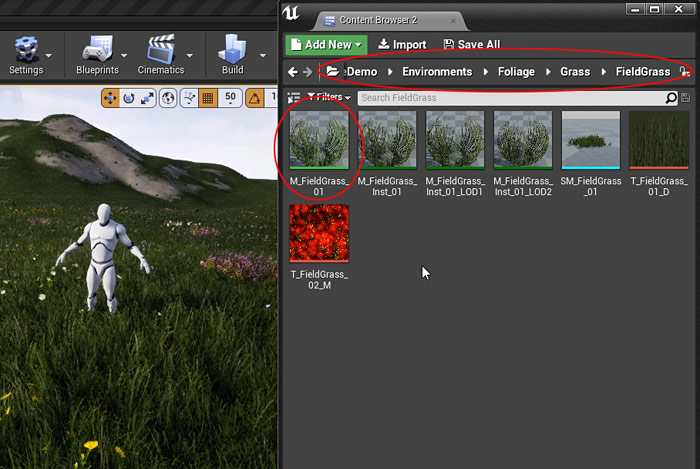
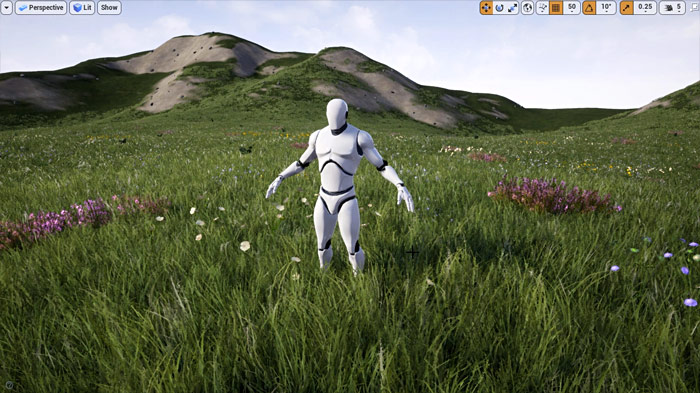
UE4 Tip #12: Fix - Open World Kite Demo Field Grass is Too Dark
Open World Kite Demo is a great foliage asset pack from Epic Games you can use on your landscape.
Except the Field Grass is too dark and there is no way to adjust the Brightness within the Material Instance.
No problem.
You can add Brightness Controls in the Material.
The Material you want is found inside KiteDemo folder, Environments/Foliage/Grass and FieldGrass folder. It is M_FieldGrass_01:
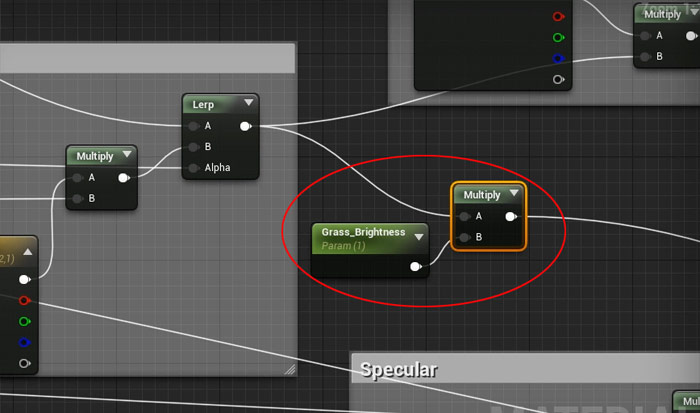
Add Multiply and a Scalar Parameter right before Base Color input and right after the Lerp.
That's it.
Open up the Material Instance M_FieldGrass_Inst_01:
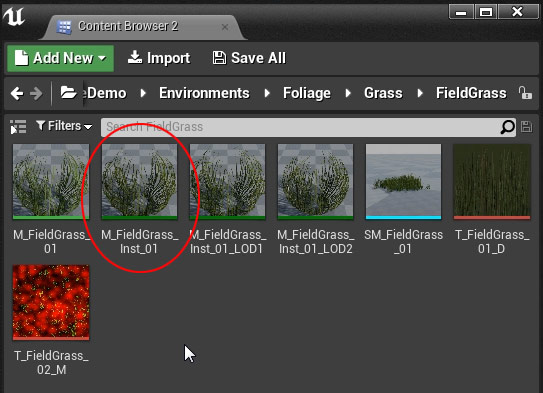
Enable the Brightness Parameter and increase it:
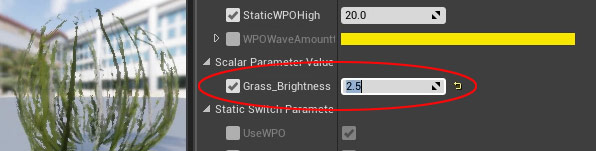
You now have Grass Brightness Controls:
UE4 Tip #13: 2 Ways to Enable Non-Destructive Landscape Layers 4.24+
In UE4 4.24+ we were introduced to new non-destructive landscape layers. This allows you to sculpt changes in the landscape non-destructively and place each sculpt effect into its own layer, like Photoshop.
You can then adjust each layer's influence on the terrain. This feature is very powerful and something many were asking for a long time.
Non-Destructive landscape layers are available in UE4 4.24 or later.
2 ways to enable Edit Layers on your landscape:
- During the creation of a new landscape
- In Details panel for existing landscapes
For New Landscapes go to Landscape Mode and Enable Edit Layers:

For Existing Landscapes select the landscape and in Details Panel and Enable Edit Layers:

The existing landscape and all the heightmap and painted data in it will become your base layer. You can now add additional layers and create changes in those layers.
UE4 Tip #14: How to Sculpt with Non-Destructive Landscape Layers 4.24+
Each layer can contain information for the heightmap sculpt and painted textures.
Each Sculpt Tool effect can be placed and contained within its own layer. This makes it very easy for you to adjust, erase or delete without destroying the other Sculpt effects on the terrain.
So you could have Sculpted the shape of the mountain on one layer, add Erosion on a second layer and add Noise or Smooth on the third layer.
Important things to remember:
- To create a New Layer, Right-Click on an existing layer and select Create
- Left-Click twice on the name of the layer to rename it or Right-Click on the Layer and choose Rename
- Click on the Eye icon to toggle layer's visibility and its effect on the landscape
- Lock the layer to prevent making any edits to it or unlock it to continue making changes
- Each layer will have Alpha controls with value set to 1. Alpha is the intensity effect of that layer; you can lower the layer's intensity below 1 to reduce that layers effect or go below 1 into negative value to invert the effect
- You can use the Erase Tool to remove the information contained within a layer
- Deleting a Landscape Layer will delete it from the Sculpt and Paint modes. Right-Click on the layer and choose Delete
UE4 Tip #15: Texture Painting Rules and Guidelines for Non-Destructive Landscape Layers
As mentioned in the previous tip, each layer can contain information for the heightmap sculpt and painted textures.
When painting texture layers on the landscape, each non-destructive landscape layer can have one or more textures assigned to it. This gets a bit confusing so in this quick tip I explain the rules and guidelines for non-destructive landscape layer texture painting.
UE4 Tip #16: What is a Landscape Heightmap and Correct Heightmap File Format to Use
A heightmap is a grayscale texture that stores landscape height information. Black color is low elevations or valleys and white color are high elevations or peaks. All landscapes in UE4 rely on heightmap data to create the terrain.
- Black = low elevations or valleys
- White = high elevations or peaks
When exporting heightmaps for UE4, follow this format:
- 16-bit
- Grayscale
- PNG or RAW file
UE4 Tip #17: Recommended Landscape Texture Heightmap Resolutions (Don't Use Power of 2)
You should use heightmap resolution listed in the Epic's Recommended Landscape Sizes.

For example, in Photoshop when you create a new document and set Width and Height, use dimensions in Overall Size (Vertices) column in the Epic's Recommended Landscape chart.
Using power of 2 texture sizes has created issues due to a stretching effect around the edges of landscapes.
My conclusion to use Epic's Recommended Landscape Sizes and not power of 2 texture sizes.
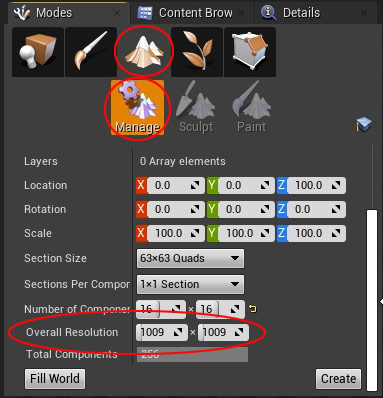
UE4 Tip #18: Landscape Scale Metric - How to Find the Size of the Landscape in KM and Miles
1px = 1meter
If your Landscape's Overall Resolution is 4033px by 4033px then the size of your landscape is 4033 meters by 4033 meters or 2.5 miles.
You can find overall resolution of the landscape when you create it using Landscape Mode:
Or on existing landscape, in the Details panel:

If you create a heightmap in external software you can define the texture resolution there and make sure you use the Epic's Recommended Landscape Sizes Chart shown in the previous tip.
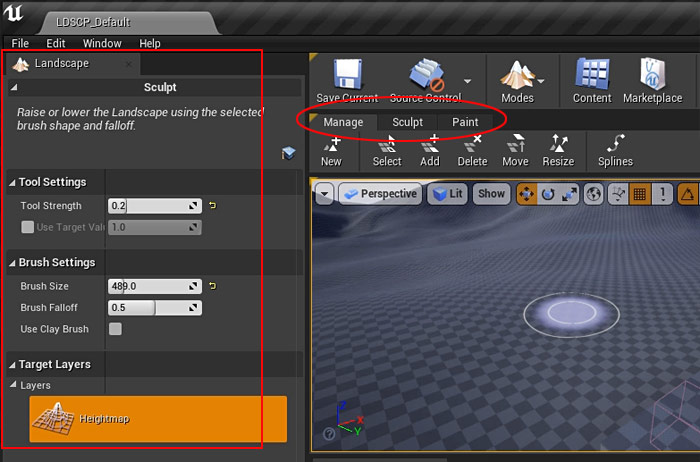
UE4 Tip #19: Landscape Mode Changes in 4.25 and Later
In UE4 4.25+ and later the Landscape Mode has been changed where it appears within the editor.
Although it still works exactly the same way.
In 4.25+ you'll find the landscape mode under the Modes drop down menu in the main toolbar (new shortcut is Shift + 2):

You will have the Landscape panel on the left hand side and the Manage, Sculpt and Paint tabs will appear within the perspective viewport:
Shortcut to Landscape Mode:
- Shift + 2 = Landscape Mode (UE4.25 and later)
- Shift + 3 = Landscape Mode (UE4.24 or earlier)
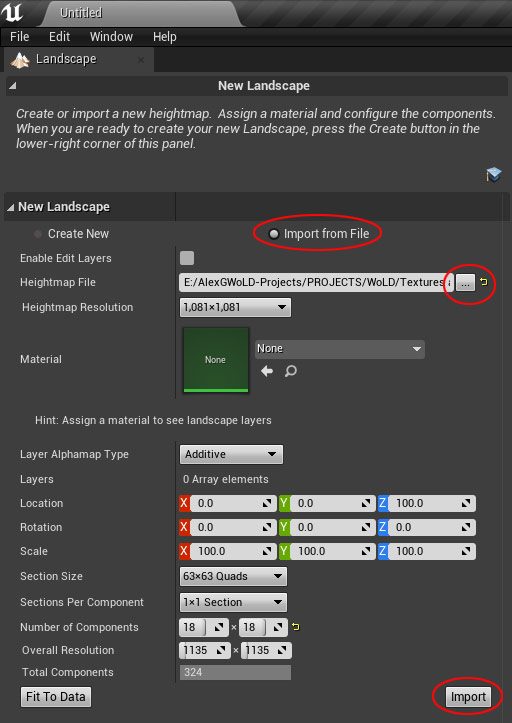
UE4 Tip #20: How to Export and Import Landscape Heightmaps
To IMPORT heightmaps into UE4:
- Go to Landscape Mode (Shift + 2 in UE4.25 and later; Shift + 3 in UE4.24 or earlier)
- Manage tab
- Choose Import from File
- Under Heightmap Guide, browse to the heightmap
- Click Import
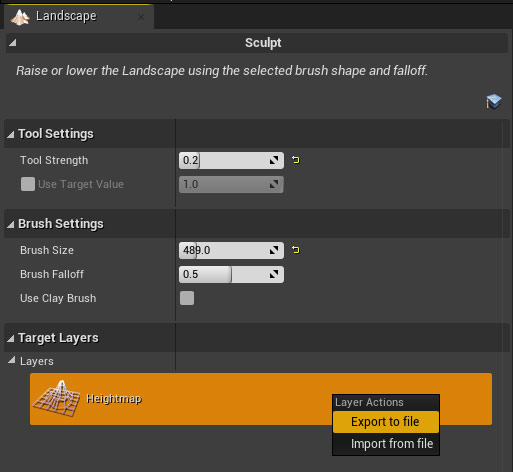
To EXPORT heightmaps into UE4:
- Go to Landscape Mode (Shift + 2 in UE4.25 and later; Shift + 3 in UE4.24 or earlier)
- Sculpt tab
- Right click on Heightmap
- Choose Export to File
- Save it
UE4 Landscape Essentials Tutorial Course
These Quick Tips are a great start but if you need more in-depth explanation and knowledge on how to use all the landscape Sculpt tools in UE4, modify heightmap manually and create landscape materials then download this new, full and updated tutorial course "UE4 Fundamentals Vol.2: Landscape Essentials".


SUBSCRIBE & GET FREE UE5 PDF GUIDE
Subscribe to receive NEW/UPDATED and FREE "UE5 Beginner's Quick Start Guide" PDF (90 pages).

Visit this page for more info about the guide...
TOP 7 TUTORIAL COURSES FOR 2026
 Modular Environment Design Masterclass Tutorial Course
 Maya Foundation: Home-Study Course - Model and UV Environments
 Substance 3D Painter Essentials - Master Texturing
 UE5: Fundamentals Vol.1 - Create with Unreal Engine 5
 UE5: Retro Office Project - Create Beautiful Interior Env
 UE5: Master Material Creation - Create Master Materials in UE5
 Preproduction Blueprint: Plan Environments and Level Designs
TUTORIAL CATEGORIES
UE5 FUNDAMENTALS VOL.1 COURSE

UE5: RETRO OFFICE PROJECT

MODULAR ENVIRONMENTS MASTERCLASS

LEARN THE PREPRODUCTION PROCESS

ABOUT WoLD & ALEXG

My name is AlexG. I am self-taught level designer, game environment artist and the creator of World of Level Design.com. I've learned everything I know from personal experimentation and decades of being around various online communities of fellow environment artist and level designers. On World of Level Design you will find tutorials to make you become the best level designer and game environment artist.
Home Terms of Use/Trademarks/Disclaimers Privacy Policy Donate About Contact
All content on this website is copyrighted ©2008-2024 World of Level Design LLC. All rights reserved.
Duplication and distribution is illegal and strictly prohibited.
World of Level Design LLC is an independent company. World of Level Design website, its tutorials and products are not endorsed, sponsored or approved by any mentioned companies on this website in any way. All content is based on my own personal experimentation, experience and opinion. World of Level Design™ and 11 Day Level Design™ are trademarks of AlexG.
Template powered by w3.css