Learn How to Create Custom Static Meshes for UE4
Step-by-Step Pipeline to Creating, Exporting and Importing Custom Static Meshes from Maya LT™/Maya® into Unreal® Engine 4

- Includes:
- Step-by-step process
- Everything you need to know to create your own props/assets
- Tutorials work in Maya LT and Maya
- FREE EXTRA Videos and PDF Workflow Guides
- Digital Download
- 30-Day, Money Back Guarantee
- Secure Checkout
Videos
Hours
Project Files
GB
I Was Done!
No more default Static Meshes or Static Meshes created by others.
I was tired of re-using default assets. I was tired of searching for the "perfect" Static Meshes to use in my projects. I knew what I wanted, so why couldn't I just create it?
"No problem", I said. I'll just create what I need.
But I was in for a rude awakening. I wasn't ready for the amount of technical knowledge I had to learn. There was so much work involved!
Custom Static Mesh process involves multiple software and specific guidelines to follow for each step of the pipeline. You'll need to make sure your 3d modeling software is set up correctly for matching the scale and grid spacing to UE4. You'll need to model a low-poly and a high-poly mesh, UV for textures and for lightmaps, set hard/soft edges, bake Normal maps, bake Ambient Occlusion maps, create textures, materials, custom collisions, export/import using specific settings while problem-solving at every single step of the way.
The process itself is actually very straight forward once you've gone through it a couple of times. The problem is getting there. Learning what to do for each step of the pipeline is what takes so much time.
There will come a time where you no longer want to use default Static Meshes or Static Meshes created by someone else to construct your game environments. Instead, you'll want to begin create and use your own custom Static Meshes.
"UE4: Custom Static Mesh Formula" video tutorial series is going to show you how to master this process.
What is a Static Mesh?
You probably already know this.
Static Mesh is a 3d model (game assets/game props) created in 3d modeling software (Maya LT/Maya, 3dsMax, Modo, Blender etc.), then exported and imported into Unreal Engine 4. These Static Meshes are either created by you or by someone else and it is what you'll use to construct game environments with.
Here are "The Corridor" Static Meshes used to construct the final environment. All were created in Maya LT following the "UE4 Custom Static Mesh Formula".
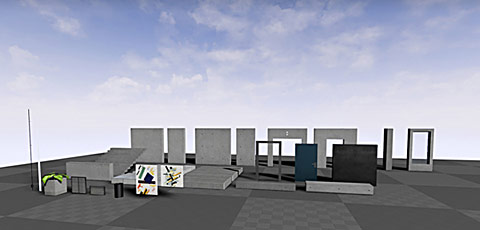
"The Corridor" Custom Static Mesh Set
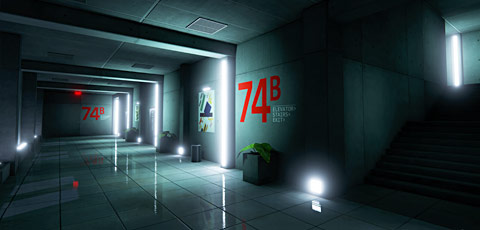
Final "The Corridor" Environment
BSP vs Static Meshes
"Why do I need to create and use Static Meshes when I have BSP? Couldn't I just use BSP brushes or convert BSP to Static Mesh instead of creating my own custom Static Meshes?"
This question comes up a lot and the answer is no.
It is not whether you should use one or the other but at which step of the pipeline should you use BSP brushes and at which Static Meshes.
BSP Brushes are simple geometry primitives that can be created inside Unreal Engine 4. You will find BSP Brushes option under "Geometry" tab:

BSP brushes should be used early in the level design and game environment process to block-in the layout and prototype gameplay mechanics.
During this early development stage you don't need to create or use Static Meshes. You must keep focused on scale, spatial relationships, layout, flow, scripting gameplay mechanics and play-testing your level. Since a lot of your design and layout will change, you need to maintain flexibility and BSP brushes allow for quick iteration and change.
As you begin to lock down level's layout and gameplay, begin to replace BSP brushes with Static Meshes. BSP becomes a template for placing Static Meshes.
Static Meshes are optimized for UE4 and are cheaper to render than BSP brushes. Static Meshes are easier to use, to duplicate and create full game environments with. Also, you will never be able to get the detail required using BSP brushes than you can with Static Meshes.
BSP brushes were never meant to be used as final geometry. Most, if not all BSP brushes should be replaced with Static Meshes prior to shipping/releasing your level.
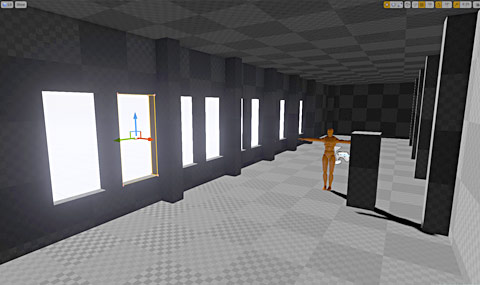
BSP brush block-in of "The Corridor" environment

Final "The Corridor" environment with 100% custom Static Meshes
It doesn't mean you can't have any BSP in your finished levels. It is completely acceptable to have BSP brushes as part of your final environment. I often advise to stick to 70/30, 80/20, 90/10 or 100% ratios of Static Mesh to BSP. And if you are going to use some BSP brushes in the final map, then keep them down to a minimum and simple for geometry like as walls, floors, ceiling, columns etc.
So if you are serious about creating game environments then you need to use custom Static Meshes. You can either use Static Meshes created by others (such as from UE4 Marketplace) or you can spend the time to learn the skill for how to create your own.
What You Will Learn
Here is what you can expect learn from "UE4 Custom Static Mesh Formula".
- How to setup Project folders for UE4, Maya LT/Maya and Texturing; important to maintain organization between different software and keep files together
- How to set up interface in Maya LT/Maya for Static Mesh work
- How to set up UE4 for Static Mesh work
- How to set up grid spacing in Maya LT/Maya to match UE4
- How to set proper scale and proportion in Maya LT/Maya and UE4 so everything you create maintains 1:1 scale ratio
- FBX export options to use from Maya LT/Maya so your Static Meshes work in UE4
- FBX import options for Unreal Engine 4
- Importance of pivot points and how they translate from Maya LT/Maya into Unreal Engine 4
- 2 modeling methods explained: low-poly to high-poly and high-poly to low-poly
- Creating low-poly and high-poly meshes
- UVing your low-poly meshes
- Initial UE4 material setup
- How to set hard/soft edges on your Static Mesh, this is also known as Smoothing Groups
- How to bake Normal Maps in Maya LT/Maya
- How to export/import Normal Maps into UE4
- How to flip or invert your Green Channel for correct Normal Map display
- What are Lightmaps
- Lightmap overview and guidelines to follow
- How to create Lightmaps in UE4
- How to create custom Lightmaps in Maya LT/Maya
- How to create collisions in Unreal Engine 4 Static Mesh Editor
- How to create custom collisions in Maya LT/Maya
- Setting up Photoshop texture file
- How to get and use UV screenshot wireframe layout to help you texture in Photoshop
- What is the difference between an Albedo and Diffuse texture
- Manually create Albedo/Diffuse textures
- How to create detail Normal Maps using NVIDIA Normal Map Filter in Photoshop
- How to create detail Normal Maps using Quixel's NDO
- How to combine baked Normal Maps with detail Normal Maps
- How to manually create Roughness texture and roughness textures explained
- How to test final Static Mesh inside your level in UE4
Detailed Video-by-Video Breakdown
Here is a list of all the videos included in this series. Click on the tab below to expand for more detailed info.
1st Module contains 24 videos (4 hours 18 minutes)
- 01.00 Introduction to Module 1 - What You Will Learn (07:04)
- 01.01 Setting Up Project Folders (07:47)
- 01.02 Example Project Files (03:38)
- 01.03 Setup UE4 and Maya LT/Maya for Static Meshes (06:08)
- 01.04 Setting Up Grid in Maya LT/Maya for Unreal Engine 4 (07:32)
- 01.05 Character Reference in Maya LT/Maya and UE4 (13:02)
- 01.06 Exporting Static Meshes from Maya LT/Maya (09:09)
- 01.07 Importing Static Meshes Into Unreal Engine 4 (09:02)
- 01.08 Importance of Pivot Points (08:23)
- 01.09 Creating Low-Poly and 2 Modeling Methods Explained (05:49)
- 01.10 Creating High-Poly Mesh (05:38)
- 01.11 Texture UVing and Initial UE4 Material Set Up (12:18)
- 01.12 Hard and Soft Edges (Smoothing Groups) (10:31)
- 01.13 Baking Normal Maps in Maya LT (12:31)
- 01.14 Exporting/Importing Normal Maps (10:48)
- 01.15 Lightmaps Overview (14:10)
- 01.16 Creating Lightmaps (25:40)
- 01.17 Collisions in UE4 (15:17)
- 01.18 Collisions in Maya LT/Maya (27:44)
- 01.19 Normal Map Rebake (11:48)
- 01.20 Creating Albedo/Diffuse Texture (11:03)
- 01.21 Creating Detail Normal Map Texture (12:17)
- 01.22 Creating Roughness Texture (09:48)
- 01.23 In Closing (00:46)
2nd Module contains 13 videos (1 hours 46 minutes)
- 02.00 Introduction to Module 2 - What You Will Learn (02:12)
- 02.01 Planning/Preproduction Process (03:05)
- 02.02 Creating Low-Poly Column (09:12)
- 02.03 Creating High-Poly Column (05:49)
- 02.04 UVing Low Poly Column for Texturing and Material Setup (06:57)
- 02.05 Setting Hard/Soft Edges and Baking Normal Maps (11:46)
- 02.06 Creating Lightmaps (06:00)
- 02.07 Creating Collision (05:38)
- 02.08 Texturing: Creating Albedo/Diffuse Map (15:27)
- 02.09 Texturing: Creating Detail Normal Map with Photoshop Normal Map Filter (18:11)
- 02.10 Texturing: Creating Detail Normal Map with NDO (09:47)
- 02.11 Texturing: Creating a Roughness Map (12:10)
- 02.12 In Closing (00:41)
Video Breakdown
Watch this video for in-depth breakdown of the formula and its process.
No Risk, 30 Day - 100% Money Back Guarantee

I know you will find UE4 Custom Static Mesh Formula very helpful with creating your own custom Static Meshes.
But, if for any reason you don't like it, I am offering 30 days, 100% money-back guarantee.
I've been running World of Level Design.com since October 2008. I'm not going anywhere. So if you don't like this premium tutorial series then I don't want your money. Full refund.
Just let me know why you didn't like the product and how I could have made it better.
UE4 Custom Static Mesh Formula
- Includes:
- Step-by-step process
- Everything you need to know to create your own props/assets
- Tutorials work in Maya LT and Maya
- FREE EXTRA Videos and PDF Workflow Guides
- Digital Download
- 30-Day, Money Back Guarantee
- Secure Checkout
Videos
Hours
Project Files
GB
FAQ
Frequently asked questions. Click on each tab to see more.
Yes.
Full version of Maya will work perfectly. There isn't much difference when it comes to modeling and UVing between Maya LT and Maya.
The only difference you will notice is during normal map baking. Maya LT uses Turtle Baker while Maya uses Transfer Maps. But everything else will be the same.
Click 'Add to Cart' and go through the purchasing process. Once you are done, you will receive an email with a download links to the product. The email is sent to the same email address you used to purchase the tutorial series with.
This is a downloadable product. You will NOT receive a physical package shipped to you in the mail. The entire package will be immediately available for you to download and get started right away after ordering. You will receive access to any bonuses on the download page as well (if available).
Each tutorial series is compressed/zipped file and ready to download.
After you download the files, Right Click on each zipped file and choose "Extract All" or "Unzip".
For now I offer digital downloads only. This is a one-time payment. You pay once and you download the product to keep. No recurring payments or subscriptions fees.
If you encounter any issues during your download and need your links to be renewed and re-download again, email me at alex@worldofleveldesign.com using the email you purchased the product with and I will re-activate all the downloads.
All payments are processed on a secure server. This website uses Paypal for transaction and E-Junkie for download delivery. E-junkie is certified by PayPal and Google Checkout and it is secured by GeoTrust.
PayPal uses SSL technology to keep your information safe. In addition, when you send a payment using PayPal, the recipient won't receive sensitive financial information like your credit card or bank account number. This way, you don't have to worry about paying people you don't know.
Absolutely. PayPal is only used to process your payment. You do not need to have a PayPal account to checkout.
You can pay with Credit Card, Debit Card or PayPal.
If you do not have a PayPal Account. Follow these steps
1. Click "Add to Cart"
2. Choose "Check out with PayPal"
3. Now, instead of using PayPal you will have an option to use Debit Card or Credit Card to pay.
PS.
If you have spent some time visiting World of Level Design website, read and watched video tutorials then you know that each video and each tutorial I create is focused on giving you a lot of value and information in each one.
When I release a product, I make sure that you get your money's worth and walk away learning more than what you paid for.
![]()
Creator of World of Level Design.com
Home Terms of Use/Trademarks/Disclaimers Privacy Policy Donate About Contact
All content on this website is copyrighted ©2008-2024 World of Level Design LLC. All rights reserved.
Duplication and distribution is illegal and strictly prohibited.
World of Level Design LLC is an independent company. World of Level Design website, its tutorials and products are not endorsed, sponsored or approved by any mentioned companies on this website in any way. All content is based on my own personal experimentation, experience and opinion. World of Level Design™ and 11 Day Level Design™ are trademarks of AlexG.
Template powered by w3.css