World of Level Design™
Tutorials to Becoming the Best Level Designer and Game Environment Artist (since 2008)
Following article was written and contributed by Pete Bottomley.
Pete is a co-founder of White Paper Games.
UDK Scripting Series by Pete Bottomley:
Intro to Kismet
Moving Doors
How to Pick Up and Place Item
How to Trigger Material Instances
How to Spawn Bots in Kismet - Part 1
How to Add Functionality to the Bot - Part 2
Bot Functionality Final Touches - Part 3
Bools - Puzzle Design and Interaction
Cinematics Introduction Part 1/2
Cinematics Introduction Part 2/2
Using Console Commands as Gameplay Elements
How to Prototype Quick Time Events in Kismet
In this pickup tutorial we will learn how to pick up and place items with use triggers and sound. We will also learn how to count how many items have been placed and fire off an event from that i.e. opening a door.
In this Pickups video you'll learn:
- How to add pickups
- Translucent materials
- Play sounds on event.
- Disable/Enable triggers
- Use counter to trigger an event
1. First, place 3 static mesh actors in your scene which will be used for your pickups. In this example I have used StaticMesh 'Pickups.Berserk. Mesh.S_Pickups_Berserk'. Right click on the meshes with the three actors selected and select Convert - Convert Static Mesh to Mover. Open up their properties (3 actors selected) and go to Collision and change the collision type to COLLISION_Blockall.
The first static mesh should be placed on a wall or on the floor, wherever you want to pick the item up from. Right click - Add Actor - Add Trigger and put the trigger next to the static mesh. Depending on the mesh you may wish to change the collision height and radius of the trigger also.
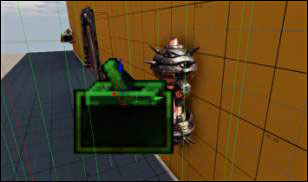
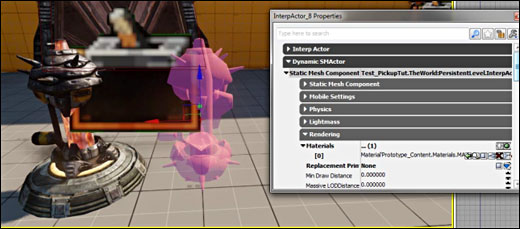
The other two static meshes should be placed where you wish to place the pickup. Open up both of the actors properties and go to Display and tick the Hidden box. One of the materials also needs a translucent material applying to it.
aterial'ExampleMap_Content. Materials.M_Hollow' is a good example of this. You can input your own material in the mesh properties under Rendering. Type in 'Material' in the top search box if you are unable to locate it. You also need to add another trigger where you are placing the item.
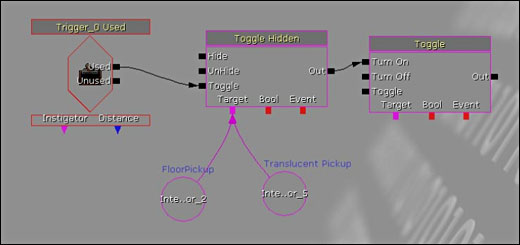
2. Next, open up Kismet and select the first trigger you set up in the level (The one where you get the item from). Right click in kismet and go to New Event using Trigger_XX - Used.
Uncheck Aim to interact in the properties and change the interact distance to 200. Right click and go to New Action - Toggle - Toggle Hidden. You will also need another Toggle which can be added by pressing T + LMB.
Add the item you are picking up and the translucent material mesh to the first toggle target and hook up the Used output from the trigger to the Toggle input. The output of the Toggle Hidden should connect to TurnOn in the second toggle.
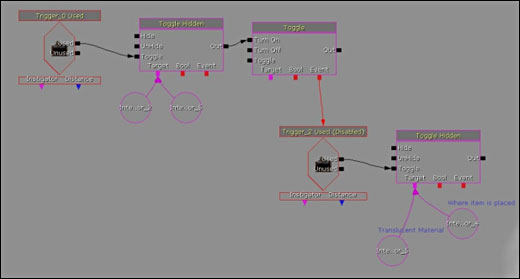
Select the second trigger in your scene and right click in Kismet and add it the exact way you did in the previous step. Used Trigger connecting to a Toggle Hidden. The two targets on the toggle hidden this time will be the Translucent pickup and the Pickup that is where the item will be placed (the one next to it).Also drag a connection from the Toggle Event down to the second Used trigger. Make sure you also change the second used triggers properties off Aim to Interact and change interact distance. Also disable the trigger by un-checking the Enabled option under Sequence Event.
click on image to view full size
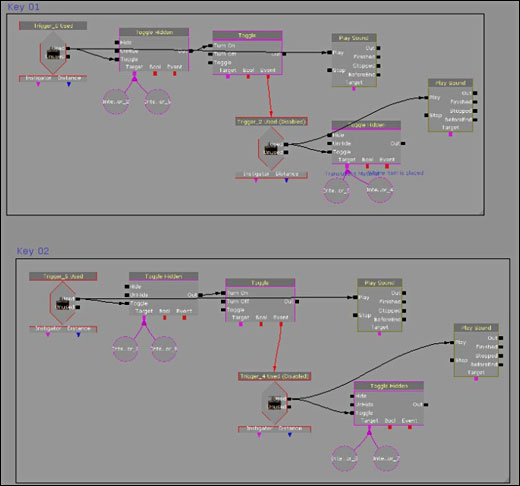
Optional: You may add sounds to your pickups. I used SoundCue 'A_Pickups. Armor.Cue. A_Pickups_Armor_Respawn_Cue' for the first trigger and SoundCue 'KismetGame_Assets. Sounds. S_WeaponPickup_01_Cue' for the second trigger. You can add a Sound node by holding down S + LMB or go to New Action - Sound - Play Sound. You can then plug in the relevant sound cues into the first target box Play Sound by pressing the green arrow with the sound selected in your content browser.
Comment your sequence and repeat the previous 2 steps to create two pickup and place items.
click on image to view full size
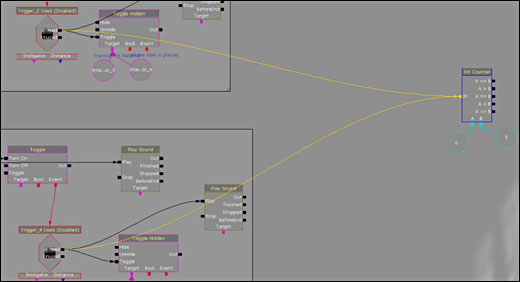
3. The next step is to add something that will count when we place our pickups so that we can trigger off an event. To do this right click inside of Kismet and go to New Condition - Counter - Int Counter. The function of the Int counter can be found here:
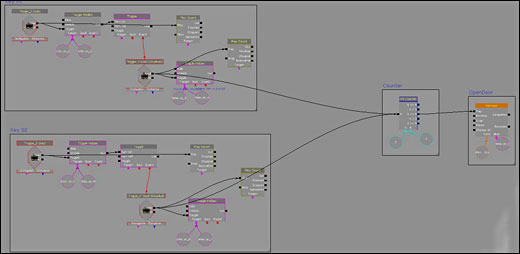
Right click on the A tab of the Int counter and select Create New Int Variable. Do this for the B tab as well. Leave A at 0 and change B to 2. Drag a connection from the Used (Disabled) trigger to the in of the Int Counter. Do this for both triggers. You should end up with something looking like this:
click on image to view full size
Now it is just a case of firing off an action from the A == B output of the int counter as we have the counter counting to 2 (the value of B) and each item that is picked up and placed is a 1 count (1+1=2). So when A ==B then something can happen. In this example I have created a new Matinee and added a door group with a movement track. This means that a door will open when you have picked up and placed two items. Remember to comment everything for future reference.
click on image to view full size
Have a play around with the setup and see what else you can achieve. Maybe you would like 3 pickups. In this case B of the Int Counter would be 3. Or maybe you want to activate another sequence or add a Camera pan to the Matinee as the door opens.
Home Terms of Use/Trademarks/Disclaimers Privacy Policy Donate About Contact
All content on this website is copyrighted ©2008-2024 World of Level Design LLC. All rights reserved.
Duplication and distribution is illegal and strictly prohibited.
World of Level Design LLC is an independent company. World of Level Design website, its tutorials and products are not endorsed, sponsored or approved by any mentioned companies on this website in any way. All content is based on my own personal experimentation, experience and opinion. World of Level Design™ and 11 Day Level Design™ are trademarks of AlexG.
Template powered by w3.css


 Maya Foundation: Home-Study Course - Model and UV Environments
 Substance 3D Painter Essentials - Master Texturing
 UE5: Fundamentals Vol.1 - Create with Unreal Engine 5
 UE5: Retro Office Project - Create Beautiful Interior Env
 UE5: Master Material Creation - Create Master Materials in UE5
