World of Level Design™
Tutorials to Becoming the Best Level Designer and Game Environment Artist (since 2008)
Following article was written and contributed by Pete Bottomley.
Pete is a co-founder of White Paper Games.
UDK Scripting Series by Pete Bottomley:
Intro to Kismet
Moving Doors
How to Pick Up and Place Item
How to Trigger Material Instances
How to Spawn Bots in Kismet - Part 1
How to Add Functionality to the Bot - Part 2
Bot Functionality Final Touches - Part 3
Bools - Puzzle Design and Interaction
Cinematics Introduction Part 1/2
Cinematics Introduction Part 2/2
Using Console Commands as Gameplay Elements
How to Prototype Quick Time Events in Kismet
In this Cinematics tutorial we will show you how to set up your scene ready for a cinematic along with go into all the Kismet actions and events you may need. We will also take a more in-depth look at Matinee how and how use it to power our cinematic.
In this Cinematics video you'll learn:
- How to use more features of Matinee
- How to use new tracks such as Event, Slowmo and Fade
- How to handle more than one camera in a scene
- How to teleport the player
- How to use Animsets and CameraAnims
- How to use Cinematic toggles
Be sure to check the Cinematic UDN page for more information: UDN Matinee and Cinematics.
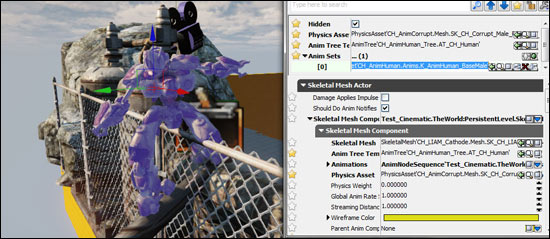
1. We'll start by looking at what actors we need in our scene. First of all for this demonstration you will need a Skeletal Mesh of the default UDK character. He can be found in SkeletalMesh 'CH_LIAM_Cathode. Mesh. SK_CH_LIAM_Cathode'.
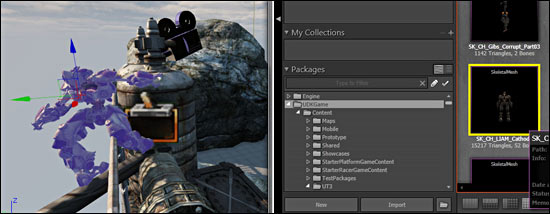
Next you will need to assign him an AnimSet and make him hidden in the level. The Anim set can be found in AnimSet' CH_AnimHuman.Anims. K_AnimHuman_BaseMale'.
click on image to view full size
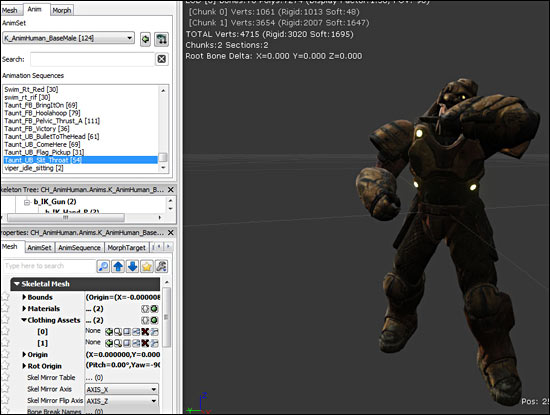
If you wish to previous the animations for this set you can double click it and select the Anim tab on the top left hand side and scroll down the available animations. Double click on an anim to assign it to him and then press play to preview. We can then use these anims inside of Kismet.
click on image to view full size
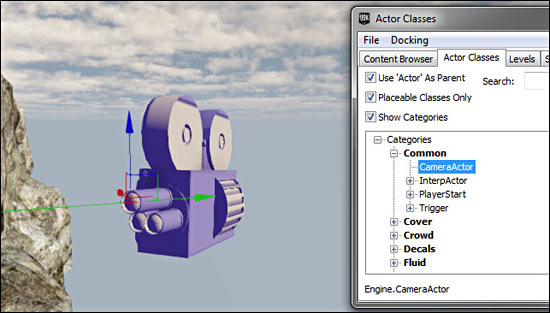
You will also need some cameras in your scene. I have 4 camera actors in mine and you can find them in Actor classes - Common - Camera.
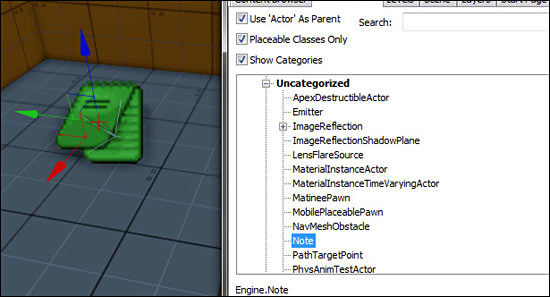
I have a Note in my setup to teleport the player later on. If you wish to add one of these they can also be found in Actor classes - Uncategorised - Note.
We also need a trigger in our scene to trigger the cinematic sequence. I have changed the collision height and radius of the trigger also.

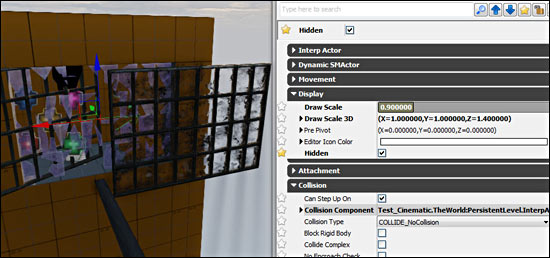
In this example there are also some windows LIAM smashes through. I have two sets of windows. One is the unbroken set which have no properties changed apart from they are Interpactors. (Right click - Convert - Mover). I also have a broken set which are also Interpactors and are set to hidden.
click on image to view full size
2. Now that we have the scene set up we will take a look at the Kismet. Before you start creating events you should plan out what you want to happen in your Cinematic sequence. Decide how many camera you will need. Look for some cool animations and also think about where you could add effects such as Slowmo and fade.
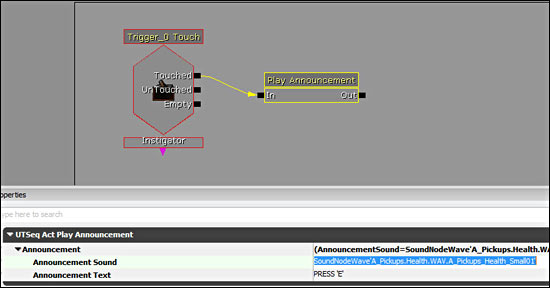
We can start by deciding how we want to trigger the cinematic to start. Select your trigger in the level and right click in Kismet and choose a new Touch event. We also want to add a Play Announcement action. In the Play Announcement action change Announcement text to Press 'E' and you can also add a Announcement sound if you wish. For this example I used SoundNodeWave 'A_Pickups.Health. WAV.A_Pickups_Health_Small01'.
click on image to view full size
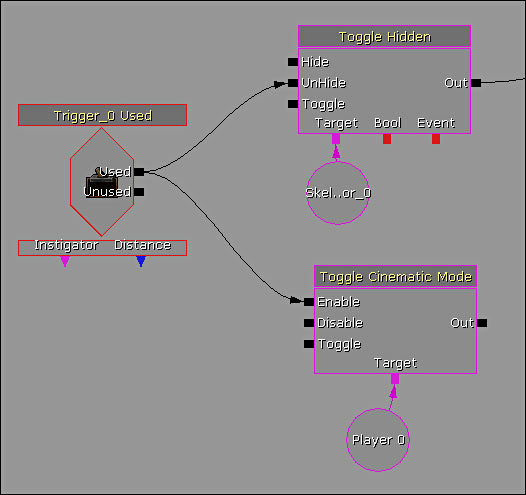
Next we need a Used trigger so that when the player does press E we can start the sequence. Make sure you turn off Aim to Interact and you can change the trigger distance if you wish also. We also need to add a Toggle Hidden action found in New Action - Toggle - Toggle Hidden. Hook the Used up to Unhide. The target will be the Skeletal mesh that you have hidden in your scene. In this case it is the robot LIAM. We also need to Toggle the Cinematic mode so that the player can't move around during the sequence. Right click New Action - Toggle - Toggle Cinematic mode. The target will be the player and make sure you hook up Used to Enable.
We now need a Matinee sequence with the skeletal mesh added in an empty group (M+LMB for a Matinee, and then right click New Empty Group). Add a movement track by right clicking on the group and selecting Add new Movement track. A good trick to use when adding a movement track is to plan out the last key first. In this example LIAM is sliding down a rail so I will select the end of the Movement track, I will add a Key (Enter or Add New Key button) and then move LIAM to the end of the rail.
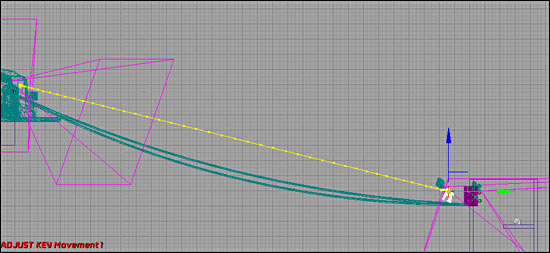
I can then go back through adding keys and bringing the movement track down.
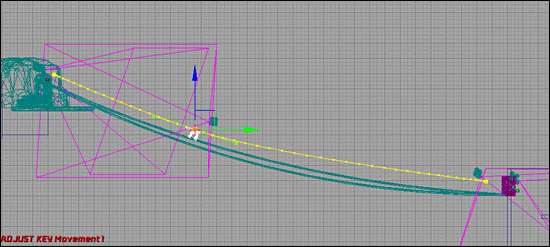
This method will keep the fluidity of the movement of the character. After we have the movement of the character sorted we can then add animations to the character. To add animations to your skeletal mesh right click on the LIAM group you created in your Matinee and Add New Anim Control track. You also need to click on the group LIAM and in the properties add a new Group Anim Set item and plug in the K_AnimHuman_BaseMale Animset. Now when you press Enter (Add key) on the Anim track you can select from a list of animations you want to add to your character. In this example I used the Hoverboard animations as these were the closest I could find to make it look like he was sliding down the rail.
click on image to view full size
3. You can add the Cameras into your Matinee like we have done in previous tutorials and make sure you have a Director Group in there also allowing you to select which camera you want to cut to (press enter to cut to camera). Be creative with your camera cuts and move them the same way you moved the skeletal mesh LIAM. Select the final location and then edit the movements as you go.
To get a camera to follow the skeletal mesh we can attach it to the actor in the editor instead of using Kismet. Select the camera and lock its properties by pressing the padlock at the top of the properties box Lock Selected Actors. Now you can select other actors without the properties changing. Select the skeletal mesh LIAM and input him in to the Attachment Base field.
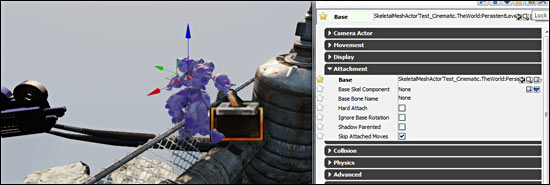
click on image to view full size
Now wherever LIAM goes, the camera will follow without you having to create a movement track.
Apart from the movement tracks following LIAM along the rail and the attached camera I have a 4th more organic camera. We can edit these by clicking the little camera icon on each of the camera groups. Now you are looking through the camera, you can add keys and move the camera around in the perspective viewport and they will update in the Matinee. This will give you a more organic feel to the keyframes so play around with this. If you feel a movement is a bit too quick, you can select the key and hold Ctrl and move the key left and right to speed up and slow down the sequence.
Home Terms of Use/Trademarks/Disclaimers Privacy Policy Donate About Contact
All content on this website is copyrighted ©2008-2024 World of Level Design LLC. All rights reserved.
Duplication and distribution is illegal and strictly prohibited.
World of Level Design LLC is an independent company. World of Level Design website, its tutorials and products are not endorsed, sponsored or approved by any mentioned companies on this website in any way. All content is based on my own personal experimentation, experience and opinion. World of Level Design™ and 11 Day Level Design™ are trademarks of AlexG.
Template powered by w3.css


 Modular Environment Design Masterclass Tutorial Course
 Maya Foundation: Home-Study Course - Model and UV Environments
 Substance 3D Painter Essentials - Master Texturing
 UE5: Fundamentals Vol.1 - Create with Unreal Engine 5
 UE5: Retro Office Project - Create Beautiful Interior Env
 UE5: Master Material Creation - Create Master Materials in UE5
 Preproduction Blueprint: Plan Environments and Level Designs
