World of Level Design™
Tutorials to Becoming the Best Level Designer and Game Environment Artist (since 2008)
Following article was written and contributed by Pete Bottomley.
Pete is a co-founder of White Paper Games.
UDK Scripting Series by Pete Bottomley:
Intro to Kismet
Moving Doors
How to Pick Up and Place Item
How to Trigger Material Instances
How to Spawn Bots in Kismet - Part 1
How to Add Functionality to the Bot - Part 2
Bot Functionality Final Touches - Part 3
Bools - Puzzle Design and Interaction
Cinematics Introduction Part 1/2
Cinematics Introduction Part 2/2
Using Console Commands as Gameplay Elements
How to Prototype Quick Time Events in Kismet
In the final part to the AI setup we will do a bit of house-keeping to keep things organised and give the player some more direction about what to do in this situation.
In this AI video you'll learn:
- How to attach actions to events
- Display Bots name
- Change difficulty of Bot
- Use logs to display additional information
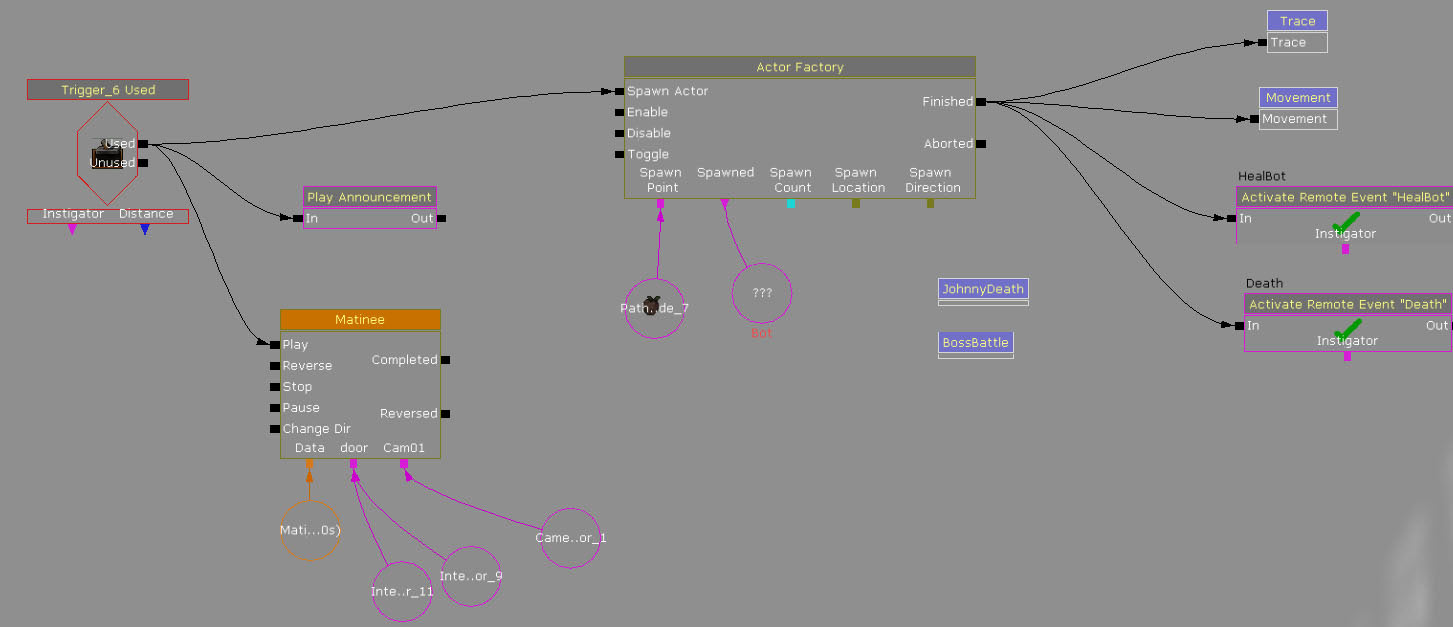
1. We can start off by adding a Trigger in our level with a Used Event to open the two doors and spawn the bot. Making sure to turn off Aim to Interact.

click on image to view full size
I have also added a Play Announcement action. This can be found by right clicking - New Action - Voice/Announcement - Play Announcement and in the Announcement Text box you can type in a message to display to the player. Make sure your Game Type is set to UTGame as Announcements don't worry with many other different game types.
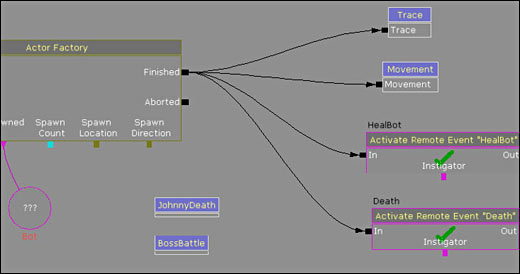
2. Next, we can set up a scenario where we detect the Bots Death and then fire off an action from it. To do this, create a Remote Event (R + LMB) and name it Death, or something similar. Hook the action Death up to the finished of the Actor Factory and move the action part of Death to somewhere away from the other kismet setups. From the Event of Death create a new Attach to Event action found under New Action - Event - Attach to Event.
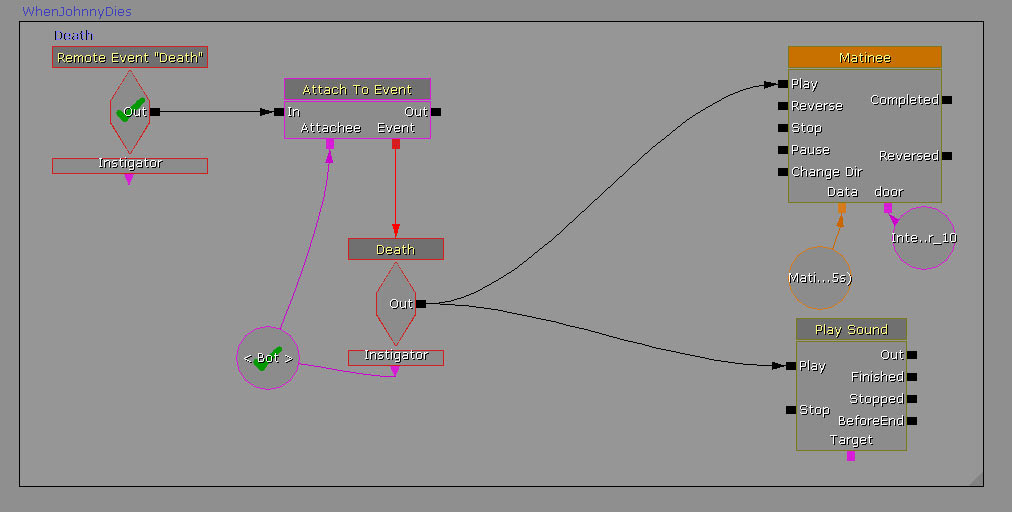
Create a Death event also found under New Event - Pawn - Death. Hook the Out of the Death remote event to the In of the Attach to Event. The Event variable box should be dragged into the top of the Death event to connect them. To link them, create a new Named Variable (N + LMB) and name it Bot. The Attachee of the Attach to Event and the Instigator of Death should both be linked to this.
click on image to view full size
The Matinee hooked up to Death in the image above opens a door to the next part of the level and also plays a Death sound found under: SoundCue 'A_Music_GoDown. MusicStingers. A_Stinger_GoDown_Playerdeath01Cue' Anything you want to happen when the Bot dies can be fired off from this event. For example, you may wish to take away all the weapons from the player, or even replenish their health if they lost any in the battle.
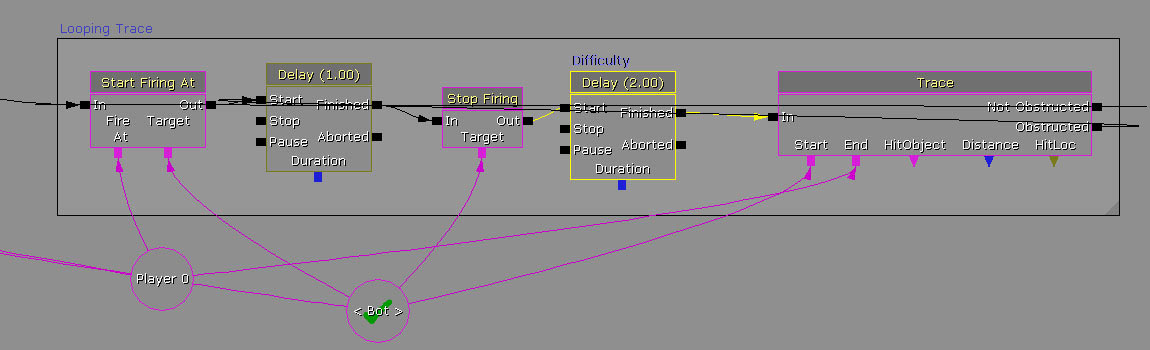
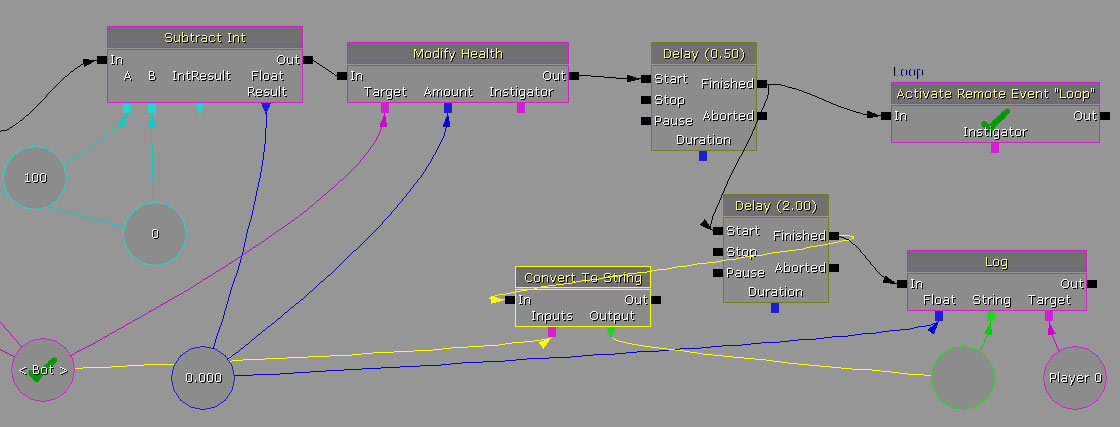
3. Next, we need to change the difficulty of the bot as it was very challenging to kill him in-game. To do this, we can locate the Delay in the second looping trace sequence after the Stop Firing action. This Delay controls how long the Bot stops firing for. I have changed mine from 0.25 to 2 seconds. This gives the player time to regain control of the match and kill the Bot. You can play around with this value to get the setup you like. The higher the number, the easier the Bot will be to kill.
click on image to view full size
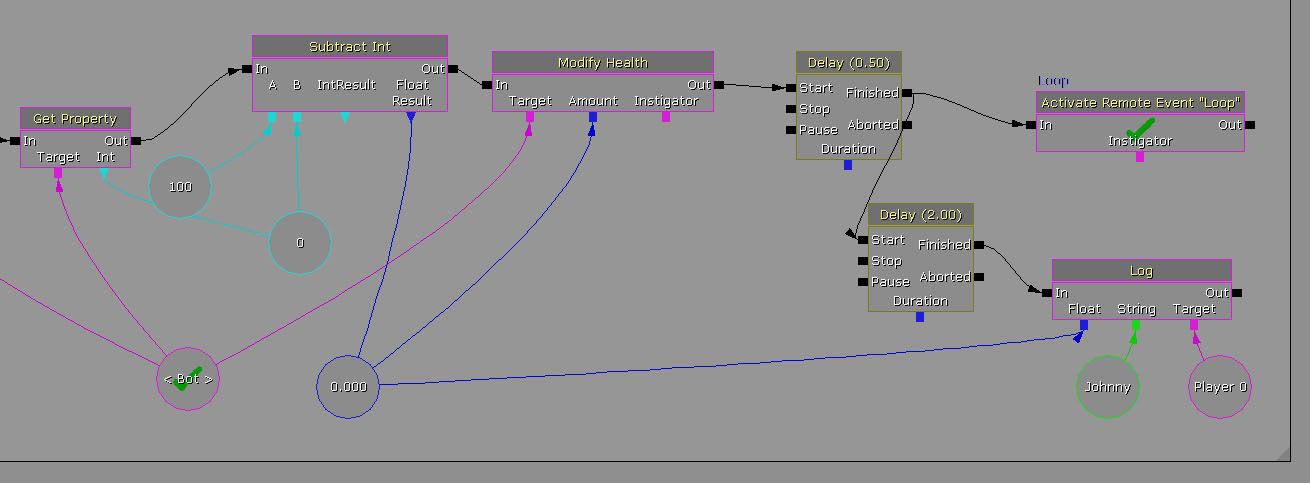
4. We also have a log that logs the Bots health to the screen in the Boss Battle sequence. This logs the Bots health to the screen every 0.5 seconds which is a few too many times for the players need. To solve this we'll add a Delay action into the sequence. If you put your mouse over the top of the In input of the Log and hold D + LMB it will create a Delay action in the sequence (see image below). Give the Delay a value of 2 seconds. This will only output the Bot's health every 2 seconds when the Log is called (theoretically, because you have a 0.5 second delay in there it will make 2.5 seconds).
click on image to view full size
If you right click on the Log and select Expose Variable - String - String * it allows us to put text onto the screen when the Log is called. Right click on the green String tab and Create New String Variable. In the Str Value properties type in the name you want to call your Bot. This will display the Bots name plus how much damage you have done to the Bot. In this example I named by bot Johnny.
If you wish to display the Pawn class you have used for the Bot we can display this also. This could be used if you have created your own custom Pawn Class you wish to display. Right click - New Action - Misc - Convert to String. This will create Convert to String action which we can hook up to the Delay Finished output to log the name. The Output will be a New Empty String Variable. The Input will be the Named Variable Bot.
click on image to view full size
5. All that's left to do now is comment your sequences and create Sub-Sequences. The new Death sequence needs commenting, in this example I have named it WhenJohnnyDies. I have also created sub-sequences for the Trace and Movement setups. To do this Select all your nodes in the Trace sequence (Ctrl+Alt) then right click - Create new Sub-Sequence. Because you have an input into the beginning of the Sequence it will create a tab that hooks up to the Finished of the Actor Factory. It is perfectly acceptable to leave the naming as Auto0, however if you wish to change this default value, double click on the Sub-Sequence and select the Sequence Activated event and change the Input Label to 'Trace'. You can do the same with the Bot Movement sequence as well.
click on image to view full size
This is how your sequence will look after commenting and sub-sequencing. It is totally up to you how you organise your Kismet as long as someone else can easily identify what each bit of your sequence does.

SUBSCRIBE & GET FREE UE5 PDF GUIDE
Subscribe to receive NEW/UPDATED and FREE "UE5 Beginner's Quick Start Guide" PDF (90 pages).

Visit this page for more info about the guide...
TOP 7 TUTORIAL COURSES FOR 2026
 Modular Environment Design Masterclass Tutorial Course
 Maya Foundation: Home-Study Course - Model and UV Environments
 Substance 3D Painter Essentials - Master Texturing
 UE5: Fundamentals Vol.1 - Create with Unreal Engine 5
 UE5: Retro Office Project - Create Beautiful Interior Env
 UE5: Master Material Creation - Create Master Materials in UE5
 Preproduction Blueprint: Plan Environments and Level Designs
TUTORIAL CATEGORIES
UE5 FUNDAMENTALS VOL.1 COURSE

UE5: RETRO OFFICE PROJECT

EVERYTHING I KNOW ABOUT PLANNING

ABOUT WoLD & ALEXG

My name is AlexG. I am self-taught level designer, game environment artist and the creator of World of Level Design.com. I've learned everything I know from personal experimentation and decades of being around various online communities of fellow environment artist and level designers. On World of Level Design you will find tutorials to make you become the best level designer and game environment artist.
Home Terms of Use/Trademarks/Disclaimers Privacy Policy Donate About Contact
All content on this website is copyrighted ©2008-2024 World of Level Design LLC. All rights reserved.
Duplication and distribution is illegal and strictly prohibited.
World of Level Design LLC is an independent company. World of Level Design website, its tutorials and products are not endorsed, sponsored or approved by any mentioned companies on this website in any way. All content is based on my own personal experimentation, experience and opinion. World of Level Design™ and 11 Day Level Design™ are trademarks of AlexG.
Template powered by w3.css