World of Level Design™
Tutorials to Becoming the Best Level Designer and Game Environment Artist (since 2008)
Following article was written and contributed by Pete Bottomley.
Pete is a co-founder of White Paper Games.
UDK Scripting Series by Pete Bottomley:
Intro to Kismet
Moving Doors
How to Pick Up and Place Item
How to Trigger Material Instances
How to Spawn Bots in Kismet - Part 1
How to Add Functionality to the Bot - Part 2
Bot Functionality Final Touches - Part 3
Bools - Puzzle Design and Interaction
Cinematics Introduction Part 1/2
Cinematics Introduction Part 2/2
Using Console Commands as Gameplay Elements
How to Prototype Quick Time Events in Kismet
Once we have our initial Bot set up we can add more functionality to him. We will keep replenishing his health if the player hits the Bot until the player picks up a rocket launcher and kills the Bot with a direct hit. We will also make it so that the Bot cannot pick up the rocket launcher and if he does, take it away from him and replace it with the default weapon.
In this added Bot functionality video you’ll learn:
- Check if the Bot is alive
- Get the Bot health
- Subtract the health property from the Bots overall health
- Heal the Bot in a looping sequence
- Take the Rocket Launcher away from the Bot if he tries to pick it up
- Add a Rocket Launcher to the scene.
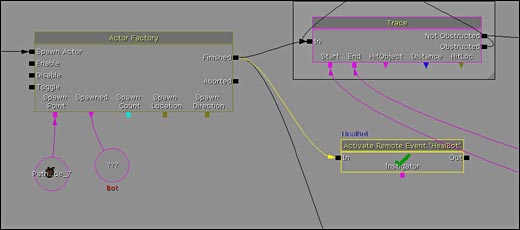
1. We’ll start by creating a Remote Event (LMB + R) and name it HealBot or something similar. This is so that we can add more Bot functionality away from our initial set up so that things can be spaced out a bit. Hook the Remote Action up to the finished output of the Actor Factory and move the Remote Event to the right of the previous set of sequences.
click on image to view full size
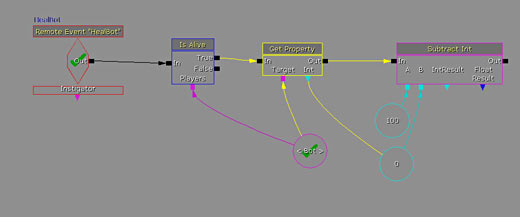
2. Next we’ll create an IsAlive comparison found in New Comparison - IsAlive. Next we need a Get Property action under New Action - Object Property - Get Property. Name the Property Name in the Properties of the action ‘Health’(Don’t worry if your Get Property action does not look like the one below, I have just hidden a lot of the tabs to make it easier to see what is going on). We also need a Subtract Int action found in New Action - Math - Subtract Int.
The Players tab of the IsAlive comparison should be a Named Variable with a Var Name of Bot. You can hook the Target of the Get Property to this Named Variable also. On the Subtract Int, A=100 and B=0. Hook the 0 up to the Int tab of the Get Property action also. What this sequence does is checks whether the Bot is alive. Then it gets the Bots health at any given moment and takes it away from 100 (which is the bots max health value).
click on image to view full size
3. Next, we need a Modify Health action found in New Action - Actor - Modify Health. We then need to create a Delay (LMB + D) after this and give it a value of 0.5 seconds. This is so that the Bot isn’t healing thousands of times each second. After the Delay we can create a Log (LMB + L) and set the Target as Player 0 (LMB + P).
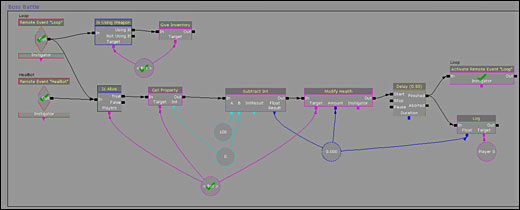
Right click on the Float Result of the Subtract Int tab and Create New Float Variable. Right click on the Log and Expose Variable - Bool - Bool *. Hook the tab up to the Float Result. You also need to hook the variable up to the Amount on the Modify Health actions also (See image below). Make sure on the Modify Health action you tick Heal on the properties otherwise you will be hurting the Bot instead!
click on image to view full size
4. We now need to create a loop so that it checks and heals the Bot every 0.5 seconds (from the Delay at the end of the sequence). To do this we can create a Remote Event (LMB + R) and name it, I’ve named mine Loop for this example. Hook the Remote Action to the Finished of the Delay and hook the Remote Event to the In of the IsAlive comparison.
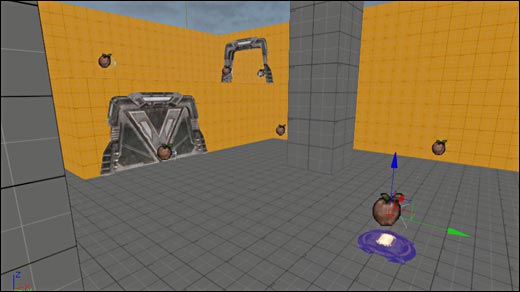
5. Next we will add a Rocket Launcher to the scene so that we can kill the Bot with a direct hit. Open your Actor Classes browser and go to Pickups - Weapon - UTWeaponPickupFactory. Place it in the scene (I have placed mine in the center). Open up the factory properties (F4) and in UTWeapon Pickup Factory select Rocket Launcher from the list.

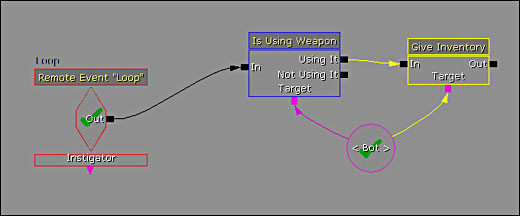
To make sure the Bot doesn’t pick up the Rocket Launcher during play we need 2 actions. Right click - New Comparison - Is Using Weapon and New Action - Pawn - Give Inventory. In the Required Weapon property of the Is Using Weapon comparison, select the Rocket Launcher.
This will check if the Bot has picked up the Rocket Launcher. If he is Using It send the output into the In of the Give Inventory. Add a new Item on the Inventory List in the properties of the Give Inventory and add a ShockRifle here (or whatever weapon you have your Bot spawning with). You also need to check Clear Existing and Force Replace so that you take away the Rocket Launcher and force the Bot to use the ShockRifle. The Target is a named variable named Bot.
Also hook the Loop event into the Is Using Weapon so that on every loop is it checking whether the Bot has picked up the weapon.
click on image to view full size
6. We have now created a sequence where we are constantly checking the Bots health. Healing him back to 100 health if he is hurt and also making sure the Bot has not picked up the Rocket Launcher. If we hit the Bot with the Rocket Launcher he will then die.
Home Terms of Use/Trademarks/Disclaimers Privacy Policy Donate About Contact
All content on this website is copyrighted ©2008-2024 World of Level Design LLC. All rights reserved.
Duplication and distribution is illegal and strictly prohibited.
World of Level Design LLC is an independent company. World of Level Design website, its tutorials and products are not endorsed, sponsored or approved by any mentioned companies on this website in any way. All content is based on my own personal experimentation, experience and opinion. World of Level Design™ and 11 Day Level Design™ are trademarks of AlexG.
Template powered by w3.css



 Maya Foundation: Home-Study Course - Model and UV Environments
 Substance 3D Painter Essentials - Master Texturing
 UE5: Fundamentals Vol.1 - Create with Unreal Engine 5
 UE5: Retro Office Project - Create Beautiful Interior Env
 UE5: Master Material Creation - Create Master Materials in UE5
