World of Level Design™
Tutorials to Becoming the Best Level Designer and Game Environment Artist (since 2008)
Following article was written and contributed by Pete Bottomley.
Pete is a co-founder of White Paper Games.
UDK Scripting Series by Pete Bottomley:
Intro to Kismet
Moving Doors
How to Pick Up and Place Item
How to Trigger Material Instances
How to Spawn Bots in Kismet - Part 1
How to Add Functionality to the Bot - Part 2
Bot Functionality Final Touches - Part 3
Bools - Puzzle Design and Interaction
Cinematics Introduction Part 1/2
Cinematics Introduction Part 2/2
Using Console Commands as Gameplay Elements
How to Prototype Quick Time Events in Kismet
Spawning a Bot in Kismet will cover how to spawn a Bot and allow him to navigate around the level. He will also be able to detect where the player is and then shoot at him if he is in view.
In this basic Bot video you'll learn:
- Spawning a Bot in Kismet
- Set up the properties of the Bot
- Use traces and firing actions to detect and shoot the player
- Use move actions to navigate the level
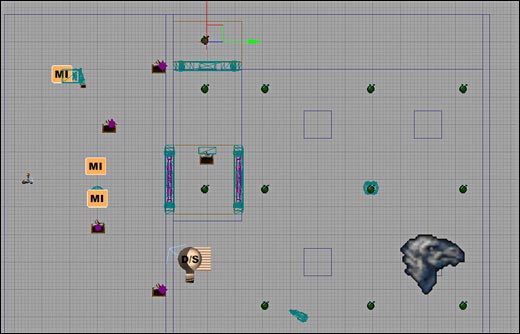
1. First we start off by adding Pathnodes into the scene for the Bot to navigate. You can find these in the Actor Classes browser - Navigation - Pathnode.
Position the Pathnodes so that they are equally dispersed around the area you want your Bot to navigate in. Remember to rebuild paths in your level before continuing.
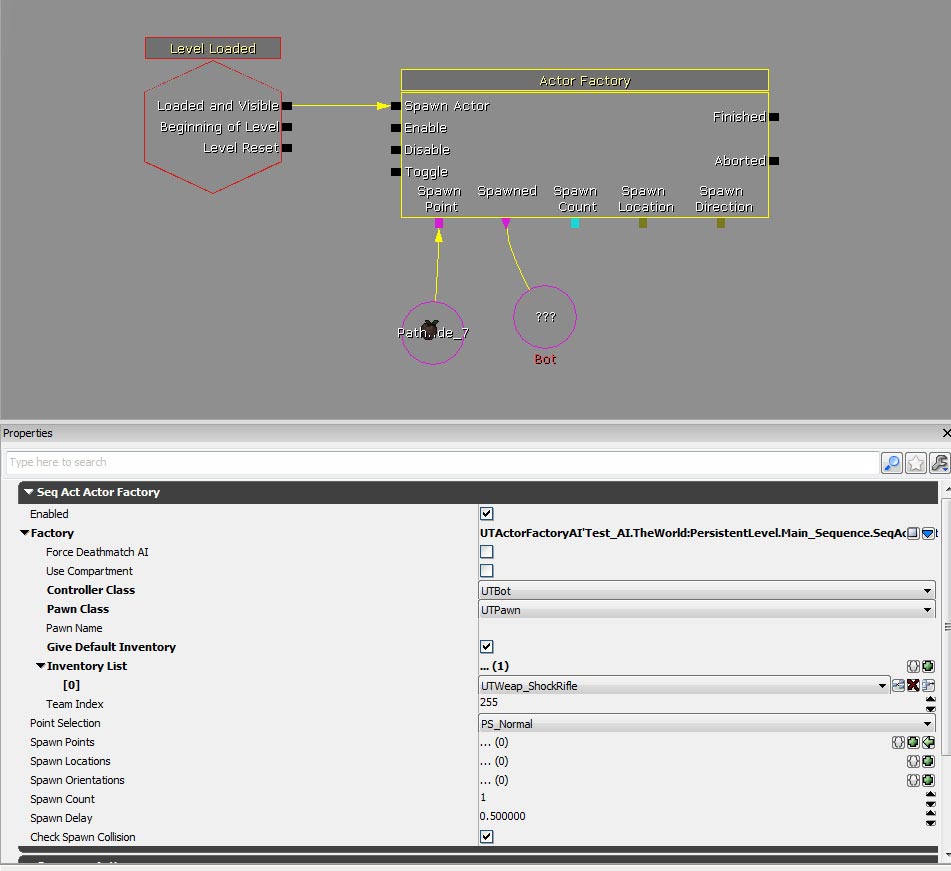
2. Next we need to select the Pathnode that you want the Bot to spawn from in the level (see above image) and then open Kismet with the Pathnode selected. Right click - New Action - Actor - Actor Factory. Create a Level Loaded Event also from New Event - Level Loaded. Right click on the Spawn Point of the Actor Factory and assign your Pathnode to that point. You can also right click on the Spawned tab and create a New Object Var and give it a Var Name of Bot in its properties.
click on image to view full size
Click on the blue tab towards the top of the Actor Factory properties and select UTActorFactoryAI.
Controller Class - UTBot, Pawn Class - UTPawn, Check Give Default Inventory and add a new inventory item and assign the Bot a weapon. For this example I have given him a ShockRifle.
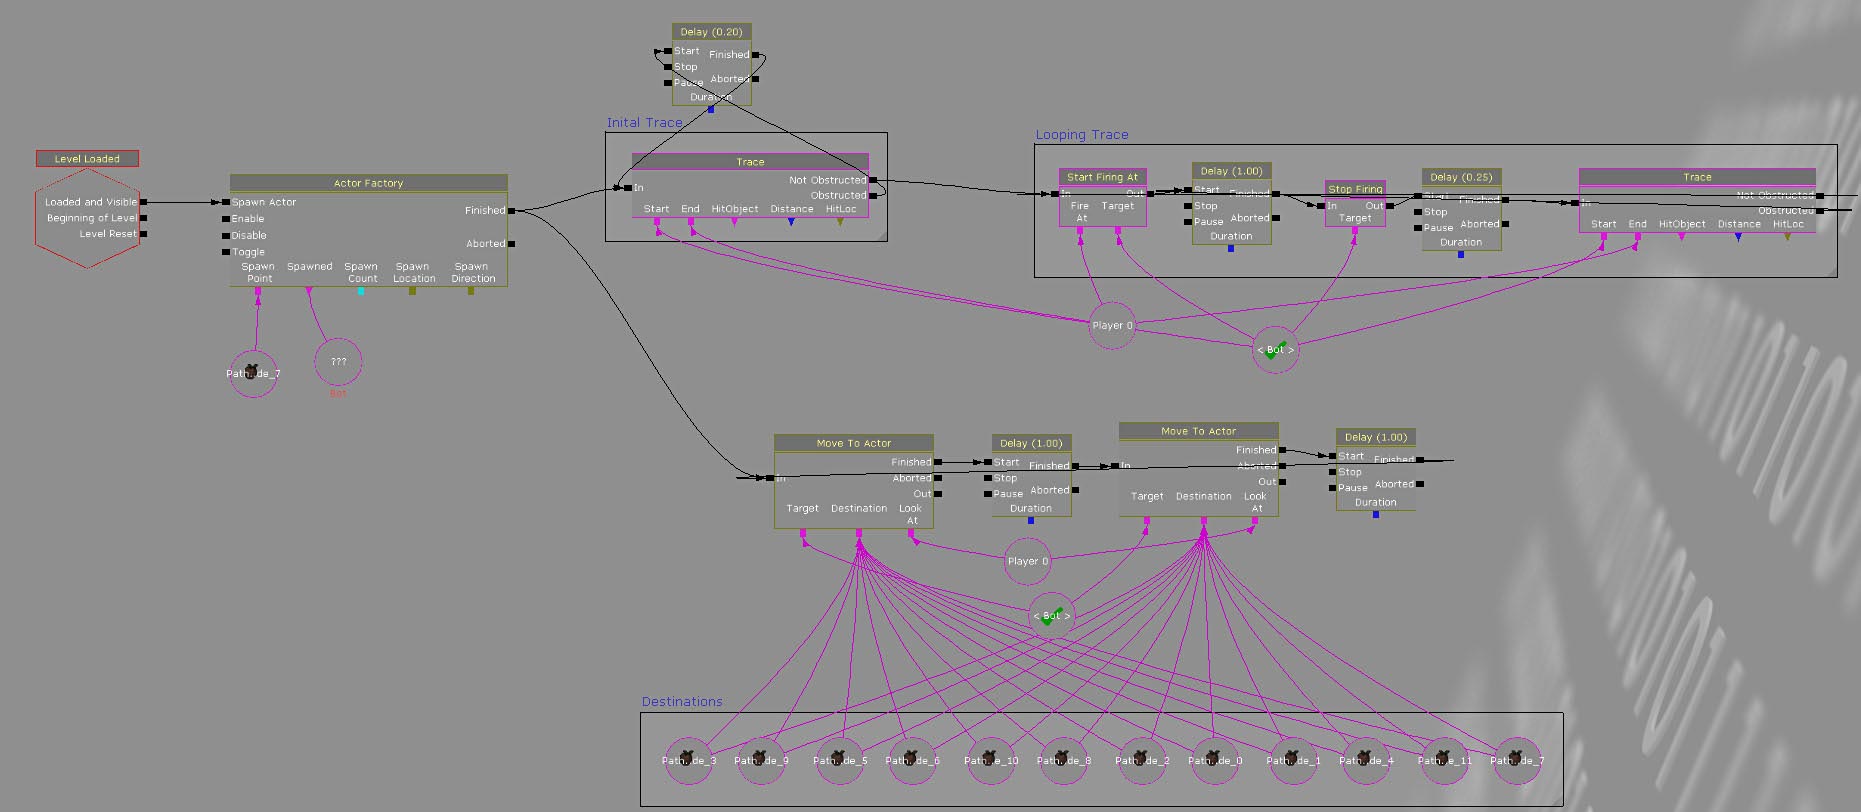
3. Next we need a way to detect if the Bot can see us. Right click - New Action - Misc - Trace. Create a new Named Variable (LMB + N) on the Start tab of the Trace action and name the variable Bot. You will also need to create a player variable (LMB + P) and untick All Players. The Obstructed output should be hooked up to a Delay action and after a 0.2 second delay should go back into the In of the Trace. Not Obstructed output should go into the Start Firing At action (See second image).

You will also need to right click New Action - AI - Start Firing At AND Stop Firing At. You need to hook them up like in the image below and also add delays (LMB + D) in the appropriate places.
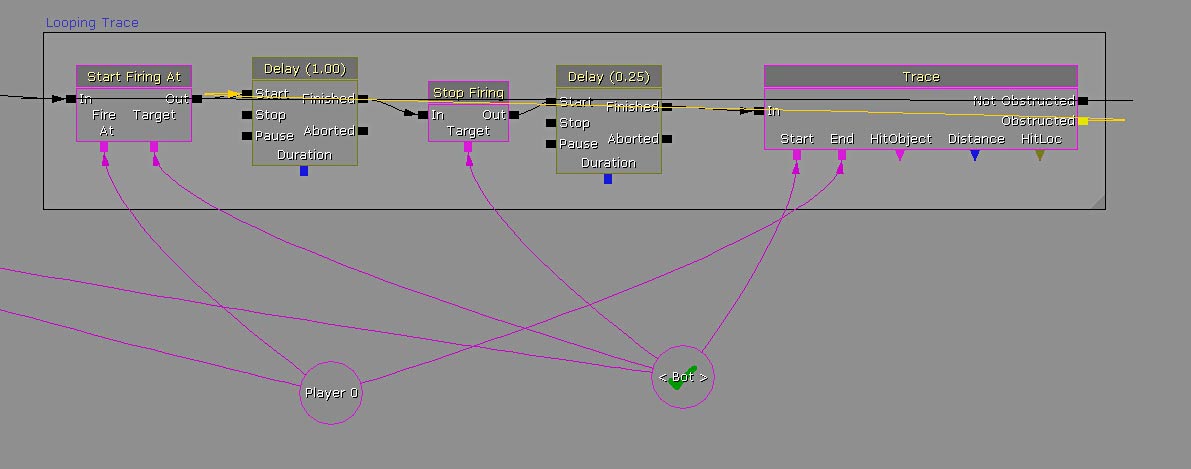
click on image to view full size
You will then need to add a section Trace action to the end of the sequence. The Start and End tabs of the second Trace are the same as the first. The Target of the Start Firing At action and the Stop Firing At action is the named variable Bot. The Fire At target is Player 0. The second Trace you have in the sequence is known as your Looping Trace. Not Obstructed output should be hooked back up to the Input of the Start Firing At action. And the Obstructed output should be hooked up to the Delay before the Stop Firing At action.
This sequence does an initial trace of whether the Bot can see you or not. If he can then he will start firing, stop firing and then do a second check (the looping trace) and then repeat the process. If the Bot can't initially see you (Obstructed) then he will check if he can see you .2 seconds later (the delay action above the initial trace) and keep doing so until he can start firing.
4. Now that we have handled the firing action of the Bot we need to get him moving around the level. To do this we use a Move to Actor found in New Action - AI - Move to Actor. We need two of these actions (Copy and Paste) with a 1 second delay in-between the two. Then we need a second delay at the end (1 second again) to loop back around to the first Move to Actor (See Image below).
In your perspective viewport, select a Pathnode, then right click on it and go to Select - Select all Pathnodes. This will highlight all the Pathnodes in your scene. Go back in to Kismet and right click on the Destination of the first Move To Actor and add the Pathnodes. Right click on the Destination tab again, select Copy and then Paste the links on the second Move to Actor action to speed things up a bit.
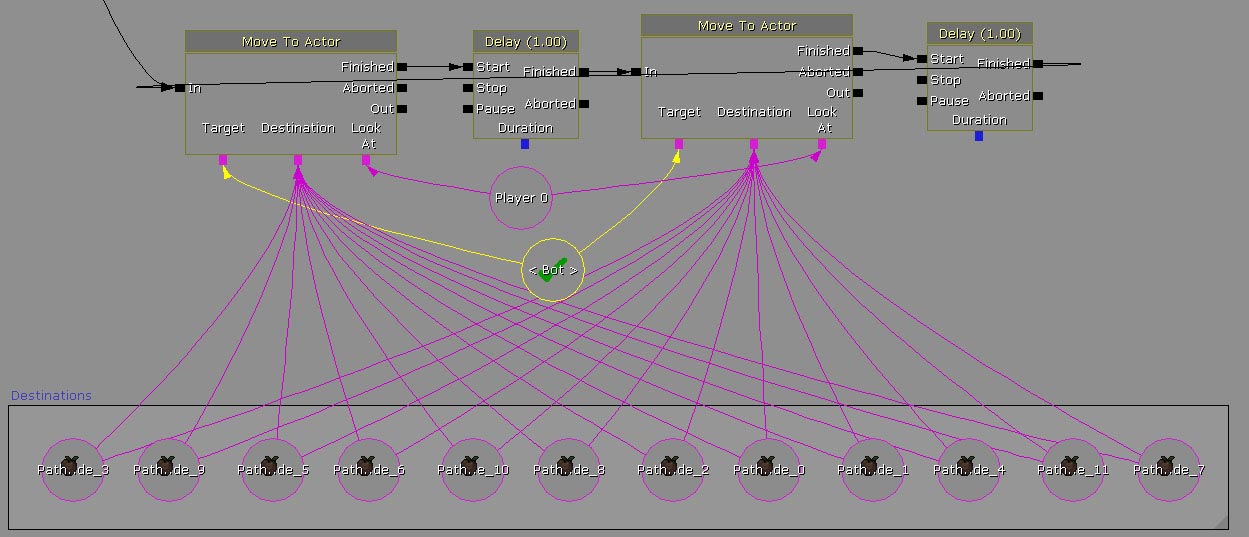
click on image to view full size
The Look At tabs of the two Move To Actor actions will be Player 0 (LMB + P). The Target will be the Bot. Create a named variable on the Target tab (LMB + N) and change the Var name to Bot. Hook up the Look At and Target of the second Move to Actor action to the other variables.
You have now create a looping moving sequence for the Bot where he finds his first Pathnode, runs to it, waits a second, and then finds the next one, waits another second, and then moves to another one. This will continue to loop whilst the Bots still alive and allow him to move anywhere in the level where you have Pathnodes.
click on image to view full size
5. Make sure you comment your sequences accordingly so that you remember exactly what is going on in the sequences.

SUBSCRIBE & GET FREE UE5 PDF GUIDE
Subscribe to receive NEW/UPDATED and FREE "UE5 Beginner's Quick Start Guide" PDF (90 pages).

Visit this page for more info about the guide...
TOP 7 TUTORIAL COURSES FOR 2026
 Modular Environment Design Masterclass Tutorial Course
 Maya Foundation: Home-Study Course - Model and UV Environments
 Substance 3D Painter Essentials - Master Texturing
 UE5: Fundamentals Vol.1 - Create with Unreal Engine 5
 UE5: Retro Office Project - Create Beautiful Interior Env
 UE5: Master Material Creation - Create Master Materials in UE5
 Preproduction Blueprint: Plan Environments and Level Designs
TUTORIAL CATEGORIES
UE5 FUNDAMENTALS VOL.1 COURSE

UE5: RETRO OFFICE PROJECT

EVERYTHING I KNOW ABOUT PLANNING

ABOUT WoLD & ALEXG

My name is AlexG. I am self-taught level designer, game environment artist and the creator of World of Level Design.com. I've learned everything I know from personal experimentation and decades of being around various online communities of fellow environment artist and level designers. On World of Level Design you will find tutorials to make you become the best level designer and game environment artist.
Home Terms of Use/Trademarks/Disclaimers Privacy Policy Donate About Contact
All content on this website is copyrighted ©2008-2024 World of Level Design LLC. All rights reserved.
Duplication and distribution is illegal and strictly prohibited.
World of Level Design LLC is an independent company. World of Level Design website, its tutorials and products are not endorsed, sponsored or approved by any mentioned companies on this website in any way. All content is based on my own personal experimentation, experience and opinion. World of Level Design™ and 11 Day Level Design™ are trademarks of AlexG.
Template powered by w3.css