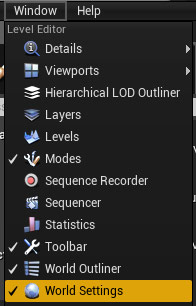
World of Level Design™
Tutorials to Becoming the Best Level Designer and Game Environment Artist (since 2008)
UE4: Night Time Lighting - Starry Sky (Static/Baked Lighting) with BP_Sky_Sphere Part 1/2
Category: UE4
January 30, 2018

How to light night time outdoor scene with a "starry" sky in Unreal Engine 4?
There are 2 major obstacles with lighting night time scenes (or daytime scenes).
First is artistic. You have to understand color theory and how lighting works to communicate proper feel, mood, and atmosphere of the environment.
Second is technical. You have to know which actors to use, which properties to change and in what order. You also have to have the content to light the scene with, such as sky Static Mesh and sky material.
In this 2-part tutorial series we'll cover both obstacles but mainly focus on the second issue - technical; how to light a night time scene, which actors to use and which properties to change.
2 tutorials in this series are:
- Tutorial #1: Night Time Lighting - Stars Sky (current tutorial)
- Tutorial #2: Night Time Lighting - Moon Sky
In This Tutorial You Will Learn
Here is what you can expect to learn from the following tutorial:
- How to light night time outdoor scene with a starry sky without any custom content
- First option for how to get access to "BP_Sky_Sphere" that comes with all UE4 projects
- How to remove "Sun Disk" from the sky sphere
- Quick fix to "I changed my Directional Light angle but my BP_Sky_Sphere isn’t updating"
- How to light night time scene without a "Directional Light"
- How to use only "Sky Light", "Environment Color" and "Auto-Exposure" to light for night time
- "Environment Color" limitation and how we can use it to our advantage
- How to adjust "Auto Exposure" for a starry night time scene
- How to change sky colors to anything you want
- One major downside in using "Sky Light" set to "SLS Specified Cubemap"
- How to use "Exponential Height Fog"
- Using "Volumetric Fog" option to create amazing atmosphere effects
- Improving night time lighting with Color Grading
- How to create a "Color LookUpTable (LUT)" and use it inside UE4
- Why you should begin to move away from using LUTs in your environments and what you should use instead
- How to adjust the new "Color Grading" properties introduced in Unreal Engine 4.16
Video Tutorial
Lighting Night Time Scenes
To light night time outdoor scenes in Unreal Engine 4 you need a Sky Sphere (aka: sky dome or skybox), Sky Light, Directional Light (if you have a moon in the sky), sky material, atmosphere (fog) and artificial lights (Spot Lights and/or Point Lights):
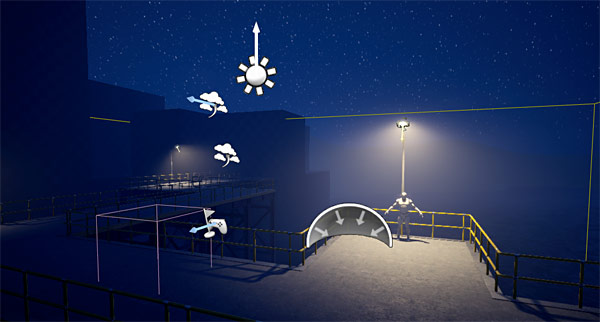
We will be using "BP_Sky_Sphere" that comes with Unreal Engine 4 and we will tweak it to what we want in our scene.
I know there is a great want to create everything yourself. I even have a complete tutorial series on it "Custom Static Mesh Formula".
But if you have to create everything from scratch every time you set out to do an environment - projects will take a long time to build. I recommend using all the tools at your disposal, this includes:
- Starter Content
- Engine Content
- Learn Content
- Marketplace Content
- Content created by others
- Content you already created for another project
Get something started quickly and update as you move forward. Create custom content and replace default content as you iterate.
Blueprint Sky Sphere That Comes with UE4
"BP_Sky_Sphere" is a Blueprint Sky set up that contains certain amount of customization right out of the box. This includes:
- Static Mesh sky
- Sky material
- Sun disk in the sky based on rotation of the "Directional Light"
- Sky color changes based on the angle of the "Directional Light"
- Ability to change "Cloud Speed" and "Cloud Opacity"
- Way to increase "Star Brightness" for night time sky
There are some limitations with using "BP_Sky_Sphere". For example you can't have both moon and stars at the same time and you can't change the size or how the moon looks.
Also, if you want something more complex such as rotating sky sphere, shooting stars, planets or night-to-day cycle that is something outside the scope of this tutorial. So if you have something more specific in mind, you'll have to create your own custom sky material and use that instead.
We'll be working with the constraints of "BP_Sky_Sphere" but even then we can get good night time sky results.
Blueprint Sky Sphere Option #1
The quickest way to get access to Blueprint Sky Sphere and its functionality is to go "File > New Level":
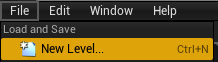
Select "Default Level":
You will have the "Blueprint Sky Sphere", "Directional Light" and "Atmospheric Fog" which all are connected to work together.
There will also be a "Sky Light", "Player Start", "Sphere Reflection Capture" and a ground plane.
You can use this scene and build your environment in.
We will cover Blueprint Sky Sphere Option #2 (Manual Setup) in the second tutorial. Where we'll insert all the actors ourselves and make them work together to understand the process and actor relationship better.
Example Scene
I have an environment already built inside this "Default Level" to give us some sort of context for lighting the night time scene.
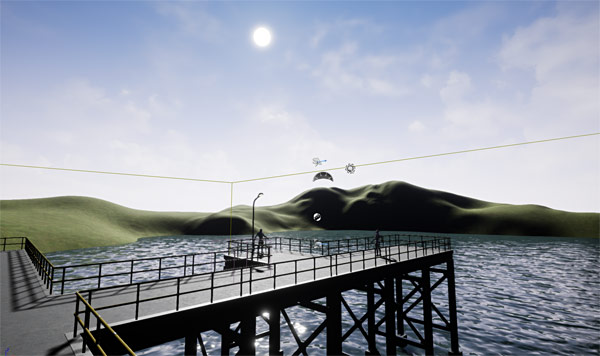
Nothing in the "Default Level" was changed other than constructing this environment using Static Meshes, inserting ocean water that comes with Starter Content and using very simple landscape.
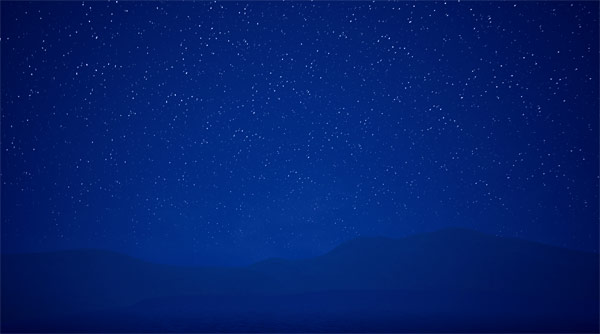
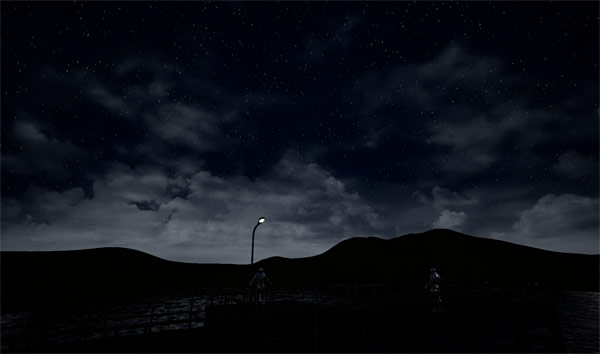
Night Time Lighting #1 - Starry Sky
Following night time scenario will give you a starry sky without a moon.
Finished sky we are after:
If you want night time moon sky, see the second tutorial.
For starry sky, the "Directional Light" needs to point up. This means you won't be able to use the Directional Light and you'll to use other lights such as a Sky Light, Spot Lights and Point Lights.
We wouldn't want to use "Directional Light" to light our night time scene anyway. The "Directional Light" will produce shadows and this will not work in this particular example. It will work if we have a moon but not when we need diffused lighting without strong shadows coming from a directional light source which is what would happen if "Directional Light" was used.
Remove Sun Disk
Select the "Sky Sphere" and in "Details" panel disable "Sun Brightness: 0":
![]()
This will remove the sun disk from the sky:

Adjusting Directional Light
Select "Directional Light" and change the rotation of the actor to:
- X = 0
- Y = 90
- Z = 0

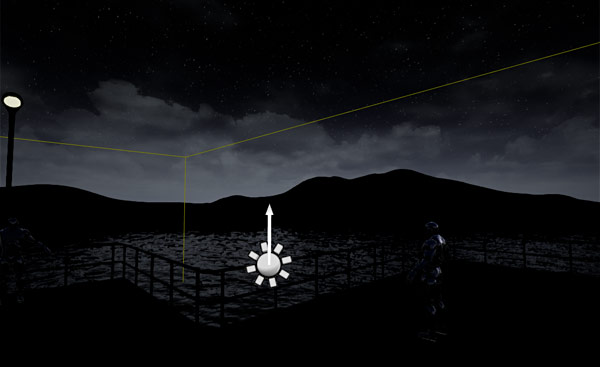
This points the "Directional Light" up. The way this Blueprint is set up it also changes the sky material to display stars. Although the starry sky will not show up yet:

To see the night time sky and stars you need to "Refresh Material" on "BP_Sky_Sphere".
Refresh Sky Material
Select the Sky and click "Refresh Material":
![]()
We can now see the night time sky and stars. This is a good start:
Post Process Volume
Insert "Post Process Volume" into the scene:

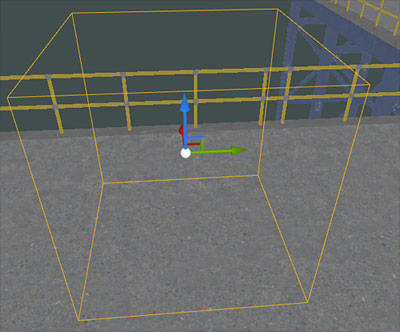
With "Post Process Volume" selected, go to "Details" panel and enable "Infinite Extent (Unbound)":
![]()
This will make the "Post Process Volume" universal, whether you are inside this volume or not.
Auto Exposure
"Auto Exposure" (Eye Adaptation) is a very useful tool that should be adjusted to your scene.
I usually disable "Auto Exposure" at the beginning of environment creation but when I get to lighting and post process stage, I adjust it to make it work for the scene.
Select "Post Process" and change "Min/Max Brightness" values. I set up mine to (exposing for the sky):
- Min Brightness: .4
- Max Brightens: .5
- Exposure Bias: adjust this if you need to add some brightness to the scene; I kept this at 0
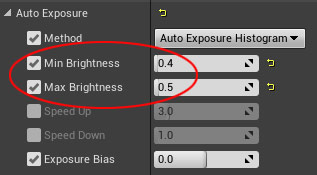
You can always come back to re-adjust "Auto Exposure" anytime, especially when you are tweaking lighting.
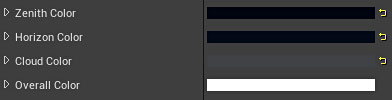
Changing Sky Colors
We'll now change colors of the sky.
Select the sky and disable "Colors Determined by Sun Position", doing this will enable us to change Zenith, Horizon, Cloud and Overall colors of the sky:
![]()
It will reset the colors of the sky sphere:

But don't worry, we'll change this.
Following 4 properties will determine the color of the sky. Change these to what you want your sky color to be:
- Zenith Color: color is when you are looking up (I used "Hex sRGB: 00050FFF")
- Horizon Color: color when you are looking straight and below the horizon (I used "Hex sRGB: 020916FF")
- Cloud Color: cloud color (I used "Hex sRGB: 3F4246FF")
- Overall Color: acts like opacity for the sky; if black(invisible)/white (visible) values are used; otherwise if you add color it will set overall color for the sky (I used "Hex sRGB: FFFFFFFF")
Here is what we have so far:
Directional Light Intensity
If you look at your scene from below you will see the "Directional Light" affecting the bottom of our environment:
Decrease "Directional Light" intensity:
- Intensity: .0001

In order to get starry sky, we need "Directional Light" to point up but we need this light to be off or have very low intensity value such as ".0001".
Lowering "Intensity" to 0 doesn't work:
So a very low intensity value should be used, which I set mine to "Intensity: .001".
Optional: You can also disable "Affect World" to remove "Directional Light" influence in the scene:
![]()
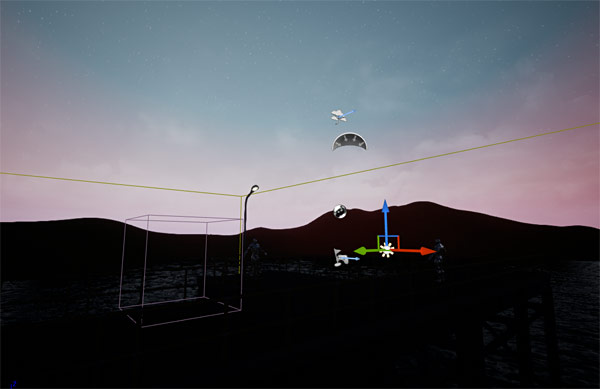
Cloud Speed, Cloud Opacity and Star Brightness
Select "Blueprint Sky" and adjust "Cloud Speed", "Cloud Opacity" and "Star Brightness" to your liking.
I changed my values to:
- Cloud Speed: 2
- Cloud Opacity: .35
- Star Brightness: .25
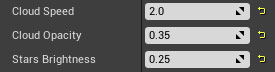
Current sky result:
Lightmass Importance Volume
Insert a "Lightmass Importance Volume":

Scale this volume to cover the important parts of your level where you want to focus your lighting in:

Night Time Lighting Without a Directional Light
Since we won't use "Directional Light" to light our scene, we'll need to work with the following:
- Post Process: Auto Exposure (Min/Max Brightness)
- Sky Light
- World Settings: Environment Color
- Spot Lights and Point Lights
Sky Light
Since we don't have a "Directional Light" contributing to the scene, we need other ways of lighting. In our case this is a "Sky Light" which is already included in "Default Level".
I will change mobility of the "Sky Light" to "Stationary":
![]()
In the default Level" it is set to "Static" but because I have water in my scene, I need to change it to Stationary. If you don't have a large body of water like I do, you can keep it to "Static".
Let's bake our lighting to see what the environment looks like right now.
"Bake Lights" on "Preview":

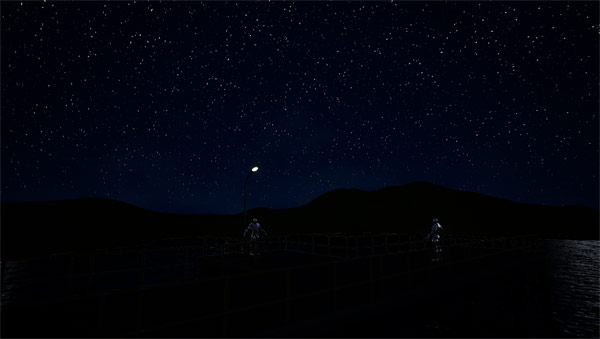
Here is what we currently have and it is very dark. We can't see our environment and we can sort of see our starry sky:
"Sky Light" is affecting our scene but it is so subtle we can't even see it.
We have 2 options on how to use the "Sky Light":
- SLS Capture Scene: which uses the scene's sky to light the environment
- SLS Specified Cubemap: which will use a specific cubemap texture to light the environment

The 2 major concerns with using "SLS Specified Cubemap" is finding HDRI cubemap texture that mimics the night time sky material in the scene and the interior spaces will be lit the same way as exterior spaces. So basically the entire environment is lit by the cubemap whether it is an exterior or an interior.
We'll be using "SLS Capture Scene", which uses the scene's sky.
Select the "Sky Light" and set the following options:
- Intensity: 2 (value of "4" was used in the screenshot example below)
- Indirect Lighting Intensity: 15 (value of "35" was used in the screenshot example below)

Important Note: night time lighting is subtle and doesn't come through in screenshots as much as it does on the monitor. I had to increase some values higher so you can see the results better.
Here is before/after adjusting the "Sky Light" "Intensity: 1" and "Indirect Lighting Intensity: 1":

Here is after adjusting the "Sky Light" "Intensity: 4" and "Indirect Lighting Intensity: 35". I used higher intensity values only for showing so it comes through in the screenshot better:

Environment Color
It is still too dark.
Let's add a bit more diffused lighting. We can increase "Sky Light" "Intensity" and "Indirect Lighting Intensity" but instead we'll adjust "Environment Color" under "World Settings":
"Environment Color" represents a constant light color surrounding the upper hemisphere of the environment (like a sky). Be careful using it as the light doesn't get bounced as indirect lighting and it causes incorrect reflection capture brightness. It is better to stick with using a "Sky Light". Knowing these limitations we can still use "Environment Color" to our advantage.
Under "World Settings" I changed "Environment Color" values to ("Hex sRGB: 0D1A30FF"):
- R = 13
- G = 26
- B = 48
- A = 255
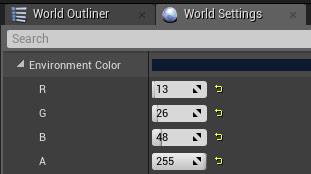
To see the results we need to build lighting.
Without "Environment Color":
With "Environment Color". Again I had to increase the intensity of "Environment Color" so it shows up in the screenshot. The "Hex sRGB" value of "Environment Color" in the screeshot below is "1A2D50FF":

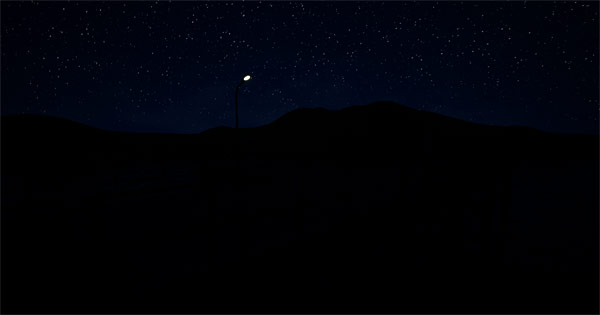
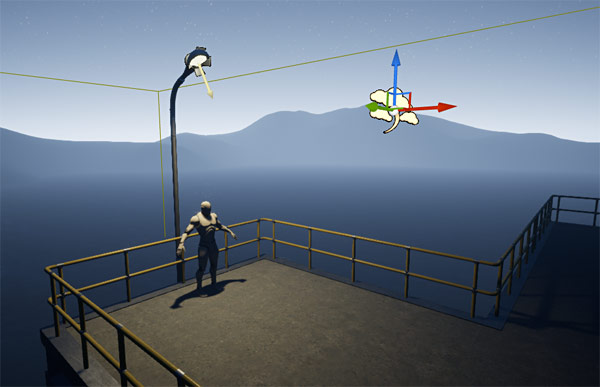
Spot Lights
No night time lighting is complete without some complimentary lights. In this example we'll use a light post Static Mesh and a "Spot Light":

Properties I used for the "Spot Light" are:
- Intensity: 14000
- Color Hex sRGB: F9F3BBFF
- Inner Cone: 50
- Outer Cone: 75
- Temperature: 5500
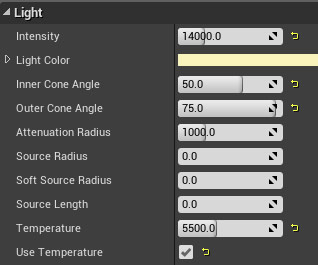
Result:

Atmospheric Fog
"Atmospheric Fog" relies on the "Directional Light" to calculate fog. Since we are not using "Directional Light" we are going to turn off "Atmospheric Fog" and use "Exponential Height Fog".
Select "Atmospheric Fog" and disable "Visible" or delete the fog actor completely:
![]()
Exponential Height Fog
Insert "Exponential Height Fog":

I've adjusted the following properties to fit the scene:
- Fog Density: .35
- Fog Inscattering Color (Hex sRGB): 0F1320FF
- Fog Height Fall Off: .2
- Fog Max Opacity: .5
- Start Distance: 250
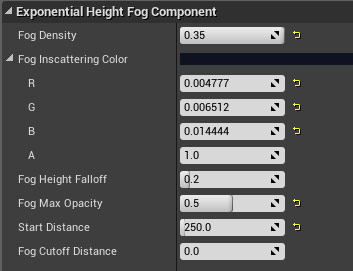
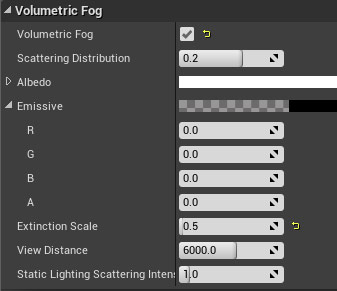
Let's add more atmospheres to the scene by enabling "Volumetric Fog" and setting up few options:
- Enable "Volumetric Fog"
- Extinction Scale: .5 (fog absorbs more light, makes it more misty)
Building Lighting
When working with Static Lighting you will need to do a lot of bake tests to achieve the final result. Although I didn't show you the constant lighting builds I had to do, I went through a lot of them to achieve the outcome that looks good.
Here is the build with everything we've done so far:
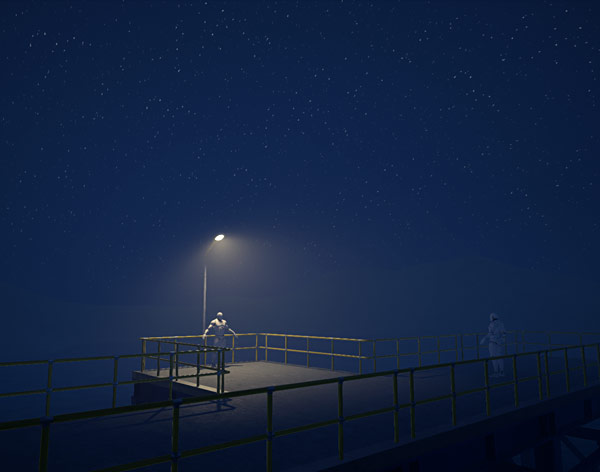
The scene looks a bit too dark, we lose definition in the distant landscape, there is lack of contrast and starry sky is being hidden by the fog.
We'll take care of all this using "Color Grading".
LUT (Color Look Up Table)
Color Look Up Table or LUT is a way to color correct your scene using a texture file with information on how your scene looks.
You can download this small texture file on this page from Unreal Engine.com.
I've also added it below:
LUT 256x16 PNG Texture (Right-Click and Save As)
Basically, LUT allows you to color correct colors and values of the scene.
To do this I took a screenshot in UE4 by pressing F9. Here is the screenshot I took in-game before any adjustments:
Open the screenshot in Photoshop and using "Adjustment Layers" I changed "Levels", "Brightness/Contrast" and "Color Balance":

Result of "Adjustment Layers":

I then placed the LUT texture underneath the "Adjustment Layers":

Cropped it to the LUT texture and saved it as PNG.
Below is the actual adjusted PNG LUT texture. If you want to use this in UE4, make sure you "Right-Click and Save As" the image below then import it into UE4:
![]()
This file now contains color information from "Adjustment Layers" that will display the same results in UE4.
I imported the LUT texture into UE4 and changed its properties to:
- Texture Group: ColorLookupTable
- Mip Gen Settings: NoMipmaps

In "Post Process Volume" under "Color Grading LUT" I used the imported LUT texture:

The scene will now display the same adjustments I made in Photoshop:

Post Process Color Grading
LUTs are a great way to change how your scene looks but there is a problem using them.
LUTs fail to be consistent across different displays such as HDR displays.
LUTs happen in Low Dynamic Range and they are adjusted at a moment in time at whatever your current display is they fail to maintain the same result for whatever the final output may be. This is a problem.
Since Unreal Engine 4.16, LUTs are being used less and Epic Games recommended using new "Color Grading" controls in "Post Process":

I used the LUT as a target what I wanted to achieve, then adjusted the "Color Grading" options in "Post Process" to match the LUT. I did not use LUT in the final scene, but everything was done through "Color Grading" options.
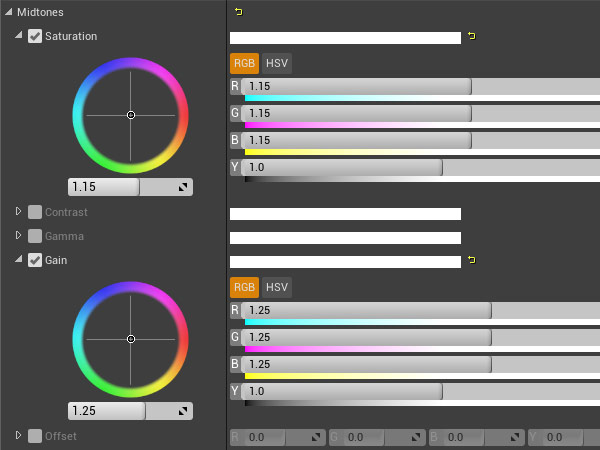
Here are all the inputs I adjusted:
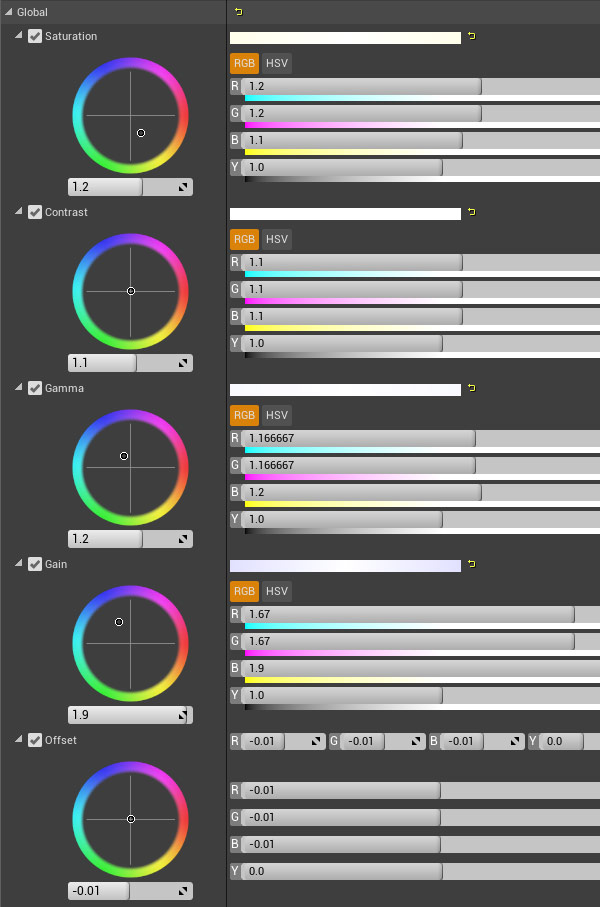
Final result:

Next Tutorial: UE4: Night Time Lighting - Moon Sky (Static/Baked Lighting) Part 2/2

SUBSCRIBE & GET FREE UE5 PDF GUIDE
Subscribe to receive NEW/UPDATED and FREE "UE5 Beginner's Quick Start Guide" PDF (90 pages).

Visit this page for more info about the guide...
TOP 7 TUTORIAL COURSES FOR 2026
 Modular Environment Design Masterclass Tutorial Course
 Maya Foundation: Home-Study Course - Model and UV Environments
 Substance 3D Painter Essentials - Master Texturing
 UE5: Fundamentals Vol.1 - Create with Unreal Engine 5
 UE5: Retro Office Project - Create Beautiful Interior Env
 UE5: Master Material Creation - Create Master Materials in UE5
 Preproduction Blueprint: Plan Environments and Level Designs
TUTORIAL CATEGORIES
UE5 FUNDAMENTALS VOL.1 COURSE

UE5: RETRO OFFICE PROJECT

MODULAR ENVIRONMENTS MASTERCLASS

LEARN THE PREPRODUCTION PROCESS

ABOUT WoLD & ALEXG

My name is AlexG. I am self-taught level designer, game environment artist and the creator of World of Level Design.com. I've learned everything I know from personal experimentation and decades of being around various online communities of fellow environment artist and level designers. On World of Level Design you will find tutorials to make you become the best level designer and game environment artist.
Home Terms of Use/Trademarks/Disclaimers Privacy Policy Donate About Contact
All content on this website is copyrighted ©2008-2024 World of Level Design LLC. All rights reserved.
Duplication and distribution is illegal and strictly prohibited.
World of Level Design LLC is an independent company. World of Level Design website, its tutorials and products are not endorsed, sponsored or approved by any mentioned companies on this website in any way. All content is based on my own personal experimentation, experience and opinion. World of Level Design™ and 11 Day Level Design™ are trademarks of AlexG.
Template powered by w3.css