World of Level Design™
Tutorials to Becoming the Best Level Designer and Game Environment Artist (since 2008)
UDK: Using Static Meshes Workflow Beginner Tutorial - How to Create Simple Room Environment
Category: UDK
April 14, 2011

In the first 3-parts of our simple room/environment tutorial we covered how to use BSP brushes to create a simple room.
We will now cover how to use static meshes that come with UDK.
Two videos are included in this tutorial. First covers the basics of using static meshes, second shows the workflow.
In the following tutorial, you will learn:
- How to add static meshes into your level
- How to navigation and search for static meshes using the Content Browser
- How to scale, move and manipulate static meshes
- Static Mesh Workflow
- Video and full notes for quick access are below
STATIC MESH WORKFLOW
CONTENT BROWSER AND STATIC MESHES
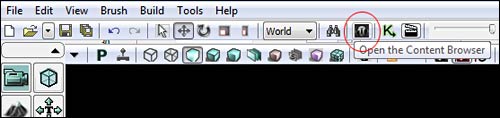
You can access all the static meshes that come with UDK by using Content Browser to look through what is available.
Click on Content Browser Icon:
Make sure that you click on Object Type: Static Meshes. This will allow you to only browse through static meshes within UDK.

You may browse through each package. This will search package names:

You can search at the very top of the content browser through available static meshes. This will search static mesh names.

Here is a full screenshot of important areas in Content Browser for static meshes:

CUSTOM STATIC MESHES
Ideally you want to create your own static meshes using a 3d software, for example such as 3dsMax, Maya or Blender. But when you are learning how to use UDK, static meshes that are available to you are enough for right now.
We will cover how to create custom static meshes in later tutorials.
STATIC MESHES PREVIEW/OPTIONS
While in the content browser, if you double click on a static mesh, preview and options window will pop up. There are various options you can look through for that static mesh, as well as get a better view of the model.

PLACING STATIC MESHES
While having the content browser open, select the static mesh you want to use and simply Left Click and Drag into the perspective viewport. This will place the selected static mesh into your environment.

Shortcut: S + Left Mouse Click = in Perspective viewport will place selected mesh from the Content Browser.
Shortcut: W = hide/show static meshes inside selected viewport
Shortcut: End = drop the static mesh down to the ground plane
SCALING/RESIZING STATIC MESHES
Few ways to scale static meshes.
First is to use the transformation gizmo.
Select the static mesh, press Spacebar key until you get scale gizmo, and resize your static mesh.

Important: do not use this method if you are going to use your static meshes in modular way. Meaning that you will have multiple static meshes snapped together to form another object. For example a building with multiple floors. Each floor is a static mesh. If you use the Spacebar scale gizmo, this will move your static mesh off the grid.
Keep you modular static meshes on the grid.
If it is a stand alone static mesh, not going to be used in modular fashion, scale away using Spacebar scale gizmo.
Second way is to use bottom toolbar, xyz transformation.
First value is xyz, next three values are x, y and z individually.

STATIC MESH PROPERTIES
After placing a static mesh into your scene, if you double click on it or select it and click F4, Static Mesh Actor Properties will open up.
This gives you options how the static mesh will behave and look in the scene.

DUPLICATE STATIC MESHES
Select the static mesh, hold down Alt + Left Click Drag = Duplicate.
Shortcut: Alt + Left Click Drag = Duplicate Static Mesh


SUBSCRIBE & GET FREE UE5 PDF GUIDE
Subscribe to receive NEW/UPDATED and FREE "UE5 Beginner's Quick Start Guide" PDF (90 pages).

Visit this page for more info about the guide...
TOP 5 TUTORIAL COURSES FOR 2026
 Maya Foundation: Home-Study Course - Model and UV Environments
 Substance 3D Painter Essentials - Master Texturing
 UE5: Fundamentals Vol.1 - Create with Unreal Engine 5
 UE5: Retro Office Project - Create Beautiful Interior Env
 UE5: Master Material Creation - Create Master Materials in UE5
TUTORIAL CATEGORIES
UE5 FUNDAMENTALS VOL.1 COURSE

UE5: RETRO OFFICE PROJECT

LEARN THE PREPRODUCTION PROCESS

ABOUT WoLD & ALEXG

My name is AlexG. I am self-taught level designer, game environment artist and the creator of World of Level Design.com. I've learned everything I know from personal experimentation and decades of being around various online communities of fellow environment artist and level designers. On World of Level Design you will find tutorials to make you become the best level designer and game environment artist.
Home Terms of Use/Trademarks/Disclaimers Privacy Policy Donate About Contact
All content on this website is copyrighted ©2008-2024 World of Level Design LLC. All rights reserved.
Duplication and distribution is illegal and strictly prohibited.
World of Level Design LLC is an independent company. World of Level Design website, its tutorials and products are not endorsed, sponsored or approved by any mentioned companies on this website in any way. All content is based on my own personal experimentation, experience and opinion. World of Level Design™ and 11 Day Level Design™ are trademarks of AlexG.
Template powered by w3.css