World of Level Design™
Tutorials to Becoming the Best Level Designer and Game Environment Artist (since 2008)

The following is a guide to most common practical material editor examples of improving and enhancing your material creation. You can do many things within the material editor that do not require you to re-adjust and re-import a texture. You can brighten or darken a texture, you can increase the depth of a normal map, you can control specular highlights or increase a contrast of a diffuse, you can add color to a diffuse or use diffuse as a specular map. All within the Material Editor itself. Find out how to improve your materials within the editor itself.
This post is an ongoing guide that will be updated with additional methods and techniques.
Table of Content:
- Brighten/Darken a Diffuse/Specular Texture
- Desaturate a Diffuse Texture
- Specular Texture Highlight Size Control
- Increase Contrast of Diffuse or Specular Texture
- Increasing Normal Map Depth
- Texture Tiling and Scale
- Adding Color to a Diffuse
- Using Diffuse as a Specular
- Material Expression Shortcut Keys
Brighten/Darken a Diffuse/Specular Texture
You can lighten or darken either your diffuse map or specular map. Use a TextureSample and ConstantVector expression plugged into Multiply. Then connect Multiply into Diffuse or Specular input of 'PreviewMaterial'.
Constant Vector node will controls how bright or dark your texture will be. Use values between 0 and 1. Values above 1 can also be used to brighten the texture.
0 = dark, black
1 = normal value, no changes

Using this set up on a specular texture, will brighten or darken the effect of your specular:

Desaturate a Diffuse Texture
Desaturation expression will remove color from your texture, turning it into a grayscale image. Use Desaturation and ConstantVector expressions.
Plug TextureSample and ConstantVector into Desaturation node. ConstantVector node plugged into Percent will desaturate your texture.
1 = full desaturation (100%)
0 = no desaturation, default texture

Any value between 0 and 1 will remove some color, partially desaturation your diffuse.
Specular Texture Highlight Size Control
Specular Power input is specular highlight size. It will define how broad or tight the highlight of your specular map is going to be. Use ConstantVector node with values between 1-100+. The higher the value, tighter/smaller specular highlight will be.

The size of your highlight will depend on the material type. Concrete or wood would need broad specular power size, while metal or glass would need tighter/smaller highlight size.
ConstantVector with value of 15 plugged into Specular Power: (Diffuse and Normal maps are disconnected to show highlight size)

ConstantVector with value of 100 plugged into Specular Power: (Diffuse and Normal maps are disconnected to show highlight size)

Increase Contrast of Diffuse or Specular Texture
Contrast allows you to intensify the colors of your texture. Make it more vivid. You can use this for diffuse to make it pop more, or you can use it on your specular to make the highlights brighter and whiter.
You need a Power and ConstantVector expressions. Use a TextureSample plugged into Power.Base and ConstantVector plugged into Power.Exp.
Constant Vector node controls how much contrast you want. Value of 1 will be the default and 0 is full white/bright. Values above 1 will increase the contrast of your diffuse.

You may also use Constant3Vector to increase contrast of Red, Blue or Green color channel:

For Specular Map, if you want to simply increase how bright your specular map is, use Multiple and ConstantVector. But if you want to increase the contrast of your Specular, you will need to use Power and ConstantVector to control the contrast then a Multiply and ConstantVector to control the brightness of your Specular.
You may also need ConstantClamp expression to control and normalize overblown values and bring the range of these values back down between 0 and 1.

Increasing Normal Map Depth
Sometimes your normal map doesn't have enough depth. You can increase the effect of the normal map. You will need a Multiply and Constant3Vector. Plug your normal map and Constant3Vector into Multiply. Then Multiply into Normal input of Main Preview Material.
Constant3Vector has 3 values, RGB. Change B channel (Z-depth) of the texture.
Select Constant3Vector and in properties set RGB to 1, 1, 1. Then change the B channel value below 1. This will increase the depth of your normal map.
In my experience, changing the B channel with values below 1 and keeping R, G channels at 1 produced better results.

Also, try to modify R and G values above 1 while leaving B value at 1 to see different effects of normal map depth.

Texture Tiling and Scale
You can change how much the texture repeats by using a TextureCoordinate expression.
Insert a TextureCoordinate using Material Expression panel or Right Click and choose Coordinates --> New TextureCoordinate.
Connect TextureCoordinate to every texture in the Material Editor. Diffuse, Specular and Normal maps. You only need to use one TextureCoordinate to do so.

Select TextureCoordinate and in the properties change U and V tiling. Default is 1. Above 1 will increase tiling, making the texture repeat more. Below 1 will decrease tiling, making the texture repeat less but also make the texture larger.

Adding Color to a Diffuse
Add a different color to your diffuse by using Multiply and Constant3Vector. Plug Diffuse into Multiply.A and Constant3Vector into Multiply.B

Constant3Vector will control RGB (Red, Green, Blue) color channels. Change these values to above 1 or below one to add different color to your diffuse, but instead of manually changing these values, Right Click on the Constant3Vector and 'Convert to Parameter'.

You will have a color picker to choose your color in the properties of the Constant3Vector.

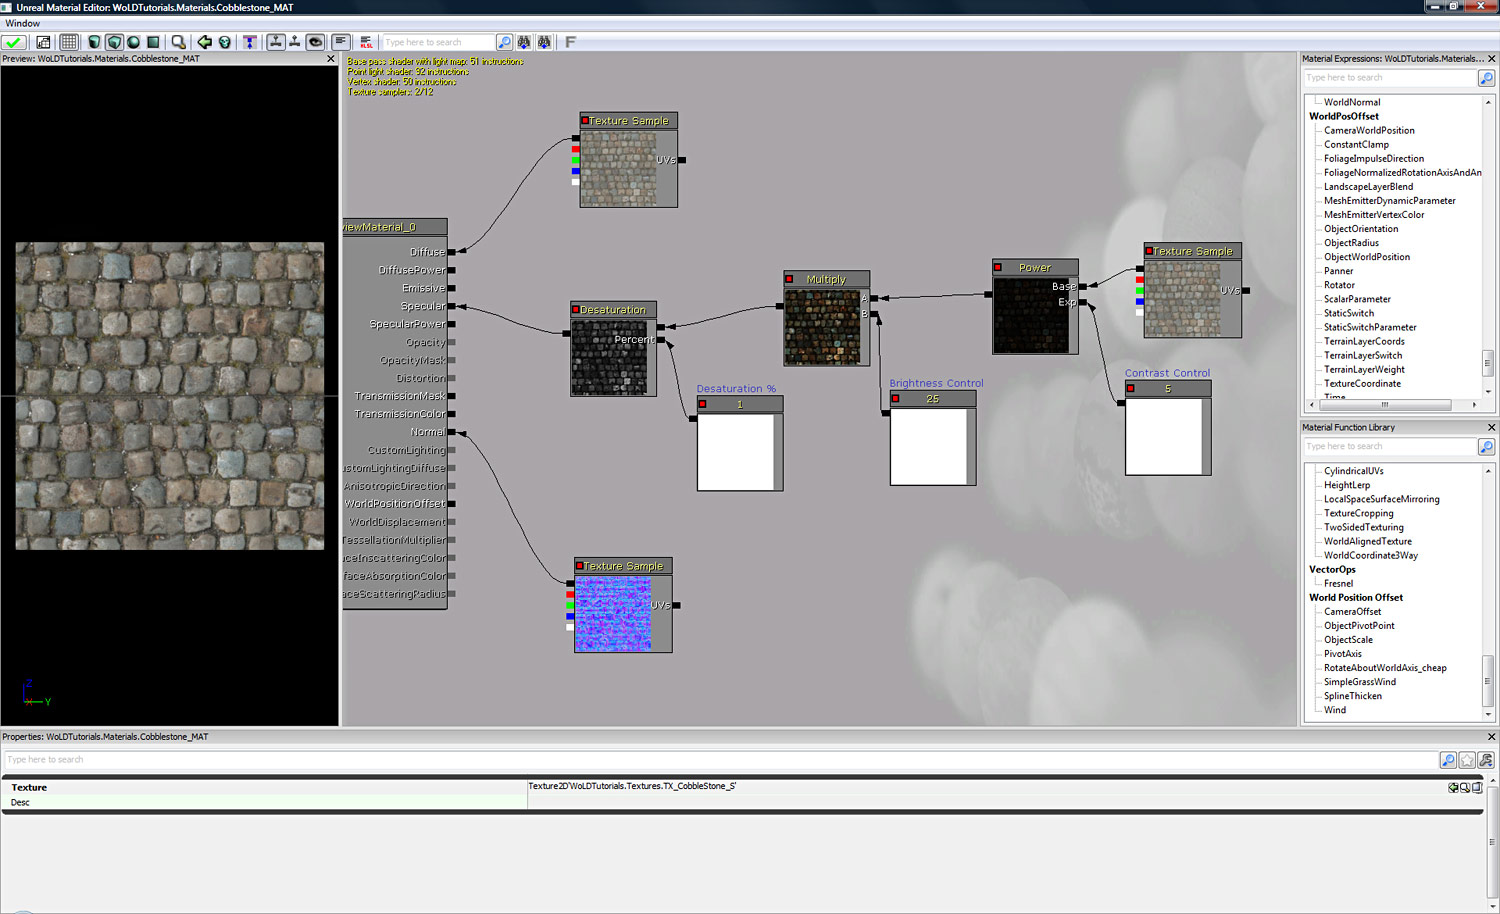
Using Diffuse as a Specular
If you don't have a Specular map created, you can use a Diffuse and with a few material expressions use it as a Spec map.
The network for this should have Desaturation, Brightness and Contrast controls.
Contrast creates higher black/white values needed for your Specular map, but this often turns the texture darker then it is. Brightness allows to control how bright you want your Specular to be.
Desaturation will turn a Diffuse into a grayscale image.
Here is the full setup:
Click on Image for Larger View
Material Expression Shortcut Keys
Commonly used shortcut keys in Material Editor for various material expressions.
- Hold 1 + Left Mouse Click = Insert a Constant1Vector
- Hold 2 + Left Mouse Click = Insert a Constant2Vector
- Hold 3 + Left Mouse Click = Insert a Constant3Vector
- Hold M + Left Mouse Click = Insert Multiply
- Hold A + Left Mouse Click = Insert Add
Related Tutorials:
UDK: Difference Between Textures and Materials
UDK: Material Editor Beginner Basics
UDK: How to Import Custom Textures
UDK: How to Create Your First Material

SUBSCRIBE & GET FREE UE5 PDF GUIDE
Subscribe to receive NEW/UPDATED and FREE "UE5 Beginner's Quick Start Guide" PDF (90 pages).

Visit this page for more info about the guide...
TOP 7 TUTORIAL COURSES FOR 2026
 Modular Environment Design Masterclass Tutorial Course
 Maya Foundation: Home-Study Course - Model and UV Environments
 Substance 3D Painter Essentials - Master Texturing
 UE5: Fundamentals Vol.1 - Create with Unreal Engine 5
 UE5: Retro Office Project - Create Beautiful Interior Env
 UE5: Master Material Creation - Create Master Materials in UE5
 Preproduction Blueprint: Plan Environments and Level Designs
TUTORIAL CATEGORIES
UE5 FUNDAMENTALS VOL.1 COURSE

UE5: RETRO OFFICE PROJECT

MODULAR ENVIRONMENTS MASTERCLASS

LEARN THE PREPRODUCTION PROCESS

ABOUT WoLD & ALEXG

My name is AlexG. I am self-taught level designer, game environment artist and the creator of World of Level Design.com. I've learned everything I know from personal experimentation and decades of being around various online communities of fellow environment artist and level designers. On World of Level Design you will find tutorials to make you become the best level designer and game environment artist.
Home Terms of Use/Trademarks/Disclaimers Privacy Policy Donate About Contact
All content on this website is copyrighted ©2008-2024 World of Level Design LLC. All rights reserved.
Duplication and distribution is illegal and strictly prohibited.
World of Level Design LLC is an independent company. World of Level Design website, its tutorials and products are not endorsed, sponsored or approved by any mentioned companies on this website in any way. All content is based on my own personal experimentation, experience and opinion. World of Level Design™ and 11 Day Level Design™ are trademarks of AlexG.
Template powered by w3.css