World of Level Design™
Tutorials to Becoming the Best Level Designer and Game Environment Artist (since 2008)
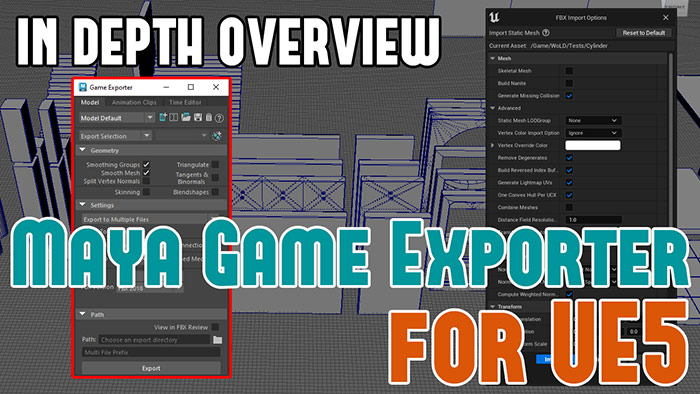
In-Depth Overview: How to Batch Export Using Maya Game Exporter for UE5/UE4
Category: Maya, UE5, UE4
January 12, 2023

Exporting large number of Static Meshes is tedious and time-consuming, especially when you are working with a lot of modular meshes. Too much time is spent on exporting such as moving objects to World Origin, renaming, moving them back, then repeating the steps for the rest of the models.
But there is an easier way...
Maya Game Exporter can automate the export process for you. One of the most useful options is moving assets back to world origin without you having to do it manually.
If you haven't used Maya Game Exporter, after this tutorial you will especially for a large set of modular meshes.
Video Tutorial
Standard FBX Workflow
Standard FBX export workflow steps:
- Select your model
- Modify pivot point
- Position the model at its pivot point in the World Origin
- Export by going to File > Export Selection
- Name or rename the mesh
- Move the mesh away from the World Origin
- Repeat for another model
The standard FBX workflow is still great for a handful of meshes. But if you have 20+ meshes or in some modular mesh kits you may have 100+, this is incredibly tedious and time-consuming.
Faster Way with Game Exporter
For large number of Static Meshes, use Game Exporter.
File > Game Exporter:

Settings I Use
Before I cover the settings and options in the Game Exporter menu, here is what I set to export environment assets.
- Model Tab
- Export Selection
- Geometry: enable Smoothing Groups and Smooth Mesh
- Export to Single or Multiple Files (I use both depending on the number of meshes)
- Move to Origin enabled
- Disable animation
- Up Axis: Y
- File Type: Binary
- FBX Version: 2018+
- Define the Path (folder where the FBX files will be saved)
- Enter an FBX file name (if you chose Single File Export)
- Enter Static Mesh prefix (if you chose Multiple File Export and if you don't want a prefix, leave it empty)
- Export

Different Tabs for Model, Animation, Time Editor
You have ability to export Models, Animation Clips or Time Editor Clips by switching the different tabs and looking over the options.
For environment assets and modular meshes choose Model. This is what is covered in this tutorial.

Presets
There is only one available preset to choose from the drop down menu - Model Default. All the options you see set in Game Exporter menu are currently using default preset.

However you can create your own presets and save them:
- Add New Export Preset: create a new preset
- Rename: rename any existing preset
- Load Preset from Disk: load a preset if you have it saved
- Save Preset to Disk: save an existing preset
- Delete Export Preset: delete the selected preset
In this tutorial I will be using the Model Default preset and changing the options within that preset to export.
Export All or Selection

Export All or Export Selection allows you to Export every object in the scene or only the selected objects in the scene.
I usually choose Export Selection, this way I get to control what gets exported and what doesn't.
Geometry Options
Geometry section contains a lot of options that defines what information gets exported along with your mesh.

For majority of environment assets, props, modular meshes the only settings you should enable are:
- Smoothing Groups
- Smooth Mesh
The rest of the options are more on case-by-case basis with few of them for advanced users.
Smoothing Groups
The objects Soft/Hard edge information will get converted to Smoothing Groups and exported with the file. If disabled, then edge information is not converted to Smoothing Groups.
Smooth Mesh
Allows you to export Subdivision Preview Mesh or will always export the polygonal mesh regardless if you are using Subdivision Preview Mode.
Here is how this works.
- If Smooth Mesh is Disabled: will export the mesh as you see it in the viewport. If the mesh has Smooth Mesh SubDiv Preview enabled (Shortcut 3) that is the mesh that is exported. If the mesh is Low-Poly Polygonal object (Shortcut 1) that is the mesh that is exported. Whatever you see in the viewport, that is what will be exported.
- If Smooth Mesh is Enabled: this will always export the Polygonal Object (Shortcut 1) regardless if you have Smooth Mesh SubDiv Preview enabled or not in the viewport (Shortcut 3)
Split Per-Vertex Normals and Tangents/Binormals
Split per-vertex Normals and Tangents and Binormals are advanced rendering/shading settings. Often used on foliage.
This will export the Split Per-Vertex Normals and Tangents/Binormals data within the FBX of the mesh.
Unless you have edited object's Normals, Vertex Normals and Tangents then you do not need to worry about this.
For most Static Meshes, most environments and prop assets you will not be dealing with these.
Triangulate
This will triangulate the mesh for you. You can also let Unreal Engine triangulate the mesh for you on import.
I disable Triangulation and let UE4 or UE5 do this for me on import.
Skinning and Blendshapes
These two options are used for object deformation and morph targets. Disable these if you are dealing only with static environment geometry.
Settings

Export to Single or Multiple Files
Choose to Export to Single File or Export to Multiple Files:

- Export to Single File: all selected objects in the scene will be exported into one single FBX file
- Export to Multiple Files: all selected objects in the scene will be exported into separate, individual FBX files
Move to Origin
You need to enable this. This is by far the most useful option to work with.
To export for UE5, you need to place your models at the World Origin at their pivot points then export. This is time consuming for large amount of meshes.
Using Game Exporter, you let Maya deal with this.
You do need to control your pivot points on all the objects prior to export. Each object will be automatically moved to the 0,0,0 World Origin on Game Export at their pivot points.
Animation
Disable animation. We are working with environment art assets, static geometry. No animation is being exported.
Up Axis
Keep it at default at Y. UE4 and 5 will convert this on import to Z. You don't need to define this for Unreal Engine.
Embed Media
Keep this on. This will embed any Textures you might be using in Maya into the FBX file. You can then let UE5 import these textures for you.
File Type and FBX Version
Keep File Type set to default Binary.
And for FBX Version I set this to whatever the Game Exporter gives me. I don't like using the most recent FBX version to export as Unreal Engine may not be fully compatible with the latest version that Maya has. Default is set to 2018 (in Maya 2023) and this has been working without any issues.
If you run into any issues with FBX version being incompatible with UE5, then go change this until you get no incompatibility errors.
Path

Path is the export folder directory. Choose where you want to export your FBX files into.
Then enter a filename or prefix. This all depends if you chose to Export to Single File or Export to Multiple Files.
Export to Single File:
- Must define a name for the FBX file. This name will be included in Prefix of the Static Mesh name on UE5 import
- Make sure you name all your objects prior to export. These names will be used as the name of the Static Mesh in Unreal Engine
- Example: FileName_ObjectName
Export to Multiple Files:
- You can leave this field blank and if you do, the name of the FBX file will be taken from the object name you used in Maya
- If you enter something to Multi File Prefix then this name will be added to the FBX file name on Export along with the name of the object you used in Maya
Importing into UE5
You are now ready to Import into Unreal Engine.
If you are importing a single FBX file that contains multiple exported meshes, you need to make sure you have Combine Meshes disabled in UE options. This will ensure that all separate objects in the FBX become individual Static Meshes in UE5.
![]()
If you are brining multiple files, then it doesn't matter if you have Combine Meshes enabled or not. Each file will be a separate, individual Static Mesh.
The rest of the import options in UE5 depend on you. Here is what I enable and disable. But remember these may vary for you and what you want UE5 to import and generate.
- Enable: Generate Collisions
- Disable: Generate Lightmap UVs
- Material Import Method: Do Not Create Material
- Disable: Import Textures

Maya Foundation: Home Study Course
Learn to model your own Static Meshes (3d models) so you can use the Game Exporter.
Home Terms of Use/Trademarks/Disclaimers Privacy Policy Donate About Contact
All content on this website is copyrighted ©2008-2024 World of Level Design LLC. All rights reserved.
Duplication and distribution is illegal and strictly prohibited.
World of Level Design LLC is an independent company. World of Level Design website, its tutorials and products are not endorsed, sponsored or approved by any mentioned companies on this website in any way. All content is based on my own personal experimentation, experience and opinion. World of Level Design™ and 11 Day Level Design™ are trademarks of AlexG.
Template powered by w3.css


 Maya Foundation: Home-Study Course - Model and UV Environments
 Substance 3D Painter Essentials - Master Texturing
 UE5: Fundamentals Vol.1 - Create with Unreal Engine 5
 UE5: Retro Office Project - Create Beautiful Interior Env
 UE5: Master Material Creation - Create Master Materials in UE5


