World of Level Design™
Tutorials to Becoming the Best Level Designer and Game Environment Artist (since 2008)

Unreal Engine 4 is a complete game engine; it is very expansive and can be overwhelming to a complete beginner.
Common question is:
"Where do I even begin?"
The following crash course is an overview of what you need to know right now to get started with UE4. It is perfect for those who have never used and are very intimated by Unreal Engine - but need a quick to the point overview to begin using this game engine.
So the focus of this tutorial is to show you the essentials to getting started with UE4 as quickly as possible; to give you a broad overview of "where and how to begin".
If you are interested in more methodical and step-by-step approach to learning Unreal Engine 4, then I recommend "UE4 Fundamentals" guide.
In this tutorial guide you will learn:
- How to download and install UE4
- Starting your very first project
- Launching the editor
- Setting preferences for the first time after launching the editor
- Creating, opening and saving maps
- Working with viewports
- How to navigate around viewports
- How to move/rotate/scale objects
- How to work with Local/World coordinate system
- Adjust details properties for each object
- Using the Content Browser to insert Static Meshes into your map
- Using grid snapping
- Adding and subtracting with BSP brushes
- Player scale
- Inserting a Player Start
- Inserting sun light
- Inserting point lights and spot lights
- Using the World Outliner
- Play testing your level from the editor
- Building (rendering) your level
Let's begin.
1. Download and Install
Unreal Engine 4 is free to use. So let's download and install it.
Go to www.unrealengine.com and click on "Get Unreal" icon on the top right of the website:

You will need to create a log-in and register to access Unreal Engine 4:

Before you can use the game engine, you have to download and install Unreal Engine/Epic Games Launcher.
Unreal Engine Launcher is very important. It is a portal through which you download and launch any Unreal Engine version you want. Through this portal, you also create new projects, manage your projects and download Marketplace Content.
So go ahead download and install "Epic Games Launcher" file:


After installation, you should now have "Unreal Engine 4" or "Epic Games Launcher" shortcut on your desktop, double click to open it:

Click over to Library tab and under Engine Version click on the plus icon. Using the drop down menu, choose which Unreal Engine version you want to download and install. Choose the newest/latest version to download:

Downloading and installation will take a bit of time, but once it is done, you now will have Unreal Engine 4 on your computer - ready to use.
2. Create You First Project and Launch the Editor
In order to start Unreal Engine 4 editor you will have to:
- create a new project
- open already existing project
- open a project that you downloaded from Learn/Marketplace section
Let's create our first project.
In "Unreal Engine/Epic Games Launcher" left click on "Launch Unreal Engine version" button on top left:

Switch tab to "New Project" and choose Blueprint instead of C++. Blueprint is a very powerful visual scripting language and you won't have deal with any C++ code.
Once you get more advanced with UE4 you can learn C++ programming. But to keep things simple, begin with Blueprint. It will do most of the functionality you will ever need to start with - especially if you are a level designer or a game environment artist.
Choose a game template to use. You can choose FPS, third-person or any other available templates:

Next, choose the following:
- Desktop
- Maximum Quality
- With Starter Content
Select a location for your project to be stored. I choose to store all of my Unreal projects on a different drive other than my main C drive.

Name your project and click on Create Project:

This will launch the Unreal Engine editor and open your newly created project.
Once you created a project, you will see it show up in Unreal Engine Launcher under the Library tab:

To open already created projects, double click on the icon within the Library tab or right click on the thumbnail and choose Open:

3. Use Starter Content
During project creation, make sure to enable "With Starter Content" option to have a set of UE4 assets to be available with your project:

This will include a series of Static Meshes, materials and effects that you can use to construct a simple environment with:

4. First Time Inside the Editor
After launching the editor for the first time, go to Edit > Editor Preferences:

Under Loading & Saving and Auto-Save section, choose to Disable Auto-Save:
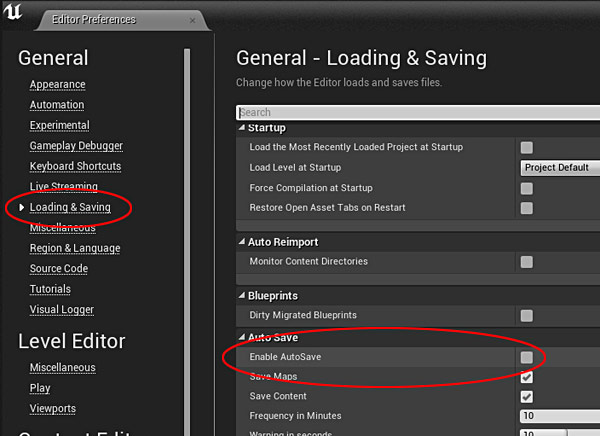
Now, this option is a personal preference. I disable auto-save functionality because I like to control when I save my work. But, this is a very useful function to keep enabled, if you want.
If you choose to keep Auto-Save enabled, set how often you want the editor to automatically save your work and how often to warn you about when it is saving:

5. Creating, Saving and Opening Levels/Maps
As in any game engine/level editor you can create, save and open maps. The file extension for UE4 maps is .umap.
Default Maps:
As you launch a project, you will have a default level/map open automatically. Depending on the type of game template you chose, this starter map will vary. This is a default starter map for FPS Shooter Template:

You can change starter default map to any other map. To update this go to Edit > Project Settings:

Under Maps and Modes and Default Maps you will have an option to switch to Game Default Map and Editor Startup Map:

Start a New Map:
To start a new blank map without any actors go to File > New Level:

Choose between Default and Empty Level:

Empty Level will be a blank map without anything in it:

But to get things started quicker, choose a Default Level.
Default template gives you few necessary actors to start with such as a ground plane, light source (Directional Light and Skylight), player start, skysphere and atmospheric fog:

Saving Levels:
To save any level you are currently working on, go to File > Save As:

Choose a folder to store your map in, name it and choose Save:

Make sure that all of your maps and any content that you save are inside the Content folder of your project. Do not save anything outside the Content folder. You can organize your maps better by creating a new folder inside the Content folder and naming it Maps:


Opening Levels:
To open any existing/saved level, go to File > Open Level:

Navigate into the folder where the map is saved and click Open:

6. How to Work with Viewports
There are two types of viewports: perspective and orthographic.
Perspective is the real world view. It is how your level looks from the point of view of the player inside the game:

You could also enable perspective viewport as a wireframe, unlit and other various other developer modes.
Orthographic view is the schematic wireframe grid view. You will have a front, side and top views:

Perspective is going to be your primary view through which you work and construct your map.
Switch to 2x2 view of the editor by restoring the perspective viewport. Click on "Maximize/Restore this viewport" icon:


You will now have all 4 views on the screen at the same time. Maximize any viewport to full window by clicking on the "Maximize/Restore this viewport" icon again:

Use the following hot keys to quickly switch to any orthographic viewport:
- Alt + G = Perspective
- Alt + H = Front
- Alt + J = Top
- Alt + K = Left/Side
- Alt + Shift + K = Right/Side
Let's switch back to perspective view.
Game mode will show you how the environment will look during gameplay. All editor actors become hidden. Press G for Game Mode.
- G = Game Mode
Real time mode will display animated and real time effects such as materials and particles. Press Ctrl + R for real-time mode.
- Ctrl + R = Real Time Mode
Pressing F11 will maximize the active viewport to fill the entire screen. This is something I use a lot.
- F11 = Full View
You can change the perspective viewport to use different view modes, such as Unlit, Wireframe, Detail Lighting and other.
Use the drop down menu to choose:

Each view mode has its own hot key. For beginners, keep your perspective viewport to Lit (Alt+4).
There are other handful of options under Show and Arrow drop down menu; including Realtime, Game Mode and Full View/Immersive Mode:

But the ones we just covered are enough to get you started.
7. Viewport Navigation
Let's cover the essentials for navigating each viewport.
Few hot key abbreviations we'll be using:
- RMB = Right Mouse Button
- LMB = Left Mouse Button
- MMB = Middle Mouse Button
Navigating In Perspective Viewport:
The main navigation key combination you will use the most is:
- Hold RMB + WASD = Move Forward/Back/Side-to-Side
If you want to disable holding the Right Mouse Button as you press WASD keys to navigate, go to Edit > Editor Preferences:
Under Viewports and Flight Camera Control Type, choose "Use WASD for Camera Controls" from drop down menu:

The rest of most common ways to navigate inside perspective viewport are:
- Hold RMB + Mouse Move Any Direction = Look Around From Stationary Position
- Hold LMB + Mouse Move Forward/Back and Left/Right = Move forward/back; Look left/right from stationary position
- Hold MMB + Mouse Move = Pan around Up/Down/Left/Right
- LMB+RMB+Mouse Move= Pan around Up/Down/Left/Right (same as MMB + Mouse Move)
- MMB Scroll = Camera zoom in/out
Perspective View Camera Speed:
When you are navigating around in perspective viewport, the camera speed at which you look around can be adjusted. To change the viewport camera speed, use the slider to lower number (slower) or higher number (faster):

Navigating In Orthographic Viewport:
Navigation in orthographic viewports is a lot simpler.
- Hold RMB + Mouse Move = Pan
- Hold LMB + Mouse Move = Marquee Selection
- Hold LMB + LMB and Mouse Move Forward/Back = Zoom In/Out
- MMB = Measuring Tool
8. Working with Actors/Objects (Move, Rotate, Scale)
In UE4, any object that you place in the world is called an actor. So we'll use actor and object interchangeably as they mean the same thing.
Very basic functions are selecting, deselecting and removing objects:
- Left Click = Select the Object
- Escape = Deselect the Object
- Delete = Remove the Object
After you select any object in the viewport you will see a move/rotate/scale gizmo appear:

- Spacebar = Cycle Between Move/Rotate/Scale Transformation Gizmo
- W = Move
- E = Rotate
- R = Scale
To move/rotate/scale the selected object, left-click and drag on the appropriate transformation handle within that gizmo:

If you don't see the transformation gizmo, press G key to disable game mode.
Placing objects is covered in a later section of this Crash Course Guide.
9. Local and World Coordinate System
Each object in UE4 can be moved along 2 types of coordinate systems - world or local. Most of the time you will be working with World coordinate system as you construct your environment. But there will be time when you'll need to work with object's Local coordinate system.
World coordinate applies to the entire world and XYZ direction does not change.
Local coordinate applies to the individual object. It ignores the universal XYZ position of the world.
Click on the World/Local icon within the viewport to cycle between World and Local:

- Ctrl + ~ = Switch Between Local and World Coordinate System

To see how this works follow these steps:
- Select any Static Mesh (3d model) inside the viewport
- Rotate it 40 or 50 degrees on Z axis
- Switch to Move tool (W)
- Move the box on X and on Y
- Switch from World to Local coordinate system (Ctrl + ~)
- Move the box again on X and on Y
- Notice the difference of how you are able to work along the World or Local coordinate system
- Switch back to World coordinate system (Ctrl + ~)
10. Details Panel/Object Properties
Each object/actor you select will have a set of properties to adjust. Select an object and take a look at the Details panel on the lower right hand side to see that actor's settings:

Depending on the type of actor you select, these settings will be different. For example if you select a Point Light, you can change color, light intensity and radius.
You can also open additional Details panels by going to Window > Details > Details 2, 3 or 4:


11. Content Browser
Content Browser is the content management system in UE4 and you will be using it a lot:

Through the Content Browser you will:
- Look for objects such as textures, materials, static meshes, animations, blueprints to insert into your level
- Import custom static meshes and textures
- Create new objects such as blueprint, materials and other advanced assets
Use the folder structure to look into any folder and find the assets you are looking for:

You can create new folders to better organize your assets:

Look for specific asset type by using the Filters drop down menu:

Use the search to look for a name of the asset you are looking for:

To search and to filter the entire directory of your project, make sure to select the Content Folder. This way you are searching everything within that folder.
12. Inserting Static Meshes
Static Meshes are 3d models and will make up the majority of your level construction.
There are 3 ways you will have access to Static Meshes:
- You will use existing Static Meshes provided within a given project to construct the world.
- You could create your own custom Static Meshes using 3d modeling application such as Maya, Maya LT, 3ds Max, Modo or Blender.
- You'll have to find a set of Static Meshes to use created by someone other than yourself. You'll find some of them in Learn and Marketplace section.
To use Static Meshes inside your level you will have to use the Content Browser. Look through the Content folder and any subfolder for the Static Mesh you need:

You can also filter by Static Mesh only:

2 most common ways to insert Static Meshes into your level. Left-click and drag from the Content Browser into your level:

Select the Static Mesh in the Content Browser and inside perspective viewport, Right-Click and choose Place Actor:

By default, all meshes inserted into your level are static objects. Meaning they are fastest to render, they will use static baked in lighting and cannot be interacted with. This will be most of your Static Meshes:

If you want a dynamic Static Mesh that can be used as an intractable object, use dynamic lighting/shadow then switch this mesh to Movable:

13. Static Mesh Editor
Static Mesh Editor is the universal menu to edit any given mesh. All changes will apply to every instance of that Static Mesh that is already placed or will be placed within your level.
To access Static Mesh Editor, double click on the Static Mesh from the Content Browser:

Some of the properties inside Static Mesh Editor include Lightmap Settings, Level of Detail, Collision and Import.
14. Static Mesh Editor vs Static Mesh Details Settings

"When you do change Static Mesh Editor settings and when do you change Static Mesh settings through the Details panel?"
Let me give you a basic workflow of using Static Mesh Editor and Static Mesh Details panel:
- If you want to update a setting to be applied to every instance of a Static Mesh across every single level that uses that Static Mesh - use Static Mesh Editor.
- When you import a Static mesh into UE4 for the first time you will use Static Mesh Editor to adjust all initial properties.
- If you want to change a specific setting for one Static Mesh placed within a level but not every duplicated instance, then select that Static Mesh within a level (already placed) and update properties through the Details panel.
15. Use Grid Snapping
Grid snapping is one of the most important aspects of constructing worlds. You want every BSP brush and Static Mesh you place inside your level to snap together like a set of Legos.
Grid snapping is enabled by default. To enable/disable grid snaps left-click on the move, rotate and scale snaps icon within the viewport:

You have 3 type of grid snapping options - move, rotate and scale.

Use the drop down menu to set the size of each grid type and at what values you want them to snap to.
Move snap sizes:

Rotate snap degrees:

Scale snap values:

Move snap grid option will be one of the most important ones. Move grid spacing starts at 1 and goes to 5, 10, 50, 100, 500, 1000, 5000, 10000:
Shortcut key to changing move grid spacing are the bracket keys [].
- [ ] = Decrease/Increase Grid Size
Begin with grid spacing of 10, 50 or 100 as you construct the level. Switch to lower grid snaps of 1 and 5 for more precise detail work.
16. BSP Brushes
BSP brushes are the most basic building blocks of a level. They are simple geometric shapes that are created inside the UE4 editor.

So before you start detailing, lighting or using Static Meshes; BSP brushes will be your first go to for blocking in and prototyping a level.
Strength of using BSP brushes come from the ability to modify their shape as you work so you can iterate and test your level.
As you use BSP brushes to block in your map, you will focus on the following:
- Layout
- Prototyping gameplay
- Gameplay testing your level
- Scale and proportion
The main key with BSP brushes is to create a shell of your level and to prototype how the level looks and plays before inserting any Static Meshes, working on any detailing or lighting.
You will then begin to replace all of the brushes with Static Meshes and detail your world.
17. Adding and Subtracting BSP Brushes
Basic BSP brush workflow is to Add and Subtract them from your level.
To include your first BSP brush, use the Place Mode Panel (Shift+1) and switch to BSP tab:

You can choose from a set of various geometric shapes such as a Box, Cylinder, Stairs or Sphere:

Left click and drag a brush shape that you want into your perspective viewport:

In perspective viewport, select the brush and use the Spacebar to cycle between move/rotate/scale transformation gizmos. Anytime you move these brushes within the level, they will automatically update:

Selecting any BSP brush will enable the Details panel for that brush:

Through this Details panel you can adjust various settings for that brush. Such as changing brush type from additive to subtractive, changing the size of the brush and managing materials placed onto that brush:

Once you have added a brush into your level, you can subtract from it.
To subtract from already placed/added brushes re-drag a BSP brush and in the details panel change it to subtract function:

Then drag the subtractive brush over the additive brush and where these brushes overlap, that geometry will be removed:

18. Using Geometry Editing Mode
The fastest way to change BSP brush shape is to use Geometry Editing mode (Shift+5):

You can then select vertices, edges and faces of any BSP brush and quickly modify their appearance:

So instead of changing the size of the brush via Details panel, you have faster iteration and control of the brush by using Geometry Editing (Shift+5).
Select the BSP brush, press Shift+5 for Geometry Editing mode and left-click to select any component (vertices, faces or edges).
Now just drag that component and the brush will change the shape to what you want:

Few important considerations:
- Do not modify a single vertex. Meaning, don't select and drag one vertex. This will create abnormal brush shapes.
- Keep BSP brushes as simple as possible; remember these brushes are just place holder and will be replaced later with Static Meshes.
- Duplicate BSP brushes by switching to Place Mode (Shift+1); select the brush, press Alt+Move the brush to duplicate a copy.
- You can also use the geometry editing mode set to extrude, by dragging a face it will extrude a new segment from it. Rather quick way to get more complex shapes yet staying simplistic and normal geometrically.
19. BSP vs Static Meshes
Most commonly asked question about BSP brushes vs Static Meshes is:
"How much BSP should be used in the final level compared to Static Meshes?"
Final level should contain as little BSP as you can get away with. It is very common to have 100% all Static Meshes. But 90/10, 80/20 or 70/30 rations of Static Meshes to BSP are also acceptable.
Your map can contain BSP brushes but their use should be minimized as much as possible.
Remember, BSP brushes are great for beginning stages to block in your layout, to prototype and gameplay test your map. But then, Static Meshes should be used to replace BSP brushes.
BSP only:

Static Meshes replacing BSP:

20. Player Scale and Proportion
Scale and proportion is probably one of the most important elements when building levels in UE4 or any other game engine.
Everything you create must stay true to correct player scale and proportion. Nothing destroys the illusion of your level faster than disproportionate game world.
4 keys to build everything to correct scale and proportion:
- Insert a character scale model that is the same dimensions as a player inside the game
- Establish base dimensions for your architecture
- Reference your construction to player character scale and architecture surrounding it
- Play test as often as possible from the game itself
In Unreal Engine 4, base character scale to start with is:
- Height: 180uu/cm
- Width/Length: 60uu/cm

Important note about scale and proportion is, it's always relevant to the game you are working on. 180uu height for a character is a starting point, but for a specific game and its world these values might be different. Always reference the world to the character scale that is going to be used in your game.
Character scale can be a simple box or a skeletal mesh that contains the same dimensions as the player character in the game.
Option A:
Create a BSP brush with the following player scale dimensions:

- Height: 180uu/cm
- Width/Length: 60uu/cm
Option B:
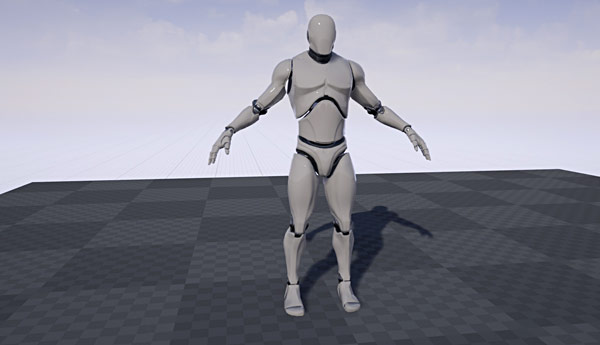
Insert a skeletal mesh reference from the Epic's Content Folder. Go to Content Browser and under View Options enable "Show Engine Content":

Select Engine Content folder and filter by Skeletal Mesh:

Use the TutorialTPP skeletal mesh character as a starting point for your scale. This character is slightly more than 180 units in height, so scale this down using the Details panel on Z axis down to .94:

Option C:
Download Epic Game's free low poly skeletal mesh character from the Marketplace under Characters and Animation category:

Option D:
If you creating or working on a game, check to see what scale and dimension the game uses and provided character mesh as a reference.
If you are creating a stand-alone game environment without any gameplay, then use 180uu/cm height as the character guide.
Insert one of these options into your map throughout the entire environment to judge scale and proportion as you build. Once you have a layout and everything is proportionately correct, you can delete these character references from your level.
21. Inserting a Player Start
Player start defines where a character player will spawn from inside the level. Every environment should have at least one player start.
If you are creating a stand-alone game environment that doesn't require player participation, then you probably won't need one. Although, it is a good habit to always insert one player start into your level.
To insert a player start, go to Place Mode (Shift+1), switch to Basic:

Left Mouse Click and drag Player Start from the menu right into your level:

Another common way to insert is Right Click inside perspective viewport, choose Place Actor > Player Start:

22. Adding Directional Light (Sun Light)
Directional Light is a light actor used for lighting exterior environments. Think of a Directional Light as a sunlight or moonlight:

You only need one of these inside your map and it will light your entire world (as a sun would).
Place a Directional Light by going to Place Mode (Shift+1), switch to Lights tab:

Left Mouse Click and Drag Directional Light into perspective viewport:

Rotate (E) the Directional Light inside your level to point the direction and angle you want:

Select the Directional Light and in Details panel change these two initial properties:

- Light color: color of the light
- Intensity: strength of the light
23. Adding Point Light or Spot Light (Interior Lights)
Point Lights and Spot Lights are most used lights for interiors or specific areas within a level. Both of these lights would be coming from a physical source such as a lamp or a street light.
To place Point Light or Spot Light into your level, go to Place Mode (Shift+1), switch to Lights tab:

Left Mouse Click and Drag a Point Light or a Spot Light into perspective viewport of your level.


Point Light:
After inserting the Point Light, select it and in Details panel start with the following properties:

- Light color: color of the light
- Intensity: strength of the light
- Attenuation Radius: lights area of influence
SpotLight:
After inserting the Spot Light, select it and in Details panel start with the following properties:

- Light color: color of the light
- Intensity: strength of the light
- Attenuation Radius: lights area of influence
- Inner Cone Angle: set the amount in degrees for inner angle
- Outer Cone Angle: set the amount in degrees for outer angle
All the properties you change will be visible in perspective viewport.
24. World Outliner
World Outliner will list all actors/objects within your level. It is located on upper right hand side of the editor:


If you do not see it, go to Window > World Outliner:

Using the World Outliner, you can search for any actors inside the level:

You can double click on any actor from World Outliner to center the viewport on that object:

And, you can organize your scene better by using folders:


And visibility option:

25. Play Test Your Level
You can play test your level as a character inside the game right from the editor. In perspective viewport, Right Click where you would like to spawn from and choose Play From Here:

To use a Player Start as a spawning location, click on Play icon at the top toolbar:

For additional options use the drop down menu and choose how you want to Play Test your level; such as "Selected Viewport", Mobile Preview or New Editor Window:

To start with, use Right Click and Play From Here as well as Play icon options.
Depending on which template being used for the project, how you spawn inside the level will vary.
Spawning inside the level with FPS Shooter Template:

Spawning inside the level with Third Person Template:

26. Build All
Last option you will need to know as a beginner is how to build your map.
Build function renders and bakes lighting information, builds geometry, generates lightmaps and shadow maps, builds level of detail and generates navigation paths.
You will find the Build icon within the top toolbar:

What you currently see inside the perspective viewport is not what the level actually looks like. It is close, but not final.
You have to Build to see final lighting and geometry results.
There are 4 quality options to choose from prior to Build:

- Preview
- Medium
- High
- Production
Preview is used for quick builds and during most of the level construction. Switch to Production when you are ready to finalize your level. Production Build will take the longest and will produce the best visual quality result.
And last, you can choose what aspect of your level you want to Build. Use a drop down menu and select:

- Build Geometry
- Build Lighting
- Build Paths
- Build LOD
- Build All (will build all of the above together)
You would start with Building on Preview when you need to see updated and quick results of your lighting. This allows continuing working without a lot of waiting. Once you begin to near the end of the level creation or you need to see how your environment looks with higher visual quality - switch to High or Production. Final Build All should always be set to Production.
27. Marketplace Content and Learn Sections
Marketplace and Learn sections can be found inside the Unreal Engine Launcher:

Through Marketplace you can purchase and download Static Meshes, characters, animations, sounds, particle effects etc. All of these can be used to help you construct game environments without you having to create these assets on your own:

Through Learn section you can download free game engine samples and game examples. You can use these to reverse engineer how they were created to help you understand what you would need to do yourself:

Recommended UE4 Tutorial series
Here are two recommended premium tutorial guides for Unreal Engine 4:
UE4 Fundamentals: this is a complete beginner guide to learning and using Unreal Engine 4. Highly recommended if you are a complete beginner with UE4. Click here for more info...
UE4 The Corridor Project: this is a bit more intermediate tutorial guide in which you construct a game environment with provided custom Static Meshes, then light it, post-process it and create a fly-through video to show it off. An in-depth guide for putting together an environment from start-to-finish. Click here for more info...

SUBSCRIBE & GET FREE UE5 PDF GUIDE
Subscribe to receive NEW/UPDATED and FREE "UE5 Beginner's Quick Start Guide" PDF (90 pages).

Visit this page for more info about the guide...
TOP 7 TUTORIAL COURSES FOR 2026
 Modular Environment Design Masterclass Tutorial Course
 Maya Foundation: Home-Study Course - Model and UV Environments
 Substance 3D Painter Essentials - Master Texturing
 UE5: Fundamentals Vol.1 - Create with Unreal Engine 5
 UE5: Retro Office Project - Create Beautiful Interior Env
 UE5: Master Material Creation - Create Master Materials in UE5
 Preproduction Blueprint: Plan Environments and Level Designs
TUTORIAL CATEGORIES
UE5 FUNDAMENTALS VOL.1 COURSE

UE5: RETRO OFFICE PROJECT

MODULAR ENVIRONMENTS MASTERCLASS

LEARN THE PREPRODUCTION PROCESS

ABOUT WoLD & ALEXG

My name is AlexG. I am self-taught level designer, game environment artist and the creator of World of Level Design.com. I've learned everything I know from personal experimentation and decades of being around various online communities of fellow environment artist and level designers. On World of Level Design you will find tutorials to make you become the best level designer and game environment artist.
Home Terms of Use/Trademarks/Disclaimers Privacy Policy Donate About Contact
All content on this website is copyrighted ©2008-2024 World of Level Design LLC. All rights reserved.
Duplication and distribution is illegal and strictly prohibited.
World of Level Design LLC is an independent company. World of Level Design website, its tutorials and products are not endorsed, sponsored or approved by any mentioned companies on this website in any way. All content is based on my own personal experimentation, experience and opinion. World of Level Design™ and 11 Day Level Design™ are trademarks of AlexG.
Template powered by w3.css