World of Level Design™
Tutorials to Becoming the Best Level Designer and Game Environment Artist (since 2008)
UDK: How to Create Landscape Heightmaps with Photoshop Clouds Filter
Category: UDK
February 19, 2015

In this tutorial I have a great technique/workflow for you - how to generate heightmaps for UDK landscapes very quickly. The results are usually very realistic and if you follow these steps, you can get a good landscape going in just a few minutes.
You will need UDK and Photoshop.
Basics steps are:
- Generate a heightmap in Photoshop
- Export it for UDK with proper size and in correct format
- Import it into UDK
- Tweak a few settings to make it work in UDK
- Test it
- Refine the landscape using Landscape tools
Lets break each of the process step-by-step.
Creating Heightmaps in Photoshop
First you need to create a heightmap in Photoshop.
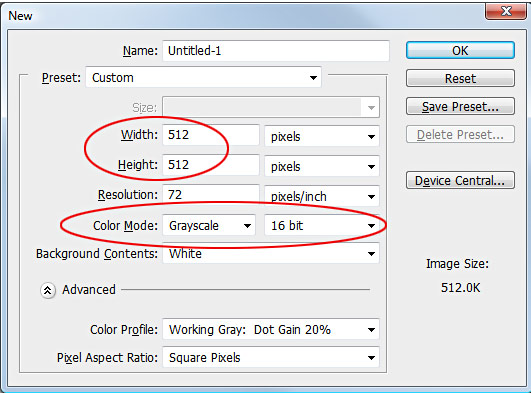
Create a New Document using power of 2 sizes (512x512, 1024x1024 etc) and choose 16-bit Grayscale:
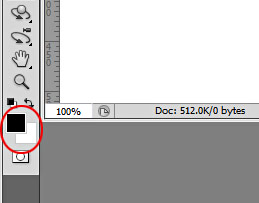
Set Foreground/Background colors to black/white; hit D key (shortcut for default black/white color):
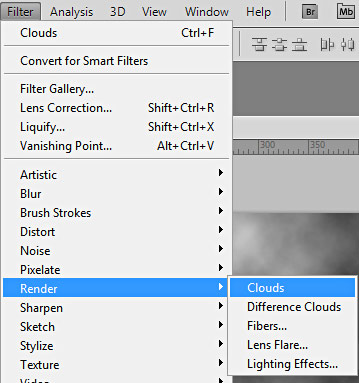
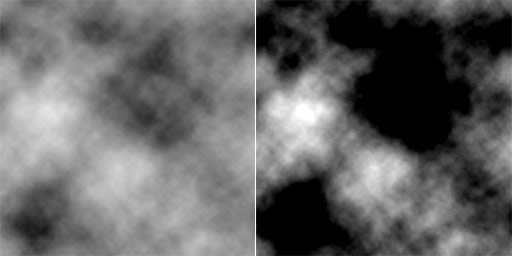
There are 2 options of rendering clouds filter in Photoshop. First is to use regular Clouds filter, second is to use Difference Clouds.
Whites are the high peak elevation of your heightmap
Blacks are the lower points/valleys of your heightmap
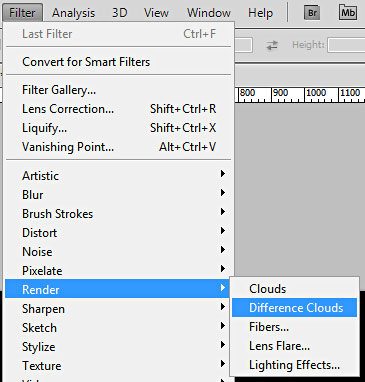
Filter Option #1: Clouds
Go to Filter > Render > Clouds:
Hit Ctrl+F (Repeat Last Filter) couple of times to get something interesting.
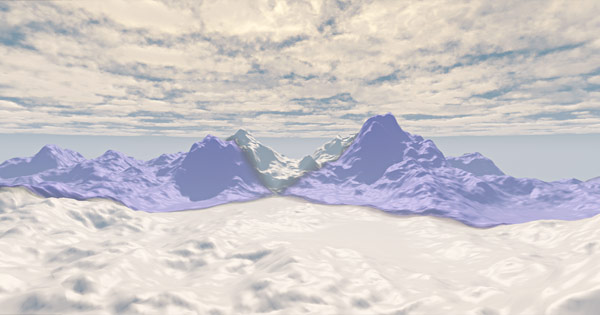
Here is regular Clouds filter (softer, smoother):

You can also use Levels (Ctrl+L) to get more contrast in this heightmap. Here is before and after using Levels:
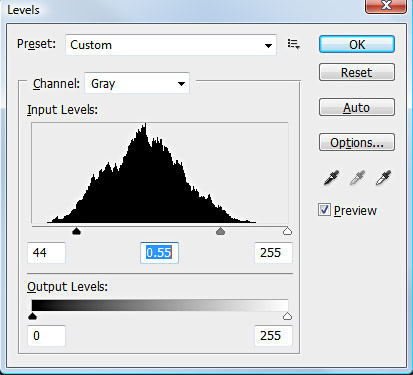
Before/After levels adjustment
Filter Option #2: Difference Clouds
Go to Filter > Render > Clouds
Then, go to Filter > Render > Difference Cloud:
Hit Ctrl+F (Repeat Last Filter) couple of times to get something interesting.
Here is Difference Clouds filter (more defined valleys):

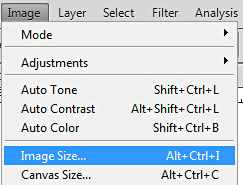
Image Size
This next step is very important. You need to rescale your heightmap image size to something that UDK will be able to accept. Use the Epic's Recommended Sizes chart to get the pixel size values to re-scale to.
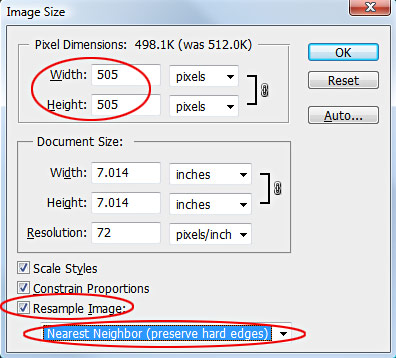
Do not scale your images up, always scale them down in size:
- Image > Image Size
- Set 'Resample Image' to Nearest Neighbor
- Change Image Size to 505x505 or other size you want from the Landscape Size Chart
- Hit Ok
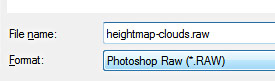
Saving Your Heightmap
Once you resized to UDK proper dimensions. Save your heightmap.
Go to File > Save As and choose 16-bit .raw (Photoshop Raw):
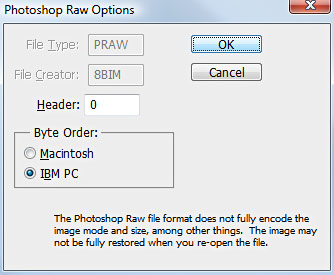
Set Byte Order if you are on PC or Mac
Set Header to 0
Click Ok
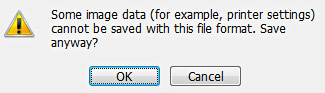
Save Anyway? Click Ok:
You are now done with Photoshop.
Importing Heightmaps to UDK
Open up UDK and choose a default map template. Or if you are already working on a map, open your map file.
Open Landscape Mode and in its menu choose:
- Format Unsigned/Signed and PC/Mac (I used PC and I Unsigned)
- Click on 'Heightmap Import'
- Find the saved .raw heightmap from Photoshop
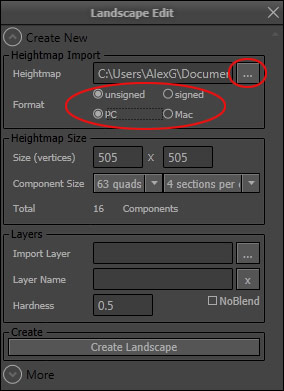
Heightmap Size and Dimensions will automatically fill-in for you:
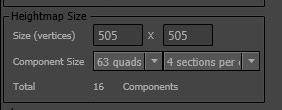
You can also choose few other settings such as multiple Components.
Click on Create Landscape:
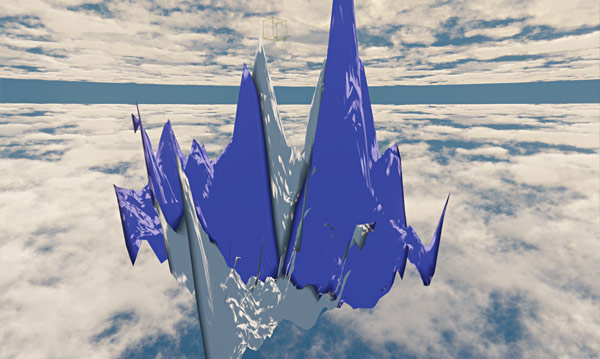
Making The Heightmaps Work in UDK
You will find that the landscape is way to big in height. We need to change the Z value to a lower setting:
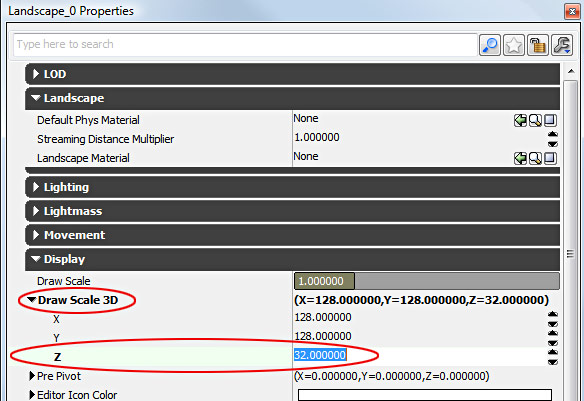
Close Landscape Mode and Double Click on the landscape to open its properties or select the Landscape and hit F4.
Under Display > Draw Scale 3D, change Z to a lower value. Try 128, 64, 32 etc. Take a look at the landscape size each time you change this value to see the result:
Save your map. Go to File > Save As.
Testing
Now we need to test the landscape and see how large it actually is.
Inserting a character reference scale and/or a vehicle will help to judge how large the landscape is:
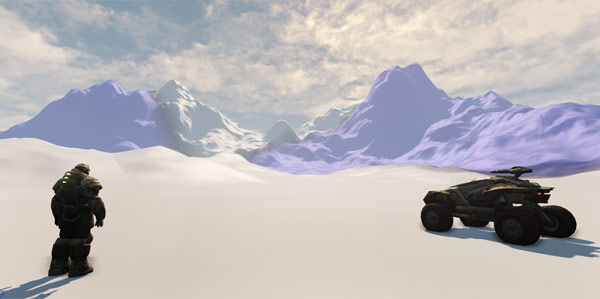
Set DM or VCTF Game Mode in World Properties, so you get to see UDK hud, weapon and ability to drive a vehicle.
Go to View > World Properties; and under Game Type set UTDeathmatch, or UTCTFGame_Content or UTVehicleCTFGame_Content:

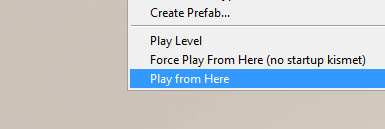
Right Click and Play From Here to test out your terrain:
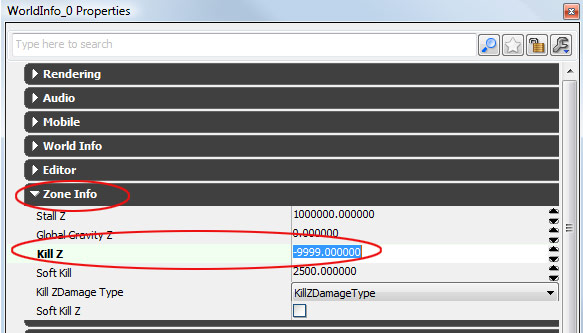
If every time you spawn, the character dies, you will need to set a new KillZ setting.
Go to View > World Properties > Zone Info and give it a -99999 or something similar to allow the KillZ to be lower then the landscape:
Finishing The Landscape
Importing a heightmap using this method is a great start. Now continue to add additional detail and modify the heightmap manually. You can then add landscape material and begin to paint Layer Textures on your terrain.
Read Next: UDK Landscape Challenge
Read Next: UDK Guide to Landscape Creation

SUBSCRIBE & GET FREE UE5 PDF GUIDE
Subscribe to receive NEW/UPDATED and FREE "UE5 Beginner's Quick Start Guide" PDF (90 pages).

Visit this page for more info about the guide...
TOP 5 TUTORIALS TO LEARN UE5
 UE5: How to Download and Install Unreal Engine 5 in 5 Minutes
 UE5: 11 Principles to Learning and Using UE5 as a Complete Beginner
 UE5: Crash Course Quick-Start Guide to Begin Using UE5 - TODAY
 UE5: Complete Guide to Player Scale, Dimensions and Proportions
 UE5: Fundamentals Vol.1 - Essential Beginner's Guide to Getting Started
TUTORIAL CATEGORIES
UE5 FUNDAMENTALS VOL.1 COURSE

UE5: RETRO OFFICE PROJECT

LEARN THE PREPRODUCTION PROCESS

ABOUT WoLD & ALEXG

My name is AlexG. I am self-taught level designer, game environment artist and the creator of World of Level Design.com. I've learned everything I know from personal experimentation and decades of being around various online communities of fellow environment artist and level designers. On World of Level Design you will find tutorials to make you become the best level designer and game environment artist.
Home Terms of Use/Trademarks/Disclaimers Privacy Policy Donate About Contact
All content on this website is copyrighted ©2008-2024 World of Level Design LLC. All rights reserved.
Duplication and distribution is illegal and strictly prohibited.
World of Level Design LLC is an independent company. World of Level Design website, its tutorials and products are not endorsed, sponsored or approved by any mentioned companies on this website in any way. All content is based on my own personal experimentation, experience and opinion. World of Level Design™ and 11 Day Level Design™ are trademarks of AlexG.
Template powered by w3.css